Basswood is one of the easier woods to carve and shape. It has medium density
wood and nice long grain and it's fairly light in weight. I buy mine at craft
stores, usually, and it usually comes in large, square blocks. I buy it in
the blocks, then using a table saw, cut it into long square rods or pieces
3/4"x 3/4", 1"x 1", and 1 1/4"x 1 1/4". I then round off the pieces using a
planer or wood carving knife. That way I reduce the amount of time needed for
sanding and shaping. Starting at one end of the basswood stock piece, start
carving the tail of the popper. Once you have it shaped the way you want,
sand it smooth then cut it off the stock piece. Sand the mouth end smooth by
laying a piece of sanding paper on the work table and running the popper face
over it.
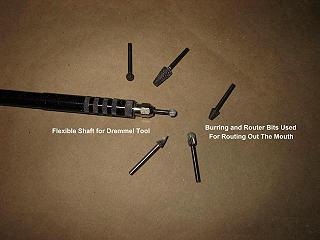
Once the popper is sanded smooth, place a burring or router bit into the
Dremmel tool and route out the mouth. Take care not to get too close to the
edges or route through the sides of the popper…… And wear your safety glasses!
I usually route a mouth between 1/8" and 3/8" deep, depending on how much wood
I have to work with and how much sound I want the popper to make in the
water.
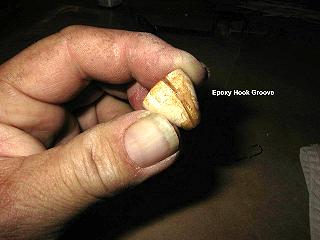
That done a groove needs to be cut for the hook to set in. I
usually use a small coping saw or a craft saw. It is critical that the groove
be cut in the center of the popper body and is straight, otherwise when the
popper is snapped it will pull off course . . . Of course that's not always bad,
sometimes fish are attracted to erratic movements.
Okay, the next step involves adhesives. There are a lot of them out there,
pick your favorite, mine is 2 part, fast setting epoxy. Hint: If you didn't
find any kinked shank popper hooks and you still want to make poppers you can,
thanks to a tip sent in by Wind Knot, down in Arkansas. He uses straight
shanked hooks, wraps them in thread, covers them with super glue and sets them
into the groove. He says that the thread adheres to the wood very well and
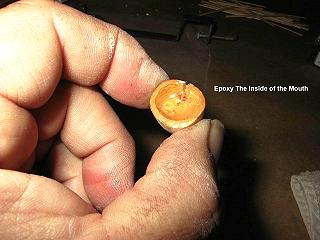
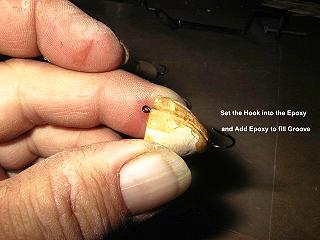
keeps the hook from rotating in the groove. You'll want to start by putting
some epoxy around the mouth area. This seals the open grain of the wood and
prevents them from taking on water, even after they're painted. Next run a
bead of adhesive down the groove and place the hook into the groove. Move it
around a bit to get it seated and enclosed in the adhesive and make sure it's
straight. Fill the groove with more adhesive and hang the popper up to dry.
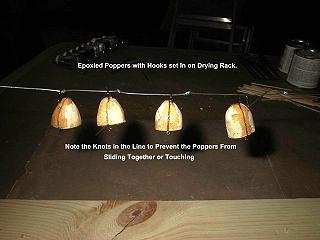
Once it's dry, check the hook groove for smoothness. If it needs another coat
to fill it up do so at this point. I've also heard a product called Zap-A-Gap
works well for this but I haven't tried it yet.
Alright, the adhesive is dry, finish sand the popper and smooth off any rough
edges. I attach the popper by the hook to a hemostat at this point and dip
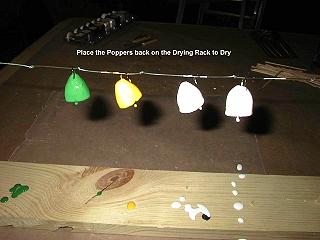
them into exterior, latex paint. Let them drip off for a bit, then re-coat
them and set them onto your drying rack for a couple of hours.

Check on them
once in a while and, using a toothpick or something similar, wipe off any long
drips from the mouth area before they dry. I usually make a batch of (frog)
green, yellow and white colored poppers.
Once the base coats are dry comes the detail painting and finishing. Let's
start with the spots on the frog popper. The easiest way I've found is by
finding a box nail with the head the size I want for the darker, base spot.
By dipping it into a small amount of paint and then onto the popper you'll get
a nice round pattern. Once that is dry, I use a smaller box nail head, dipped
into yellow paint and place that spot inside the darker one. The same method
can be used for the eyes. Hang them up to dray again. Other poppers can be
sprayed with spray on glitter, purchased at craft shops, spray painted with an
over coat on the top or bottom side. Or if you'r looking for a scaled look,
place a piece of nylon netting over the popper, hold it tightly in place with
a clothes pin and give it a light overspray. Once the paint is dry, peal off
the netting and Voila, Fish scales! Like the late famous, fuzzy haired, artist,
Bob Ross used to say . . . "these are your poppers, and you can paint them anyway
you want to" Another technique is to 'speckle' them using a toothbrush,
lightly dipped in paint. Just make sure that when you run your stick down the
bristles it's in the right direction (towards you) or you'll be the one
speckled instead of the popper.
Next we'll move onto eyes. One method was already outlined above, using box
head nails, dipped in paint. Another method is gluing "baby doll" eyes onto
the sides of the poppers. One advantage of the baby doll eyes is that the
eyes roll around inside the housing. This makes for a little more noise and
attraction. These, again, can be purchased at a craft store for a whole lot
less money than you'll pay through a tackle supply catalog. Another method is
the self adhesive eye. These are sold primarily through tackle crafters or
catalogs. The come in a variety of sizes, shapes, and colors (even glow in
the dark). There are solid colors, multi-colors, prism colors, fluorescent
colors, you name it, they got it. Regardless of what type of eyes you'e using,
I've found the most effective placement of the eyes is right at or along the
waterline of the popper. Before placing the eyes I'll actually water test
them in the sink, make a small mark where the water line is, then dry them off
and put the eyes in place.
Last are the whiskers, legs, trailing feathers, live rubber skirts and any
other attractor. These are placed onto the popper using a variety of ways.
For whiskers, feelers, and legs I drill a small hole in the side of the
popper, slightly larger than the piece that's to be inserted. I then place a
small amount of clear glue or epoxy in the hole, then using an awl or needle,
I force the material into the hole, put another top coat of glue over it and
hang it up to dry.
Small knots tied in the rubber will serve as leg joints as
will very small beads. Remember to cut the material longer than what you
think you'll need, you can always cut off the excess.
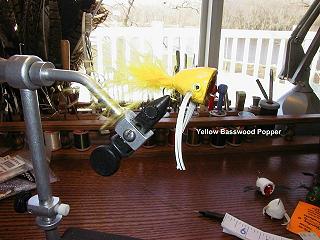
For tails, you can mount the popper into a vise and tie it as you would a
normal fly, remembering you now have to navigate around the popper body.
Marabou, feathers, live rubber skirts, fur, rabbit strips, or nothing at all.
It's wide open out there people, let you imagination go! Tie on what ever you
think is going to work the best. I usually avoid anything too long, as the
fish have a tendency to hit the end of the skirt or marabou, missing the hook.
One way to avoid this is to add a smaller trailer hook that hides in the back
material.

Have fun, try new stuff, let me know what you've found that works for you.
Till next time . . . keep a poppin'!
~ Randy Fratzke
|