|
Foam. Foam is a very popular material used in making poppers. It is light in
weight, very easy to work with, inexpensive, comes in a variety of forms and
minimal tools are needed in their production. There are a couple of cautions
when using foam you need to be aware of. It is very reactive to certain
adhesives and paints. In other words, if the adhesive or paint contains ethyl
alcohol, mineral spirits, or acetone additives (usually used as a thinner or
evaporative agent) it will melt the foam into a jelly like mass on your work
surface. I generally use 2 part epoxy for adhesive or filler and either
acrylic or latex based paints just to be safe. Some of the foam materials I
use and their assets and drawbacks are listed below:
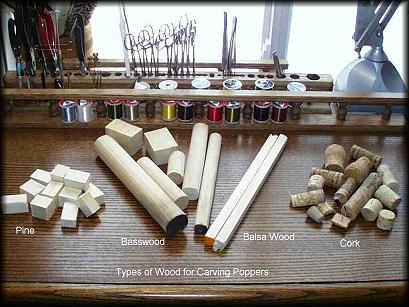
Preformed: Preformed popper shapes can be purchased from various catalog
vendors (Cabela's, Stamina (out of Minneapolis, MN), Netcrafters (out of
Ohio)). These are preformed, pre-shaped, and, sometimes, the hook slots are
already cut into them. Minimal work needs to be done to get to the finished
product. The drawbacks are they only come in certain sizes or shapes, usually
1/2" to 3/4" and cone shaped.
Foam Injector Systems: These can be purchased through catalog sources also.
They consist of 2 part mixes of chemicals to create the foam, an injector, and
a set of molds. You mix the chemicals together, place it into the injector
and inject the foam into the mold. I don't own one but do know several people
who have tried them, most were not happy with the results. But it is an
option out there, especially if you want to get into some heavy-duty
production and can get the consistency and method down to a science.
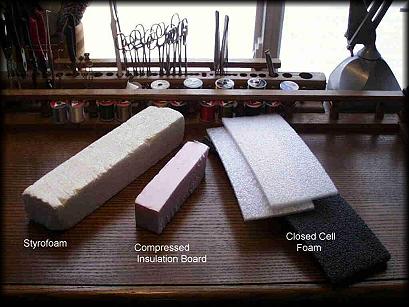
Closed Cell Foam: Closed cell foam can be picked up at a lot of places. It
can be purchased at hobby and craft stores in sheets and dowels. You can
find it in boxes, used as packing material. You can find it at construction
sites (especially roadwork) that are pouring concrete being used in the
expansion joints. It's also sold in 'ropes' at many contractor supply houses
and chain stores. It can be painted (though the paint will chip off) but
waterproof magic markers work great for coloring and details. Simply cut off
the amount and shape you need using a razor blade or Exacto knife, thread the
hook through it (or tie or glue the hook onto the piece), detail it with the
magic markers, add a few feathers or rubber legs and you've got yourself a
popper! It comes in a wide variety of colors so have fun and be creative.
Foam Insulation Board: Yes, you know what I'm talking about, the stuff they
use to insulate houses. It comes in 4 foot by 8-foot pieces
for a couple of dollars at most home improvement centers. There are also a
variety of densities, colors and thicknesses to choose from. The easiest way
to avoid having to by a full sheet is to find a construction site and ask if
you can pick up a few scraps around the site. Most of the time the contractor
will be vary accommodating, especially if you offer to make him a few also.
It is most often used around the outside of basement walls and put on just
before it is back filled. The foam board is very easy to work with. It can
be cut and shaped with a razor blade or Exacto knife, the hook placed into it,
painted and finished in a couple of hours. (Hint, don't try to force your way
through the material with the blade, it will crush and tear, slice the
material with a sharp blade).
"Canned" (Liquid) Spray Insulation: Most of you know this stuff. It comes in
a can, you shake it up and spray it into cracks and crevices and it expands
(and expands, and expands. . .) to fill the gaps. Please note that there is now a
water-soluble type (or latex based) out there and, while it's great for
insulation purposes, it won't work for this application. You want the
regular kind, it's yellowish in color and sticky and you can't wash it off
anything without using gas or mineral spirits. A can only costs around $4.00
(I watch for sales) and you can always find an area of your house that needs a
little repair. The thing is, once you start a can you might as well use it
all because trying to get the nozzle clean enough to use the rest is nearly
impossible. What I do is lay out a few sheets of wax paper and spray the
'left over' in lines on the paper. Let it dry for a couple of days, cut off
chunks with a sharp blade and shape it into poppers. I also go around the
different areas I filled and cut off the excess and us it also. Once
dry, this stuff can be painted, sanded (carefully), filled, glued, etc. Just
remember the rule of not using petroleum products, paints or solvents.

Spun Deer Hair. Deer hair is hollow, like a paper straw, as is the hair on
some other animals such as elk and moose. It comes in a wide variety of dyed
colors, along with the natural colors. 'Spinning' the hair is almost an art
form in itself and does take some time and lots of practice to learn, but once
you learn it, the variety of poppers you can produce increases dramatically.
Spun hair poppers and lures have been around for probably several hundred
years (or more). The process basically involves placing a small bunch of hair
on the hook, wrapping a rather loose first turn of thread around the hook and
hair, then a series of gradually tighter loops. In the process, the hair will
flare out, like a fan, and in the winding process, rotate or 'spin' around the
hook. That bunch is then pushed into position and another group is put in
place. This process is repeated until the hook is covered with a tight mass
of spun hair. Then the fun begins. Using a scissors or razor blade, start
trimming this big hairball into a shape that resembles something real. You
can make frogs, mice, poppers, the limit is only your imagination. Once you
get good at it, you can start combining colors for special effects and color
blending. For those of us who have done this, I realize this is a bit over
simplified, but essentially that's what happens.
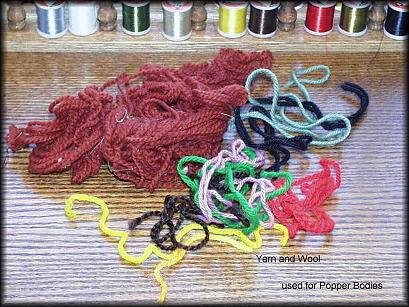
Miscellaneous Materials: There are many other materials that can be used in
making popper bodies such as wool, yarn, cotton, and rubber. Almost anything
you can think of that will float on the surface of the water can probably be
adapted in one way or another. I know of one guy who used plastic soda straws
from a fast food place, cut them into two inch pieces, ran a piece of
monofilament line through them, tied a hook on the end. He used a nail head,
heated with a lighter to carefully seal the ends of the straws (without
melting the mono) so they would hold air. He then painted it dark green on
top with a light colored "belly", put a couple of yellow stripes down the top
side and calls it a garter snake. The design is so simple and it works great
for large mouth bass and northern pike. Plus the materials are practically
free.
Ok, so now you have materials. Hopefully next week we'll start building a few
poppers. I'm going to skip the pine and use basswood. The procedure is about
the same for both and I'll actually use the basswood popper. Until then, go
fish!
~ Randy Fratzke
|