Welcome to Panfish!

Two Flies

By Doug Terry, Angleton, Texas


Bream Killer:

The bream killer is an old pattern that you don't see much any more and that's too bad. It's a very effective fly for warm water fishing, particularly pan fish and black bass.

Bream Killer

Materials: Bream Killer

    Hook: #8 or 10 curved nymph hook.

    Thread: Black 6/0.

    Weight: 0.015" lead wire.

    Body: Black Chenille.

    Tail: (Optional, original had none) Squirrel tail.

    Wing: Gray squirrel tail.

    Legs: White rubber legs.

    1. #10 or #8 curved nymph hook-thread wrapped.

    2. 1/4 inch wrap of 0.015" lead wire about mid-shank to help get the lure down in the water a bit faster.

    3. Tie in the chenille (I generally use black) at the bend of the hook. This lure traditionally does not have a tail though the pictured one does have a squirrel hair tail - probably more for the edification of the tier than of any real interest to the fish.

    4. Wrap the chenille up the shank to the eye. Tie off the usual thread head.

    5. Tie in a single wing over the top at the eye, traditionally with gray squirrel tail hair, about 3/4 of the shank length.

    6. Cut 4 rubber legs a bit longer than the length of the hook. I usually use white.

    7. Tie in the rubber legs, two to each side in the middle of the legs and in the middle of the fly or maybe just a bit forward of center.

    8. Coat the head and leg wraps with quick set epoxy.

The fly is typically fished with twitches of the rod tip which makes the lure "swim" through the water, like it's swimming with the legs.

Black and white has been most effective by far though late in the day and in some dark water situations I've had good luck with all white. Brown Chenille/white or yellow legs is OK. I've never had much luck with reds, yellows, greens, etc.

It's as simple a fly as you can tie but it's my "go to" fly. I've caught more fish on it than any other one fly. It's good for bass as well as panfish.

Desperation Bug:

Desperation Bug

This one is my invention, the Desperation Bug. It started out as almost a joke. I tied it on a #12 hook back when I never tied anything that small. When the fish are just pecking at other lures and not taking them, and you're desperate to catch something - well you get the picture. Turned out to be a pretty dog-gone-good lure. One of the first fish I caught on it was a 2.5# bass. And of course this is an even more simple fly than the bream killer. You can use regular rubber legs on this of course but since the legs (or what ever they are) are short on this fly, I often use a material I get from Academy that is intended for skirts on jigs (Stanley Jigs is the brand - 2 bundles in a package secured by rubber bands - all of 99 cents). It's a little more flexible, a bit too much so for the bream killer but good on this size and some of it has shiny flecks in it that fish seem to like. I've tied these bigger too but pretty much limited them to 12's and 10's -mostly 12's. I put a little lead on the shank of these too to get it under the water surface.

There are times when fish just peck at lures and if they're in a pecking mood, they will hit the legs of Bream Killers and poppers and not take the hook. I've tried a couple of different patterns in which the legs lay close to the body and the hook. It often does work and I'll start catching fish.

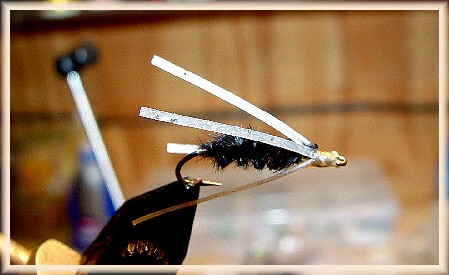
Materials: Desperation Bug

    Hook: #12 or #10 curved nymph hook.

    Thread: Black.

    Weight: 0.015" lead wire.

    Body: Black chenille.

    Legs: Rubber shirt material.

    1. #12 or #10 curved nymph hook (a dry fly hook would work too, particularly 1X or 2X).

    2. Wrap the shank with thread.

    3. 3/16" or maybe even a bit less wrap of 0.015" lead wire around the shank.

    4. Tie in black chenille at the bend of the hook and wrap to just behind the eye. Tie it off.

    5. Cut 4 pieces of the skirt material a bit longer than the shank of the hook.

    6. Tie them in at the head. It's easiest to tie them in 1 at a time, evenly spaced around the hook and then build the thread head after all 4 are secured.

    7. Secure the head with quick set epoxy. ~ Doug Terry dterry@beamans.com.

Archive of Panfish