Tying the Tube Fly
The methods presented in this series are by no means
the only or absolute correct way to tie tube flies.
They contain my experience, methods and fellow angler
inputs that have worked successfully for me. When it
comes to fly-fishing my philosophy is "There are no
hard and fast rules in fly-fishing or fly tying.
It's an art expressed by the individual and shared
among the fellowship." With this in mind let us go
into methods of tying and rigging the tube fly.
The biggest problem with tying tube flies is keeping
the tube material from rotating around the mandrel while
spinning material or tightening up the thread. There
are preventive methods and depending on the tube material
whether it be hard or soft, the methods vary. Also the
style of mandrel will make a difference. All my
presentations will be on full head mandrels as I have
found them to be the most effective for tying.
So to start off the first thing we want to do is stabilize
the tube. If a hard tube is used then use a mandrel that
is just smaller than the inside diameter of the tube. If
you are using soft tubes like me then the mandrel needs to
be about .5 to 1mm less in diameter than the inside if the
soft tube. The reason for this is as you spin material
and tighten down on the tube with the thread the soft
tubes will slightly shrink inwards. If the mandrel is
just ever so slightly smaller than the tube's inside
diameter, the tube will grab the mandrel and getting
it out may result in destroying the fly you just tied!
The best thing to do is make a few tight wraps with your
thread first and see if the tube will still slip freely
on the mandrel.
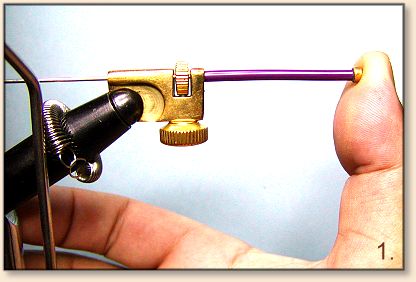
Now we adjust the mandrel with the adapter to prevent
the tube from spinning while tying. Look at figure #1
to use with the explanation. Typically I place my thumb
on the mandrel head and press the mandrel head firmly
against the tube. The tube body is "gripped" between
the vice body and mandrel head. When the tube is tight
enough without crushing the head or tail of the tube,
tighten down the mandrel clamp screw.
Now the tube is in position for tying. At this point
the sky is the limit for how you want to patterns on
the tube. For this article we will be tying a simple
bass attractor to show tail, body and head sections.
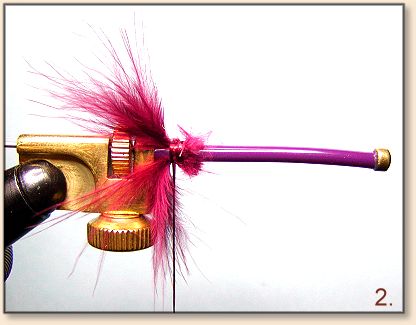
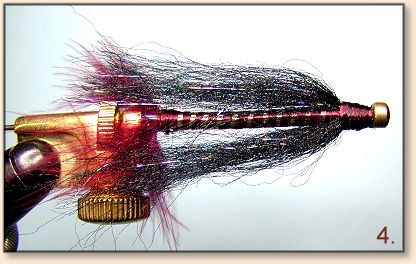
Our tube is in position and our fly will be the black
swimmer. The first thing we tie is the tail section.
Here we use some dark maroon marabou. Tubes being much
larger than hook shanks will require more material to
encircle the tube for a full tail. Another popular
method is to stack marabou on top and bottom of the
tube showing more tube body. For this fly we will
stack the marabou.
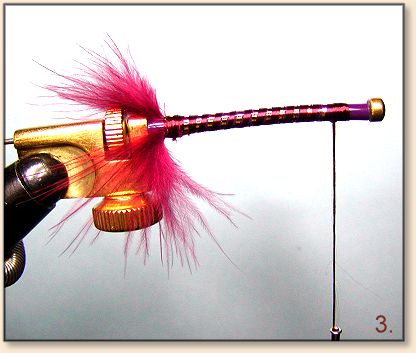
Next we tie in some gold tinsel to give the body some
flash. We wind the tinsel up the body to the head area
and give it a couple of wraps with the thread to hold
in place. You will notice I stopped the tinsel about
an eighth of an inch from the tube end.
For the wing we will use Black Shimmer from Orvis. Again
this can be tied in as stacked top and bottom or full
around the tube. For this demonstration we will tie in
stacked top and bottom to match the tail style. Secure
the wing in just where the tinsel was ended and hold in
place with a couple of wraps of thread and do a half
hitch to hold the thread snuggly in place. Trim the
extra wing that protrudes forward of the last wraps made.
Whip finish the head. Having a full head mandrel allows
the whip finish to cover the entire tube end, if desired,
without the thread slipping off the tube. Apply head
cement and this fly is finished.
Now that we have our fly, let's look at the different
ways one can be rigged to our lines. The two basic
forms of rigging are fixed tubes and free tubes. The
examples shown below are with untied tubes to clearly
show all components to rigging.
Fixed tubes are in some way attached to the hook and do
not slide or rotate about the tippet/leader. Most places
you order hard tubes (metal) will come with soft plastic
inserts so the hook can be fixed to the tube. Basically
it's a soft tube which fits into or onto the metal tube
end with some force while the other end allows the hook
eye to be inserted with some force.
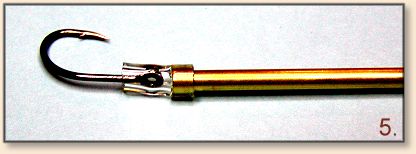
Soft plastic tubes can be directly forced over the hook
eye. With this configuration, the tube is "Fixed" to
the hook. One disadvantage of fixed tubes is having a
tube fly which tends to spin a great deal; you will be
going through a lot of tippet as it becomes constantly
twisted.
Free Tube rigging is my preferred method and gives the
maximum movement/action of the fly. Here the tube is
separated from the hook by a bead, allowing the tube
to spin freely without twisting the tippet/leader.
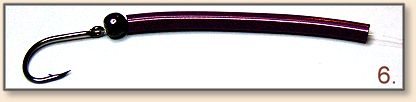
Additionally a bead can be added to the head of the tube
as well. The beads pictured here are Hematite and being
an iron bead adds weight to get the fly down. An optional
over line slipknot (separate line tied as a nail knot over
the tippet/leader) can be added to the tippet/leader before
slipping on the first bead. The slipknot allows the tube
to remain free but it will not travel up the line any
farther than where the slipknot is placed by the individual.
This knot is also easily moved at any time.
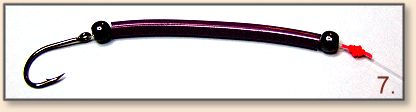
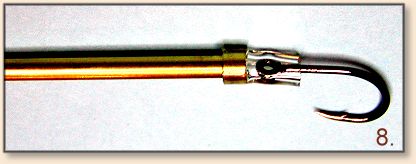
Lastly the hooks can make a difference on the appearance
and action of the fly as well. Here we see a Partridge
tube hook which can behave as a keel and keep the tube
fly upright by the hooks weight.
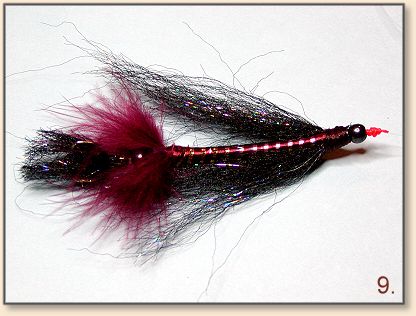
Treble hooks will allow the tube to spin as the weight
is evenly distributed. Also by dressing the hooks they
will give an added dimension to the flies appearance.
Below is a fully rigged free tube fly with a dressed
treble hook.
Now that we have the basic tying and rigging in place,
the last part, Four, will have a few patterns with
instructions for tube flies that work for our warm
water species of bass and panfish.
Until next time good fishing!
~ Hillfisher
|