This is a very effective for gills, and small bass. I like it
because I can tie them by the dozens in half the time and I
only have one hand. It's a variation on the foam
spider, but a little more elaborate.
It is very simple to tie though. I use #8, or # 10 dry fly hooks.
I don't pay much attention to what kind, but they are a 1X fine,
2x long to give me more space. Mustad 84321 or something of that
sort.
I found Hobby Lobby has craft foam in olive, tan, and dark brown now so my
colors vary from green and yellow, to tan and black. I take two colors I want
and rubber cement them together in 2 inch by 8 inch strips. Use the 2
millimeter foam or the flies get really thick and hard to work with. For
underbody I use pearl chenille, ultra chenille, or even variegated chenille.
It is the tiers preference but pearl floats without need for grease.
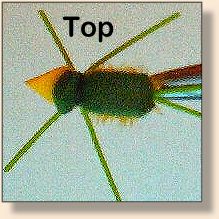
I also use live rubber jig skirts, instead of strips of rubber hackle. I get
pre-cut rubber hackle that is round, not square, and in a large variety of
colors. It works out well because the length is perfect and they are uniform
in length.
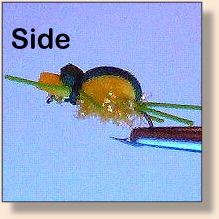
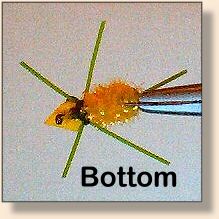
1. OK, hook in vise, 3/0 thread to match foam color, start wrapping
about a hook gap back from the eye. Wrap right up to the bend, then
fold the rubber hackle in half and tie in the tag ends to form a tail
or back legs, about a half inch long. Secure it with five or six wraps
forward, (before I cut the excess rubber hackle I cut it in half, this
saves me from trying to fold and cut it later.)
2. Wrap the thread back to the starting point and tie in the foam shell
back. The foam should be cut wedge shaped so it doesn't bulk up too much.
Tie it in, then wrap it back to the tie in point for the back legs.
3. Once its smooth and compressed, tie in the chenille. Don't
strip the chenille, just tie in on top of the hook and wrap back to start
point, then wind chenille around hook, and tie off.
4. Now pulling the foam tightly, tie it in with a couple tight wraps,
take one of the two pieces of rubber hackle and tie it on the left side,
once secured with one or two wraps, then do the other side. If the legs
stick straight out I figure eight around the outside and they usually
pull out in a nice v shape.
5. Wrap a small whip finish and trim the head to shape. I know it seems
like a lot, but really once you get into it you can knock out a dozen or so
in a couple minutes.
I was introduced to the pattern by a gentleman on one of my favorite creeks
in Oklahoma. I was changing cork poppers for the fifth time in three hours when
he gave me three of these gems. I fished the rest of the day with the first I
tied on, because unlike my cork poppers these didn't crack, chip, break, or
lose hackle after a few bites, not to mention the bad back casts into rock
walls that line the creek in most areas. I went home and began to tie my own,
but I embellished on his original fly by adding back legs and using two
colors instead of just one. I use five basic colors of yellow, tan, olive,
black, and brown. Because I glue two or three colors together I really get
more than five color schemes. You may already know this pattern
but I thought I could streamline tying it or add something new to an
old bug.
I'm in Oklahoma City currently, but I fish all over. I prefer to
fish for bluegill and bass in the summer, but that has more to
do with my loss of limb than preference. I fished Arkansas quite
a bit too. I can't get enough of the North Fork of the White River below
Norfolk Dam. I fish smaller streams in Oklahoma and Arkansas, ones not on maps or
known by locals. It keeps the pressure down, and the fish bigger. Just ask
because I'm willing to share my little gems with anyone if they fly fish.
~ Tim TDYS65@aol.com
|