This is part two of a two part step by step tutorial discussing the dressing of the king of the
salmon flies, the Jock Scott. I intend to get very in depth with each stage, with an emphasis
on material preparation, which is key to being able to pull off this very difficult and
complicated fly. The methods discussed will apply to more than just classic flies, and can
be applied to all sorts of flies, and applied directly to classic wets from the Mary Orvis
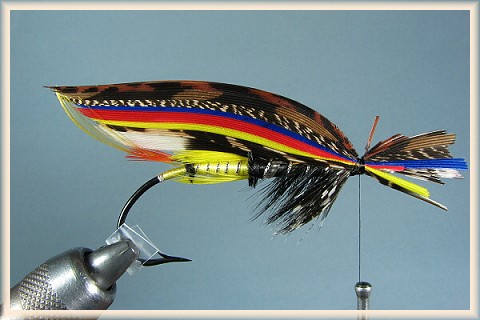
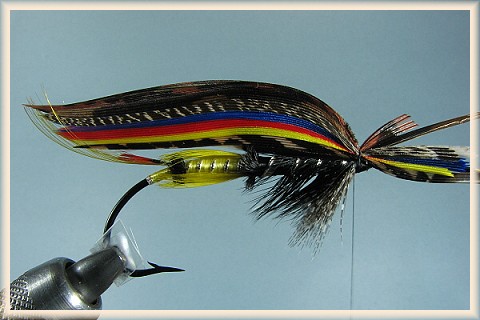
Marbury era to modern day European wets. For a photo showing the sections of the fly with names,
see the large photo at the end of the article.
The Underwing
The white tipped turkey underwing must be perfect. If it isn't, all sorts of ramifications ensue,
none of them pleasant. You are, to a degree, always at the mercy of your materials, but in this
case, if you can't hold the left and right turkey sections back to back (concave sides together)
and look down on them and see that there is no curvature right or left, get another set of turkey
slips. These will never work, and your fly will be a disaster.
We should discuss what is meant by right and left slips. If you hold a feather in front of you,
tips up, stem down, with the "good" side of the feather facing you (convex side typically), slips cut
from the left side of said feather will be "lefts", and slips cut from the right side of the feather will
be "rights". Lefts almost always comprise the near wing in a salmon fly, and rights comprise the
far wing. I don't want to be confusing, but duck quills are an exception to this rule, as they have lots of
reverse curve in their wings. But for the winging materials used in salmon flies (goose secondaries, swan, turkey,
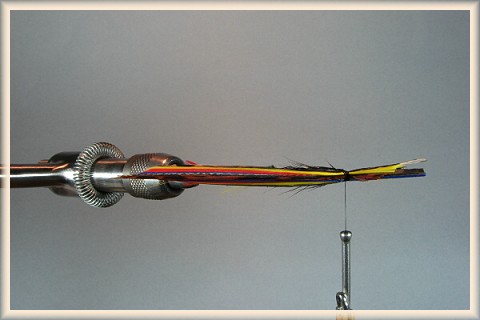
bustard, macaw, etc.) this is absolutely the case. So our underwing here will be made up of a slip from the
left side of one white tipped turkey feather for the near wing, and a slip from the right side of the same
feather, or a different white tipped turkey feather, comprising the far wing. The two wings are placed back to
back, and tied in with three soft wraps dead center on the top of the hook. It should look something like this.
Be sure to look down on the top of the underwing you've done and make sure it is on the same plane as
the bend of the hook, in other words, perfectly vertical. If it's not, adjust it now or you are completely
doomed. Not to overstate it, but call a suicide hot line now, so they can get there in time. Once it looks
good, three or four hard wraps are in order, while holding the front of the wings securely to prevent thread
torque from rolling them out of place.
Do you see the little flare-out in the white section of the upper wing in the picture above? I had no control
over that, it's just the way the turkey feathers curved. But that little flare caused no end of problems
when I tried to mount the wing. I can't emphasize this enough, your underwing must be perfect. I've "humped" these
slips before tying in, so that the underwing would stay low on the fly. Humping is merely a case of holding
the slips together in one hand, as they'll be on the fly, and then stroking them with the other, trying to
change the curvature of the wing as you stroke. The fibers will remarry slightly. It's natural to stroke toward
the tips, but stroke toward the butts as well, that seems to work well for me. Practice with some bad slips,
and see how much curve you can generate. Try to get the slips to do your bidding.
The Overwing
It's always surprising to me how many people think that marrying wings is difficult. This is a mental
thing, thinking something's hard when it's not. Marrying wings is a piece of cake actually, but
mounting the married wings, well now, that's hard. There is but one rule you have to follow where
married wings are concerned, and that is "lefts marry to lefts, rights to rights". Do yourself a favor and
first off, properly identify from which feathers you'll be cutting left slips, and work only with
those. Don't even get the rights out of the plastic. Make sure that your feathers don't exhibit an
inordinate amount of reverse curvature, in other words, don't curl up on he ends. Make your left wing,
which is the near wing (closest to the tier), first. With some turkey it is difficult to tell which is the "good" side.
How can you tell if it's a left or not if you don't know which side to look at? Well, the good side
will typically have just one stem, while the underside will look like the stem is split, or has two
sections to it. So face the side toward you that has the single stem, and cut your slip from the left
side of the feather. Try to keep your first married wings simple, as I've done on this fly. Each slip
here has four strands or so, and there are seven slips married together to make up the wing. If slips
don't marry well, try other slips, or even another type of feather all together. This is all a matter
of not giving up. I've got an article devoted to married wings on this site, and it can be found here:
Married Wings
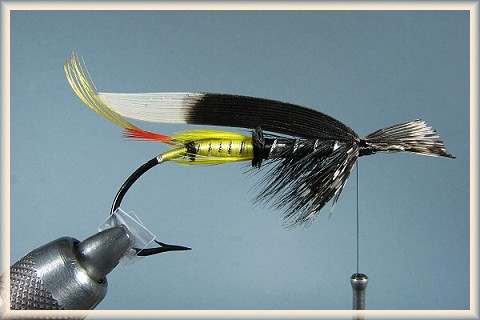
On this fly I ultimately made two sets of wings, and mounted each a number of times. Sometimes it just
goes wonderfully the first time, sometimes fifteen is a charm. I haven't trimmed the underwing butts here,
but in retrospect I probably should have, if only on this fly. It is said that leaving the butts in place
helps stabilize the wing, but I found in this case they simply got in the way and caused problems. I never
cut the butts when the underwing is golden pheasant tippet, but turkey is different, and adds bulk to the
head as well when not trimmed before mounting the main wing.
Mounting the Wing in Detail
Just so we don't get confused, this section shows a different Jock Scott than the one we've been working with,
because I decided to go into greater detail with the mounting of the wing, and had no pictures. So if this fly
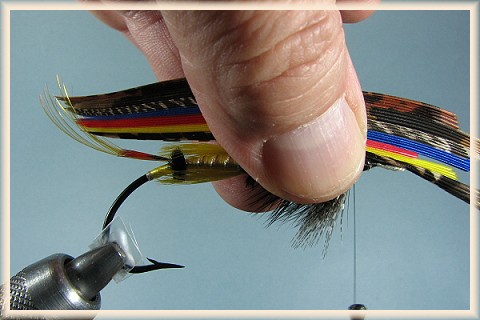
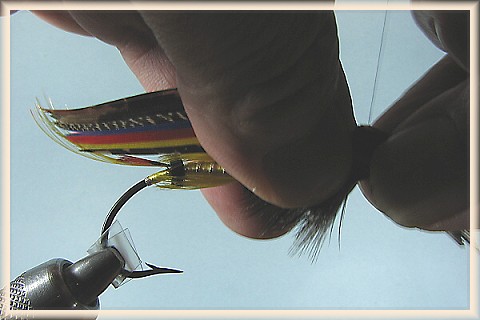
looks a little different, it's because it is. Here, I'm holding the wing in place with my thumb and middle
finger of the left hand. I'm trying to cover as much surface of the wing as possible, with special emphasis
on the top of the wing. I want pressure on the top especially because as the loop is slid down the wing, the top
can get pulled forward if the tread catches the wing fibers. I don't have a death grip, because just that can
screw up a wing. I'm trying to stabilize it in place, as I crush the fibers of the wing straight down with my
thread loop. Be sure to check the other side of the fly before going any further, and make sure you're straddling
the underwing (you might not be and never know it), and make sure that the lower part of the wing is just on top
of the shank, and that you've formed a "tent" of sorts, and are in the middle of the shank as well. This is CRITICAL.
This is the part you have complete control over, and if you get this right, the outcome is much more likely to
be a good one. Take a LOT of time on this setup.
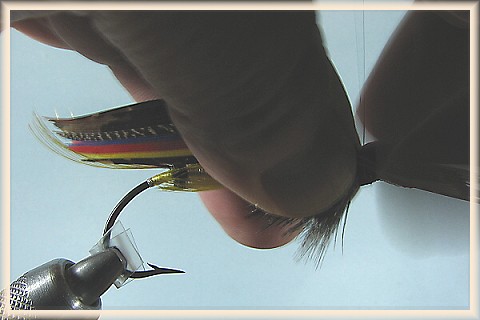
Now I've done a pinch loop, and the thread is on the other side of the fly. I would normally not let the weight of
the bobbin hang down, but I had to take the picture. I would have the bobbin in my right hand as a rule,
and the thread would be unweighted.
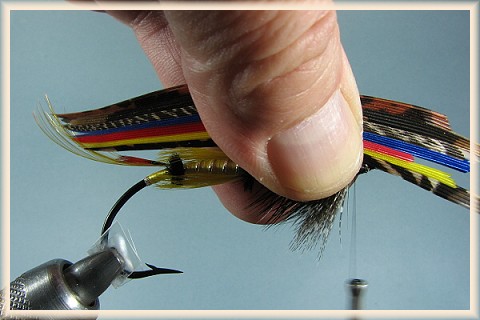
Here I've released the pinch loop, and I'm very slowly pulling up on the bobbin, closing the loop as I watch the tread slide down the
face of the wing, making sure it doesn't get caught on any of the fibers. I'm at the same time grasping the butts
and angling them up slightly, making a nice "V" in which the thread will land, and fighting the thread torque at the
same time. I NEVER let go with my left hand.
Tightening the loop some more…
Now I continue to hold with the left while I do two or three medium wraps with the right hand, if I feel that things
have gone well.
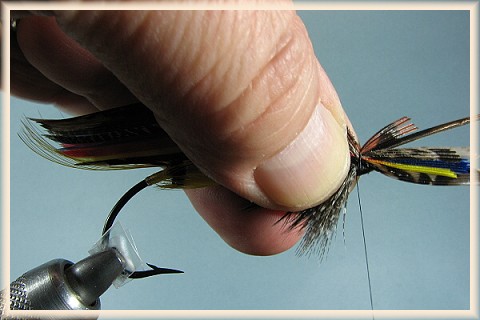
Things have gone reasonably well, and this is the result. It looks bad now, but can easily be fixed. Don't panic if
your wing comes apart a bit, it can be dealt with. Sometimes though, if it really explodes, it can't and you need
to take the pieces and steam and re-marry them.
Here is the wing after some minor touch up. Next, we go back to the original fly.
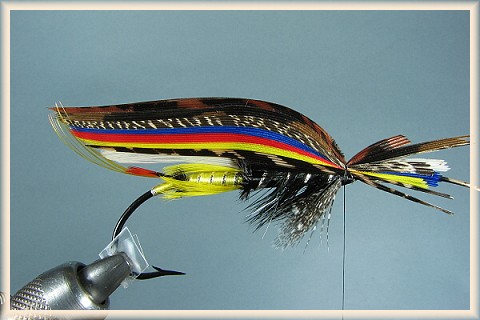
The Wood Duck/Teal Pair and Jungle Cock Sides
The wood duck/teal pair is fairly straightforward. I like to use gadwall, as it marries so
well to the wood duck. It's important to use the very large premium teal feathers or
widgeon or what have you, as long as they're big and don't exhibit much curvature. The wood
duck works better farther down the feather. Up toward the tip it curves up too much, and
doesn't hump as readily. Some serious humping must be done once the
pair is married, or they will really curve upward. Pryce-Tannatt recommends mounting them
in the middle of the wing, and I think this is good practice as they will tend to ride up
otherwise. If your pair is not behaving, riding up or curving up, you may coat the backside
of the pair liberally with saliva (nature's flexament), and "stick" it in place.
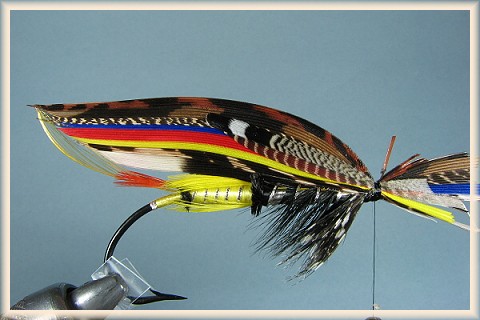
The jungle cock sides are not too difficult, but I would again use Pryce-Tannatt's tip
about not stripping, cutting fibers close to the stem instead. Jungle cock really likes to stick to
your fingers and pull out, especially when you're grabbing the front of the fly with the left
hand while putting the topping on. This happened to me twice while tying this fly, and I was
really wishing I hadn't stripped the stem of the jungle cock, but old habits die hard. By the way,
if you haven't cut the guinea throat stem and removed it from the sides of the fly, the jungle
cock becomes a nightmare. The stem will make it stick out from the fly and not lay flat. The same
thing can happen to the wood duck/teal pair.
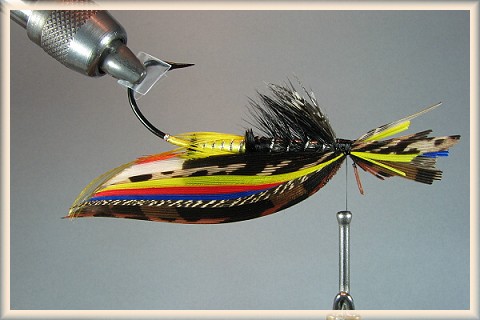
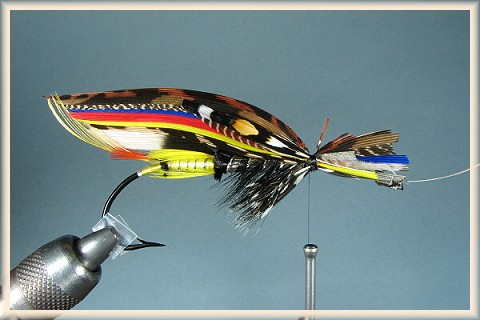
Now, if you'll look carefully at the picture above, you'll see that there is thread showing behind between
where the overwing is tied on and the throat. This was a mistake on my part, but something easily
overlooked after you've mounted the wing a number of times. I mounted the wing a bit too far forward, or it crept
forward during the mounting process. There's a fix. It's the DeFeo throat method, and you start by
prepping another guinea hackle by cutting a large wedge out of the top. Make it large enough so that
what is left is as long or longer than you want the throat to be. Now turn your vise upside down
and tie on with three wraps as shown:
Next, pull the hackle slowly forward by using the stem, endeavoring to keep it straight, until it's
the length you want.
Slowly pull out sides of the hackle that are up too high on either side of the body, which will look
like this from the top:

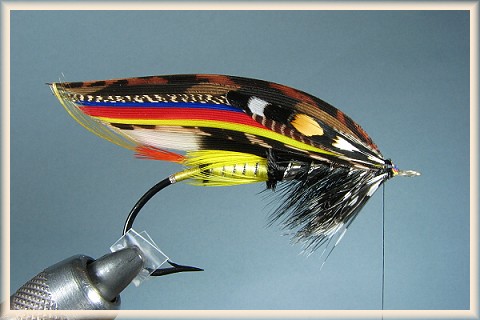
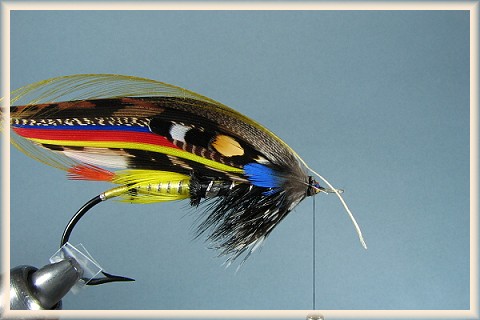
Your throat will now look like this, and that thread behind the wing is now hidden. At this point I've
trimmed all the butts, which I like to do before mounting the mallard roof and topping. I find that cuticle
cutters are invaluable for getting in and trimming some of the tougher stuff. Don't cut the gut eye! Yes,
I've done it. It affected me a little bit at the time, but I got over it in a few short months. Remember,
it's just a fly. You'll see in a couple of shots where I've further camouflaged the thread with the cheeks
and mallard roof.
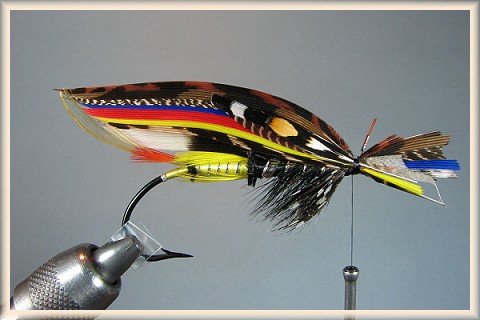
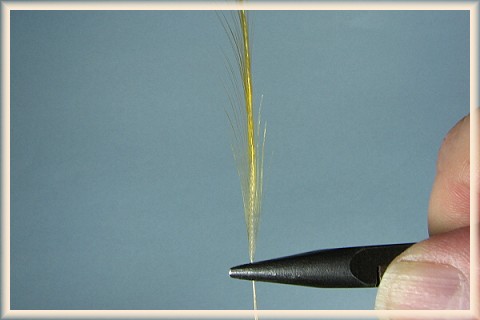
The Peacock Sword
The two or three peacock swords that go over the top of the fly are very difficult to do. The
only help I can give here is to make you aware that this material, like many others, can be
crimped with fingernails, or curled as you would curl ribbon, etc. Sometimes doing them one
at a time helps, sometimes not.

The Mallard Roof and Cheeks
Under some circumstances the cheeks could have been added earlier, but I chose to add them last
here, after attaching the mallard roof. With some flies this is a great trick for cutting down
head size, but on this particular one, because I didn't choose to trim the underwing at first,
it only helped a little.
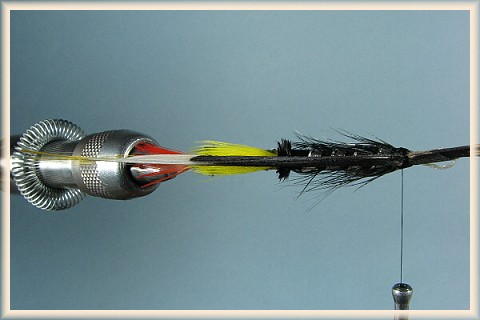
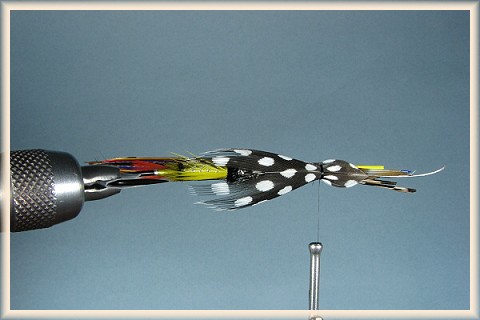
The mallard roof used to give me fits until I found this method of doing them in the Michael Radencich
book. First, pull an amount of mallard at right angles from the stem that is twice the width of
the roof you'd like to see on one side of the fly, remarrying the slip and evening the tips, like so:
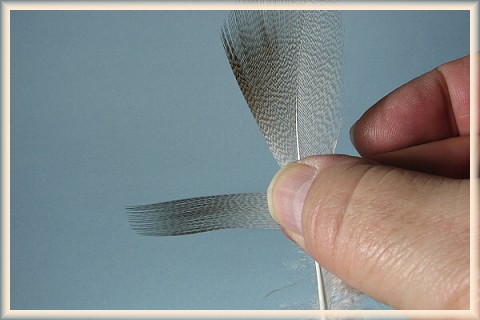
Next, pull the feather away from the strip, leaving some stem attached to the strip. Take the resulting
slip and fold it in half, and hump it to match the curve of the wing.

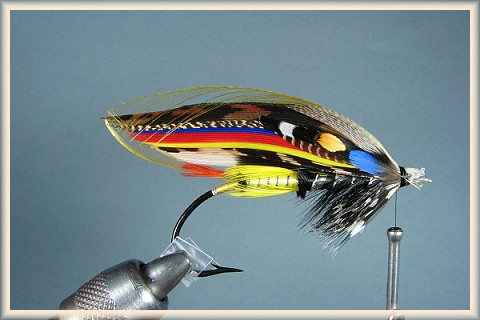
Tie it in tent fashion, and notice that the tail of the roof is sticking up, sometimes almost straight up. Don't worry,
we'll fix this. Make sure both sides of the mallard roof are about the same width. This is quite tricky, as
the wing wants to move, get pushed down, etc., so be very careful. Once in place so you're happy, slather up
your left thumb and middle finger with lots of saliva, and run them over the rear of the mallard roof, sticking
it down to the top of the wing. This can usually be accomplished in one deft move, and voila, your roof is
perfect.
Now for the mounting of the topping (golden pheasant crest). I do a lot of preparation for the topping, crimping and
curving with my thumbnail where necessary, stripping the base just barely long enough and then
bending the stem just right at the tie in point with pliers. I will always set the topping on the fly after
each adjustment, making sure that it's just right. In the shot below I'm flattening the tie-in
point with needle nose pliers, and looking to make sure the topping is straight. If not, I'll
twist it the other way.
In this photo I'm trying the topping on for size. It's critical to get the front bend just right.
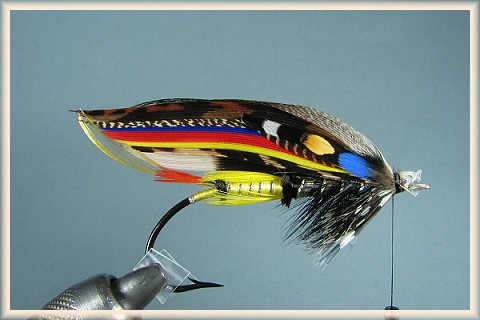
Now the topping is tied in. Try to get some of the fibers on each side of the wing, and make sure
that the topping goes right along the spine of top of the fly. Make sure too that there is no space
between the tie-in point of the topping and the wing, a common problem. If there is, redo it, and bend
the stem of the topping a little bit more, so it has a sharper angle, or less, as too sharp an angle
can be a problem too. The angle has to exactly agree with the angle between the head and the front
of the mallard roof.
Now the horns would go on, if I had chosen to do horns, which are considered optional. I might
have put horns on, if I had thought about it one time. There are different schools of thought
where horns are concerned, some never do them, others curve them over the top of the fly, and
others still mount them on the sides of the fly, angling up so they meet above the tail. I usually
do the latter, when I remember. One strand of Macaw on each side tied in high on the head will do it.
I always have to fool with these a lot, and I like to have them cross in the back, when I remember.
I remembered on the second fly I did for the winging section, and did a conventional head on that
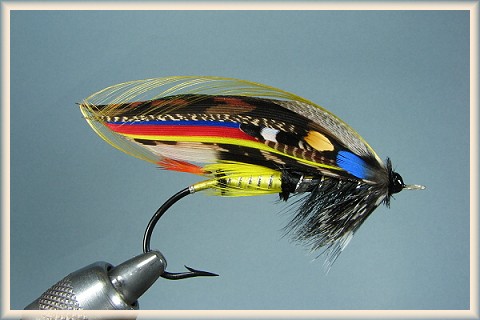
one as well:
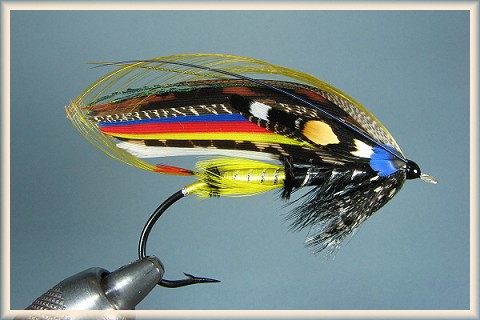
The head is the last thing to go on, and can either be done with ostrich herl, as I've done below,
or without, as shown above. I was looking at too big a head on the first fly, or bigger than I like,
so I went the ostrich herl route.

I should talk about thread avalanching now. If you like a steep head, and I do, as
you wrap the thread down the slope it can pull down, or avalanche, and take everything from your
ostrich herl head to the topping to the sides to even the wing with it. This is quite discouraging
after working on a fly for hours or days. First, you must be aware that this can happen. Second,
you must do something in advance to stop it. There are very sticky waxes used, some guys glue up
the thread with Sally Hanson's and then wrap, some guys use Zap-A-Gap and then wrap, some skip a
whip finish, some do one at the eye, and some don't wrap the thread at all. They just trim the
butts in the shape of a head and lacquer the whole deal. The topic of glue seems to be quite taboo,
with nobody admitting they do it, and everybody doing it. Well, not everybody. Ron Alcott for one is
quite proud of the fact that he uses no glue, other than to lacquer the head. He uses a liquid wax that
sticks like, well, glue. In the 1800s they used a tarry blend of pitch or whatever other goo they had
available. Or they made special tacky waxes. I did a vast number of these flies with no glue anywhere
on the fly because I thought I was being true to some ideal. Man were those flies frustrating. Each stage
could affect the one before it seemed. Now, my flies have a better overall construction, and are more
solid generally, but I still run into situations where glue is good answer. Some guys Crazy Glue every
stage of the fly, though I don't. I use Griff's penetrating cement on the throat wraps before razoring
the stem, and on the head wraps just before I trim all the butts at the front of the fly (before the
mallard roof and topping). It just keeps the sides from shifting during the very delicate trimming process.
I'm very ambivalent about glue, and can't bring myself to Crazy Glue all the stages, but I won't sit here
and say it's a bad idea either. Spit is very often a very good alternative to glue and quite handy as well,
but there are one or two old timers who claim that even using that is cheating. Do what you're
comfortable doing. Saliva is all natural as far as I'm concerned.
If You're New to These Flies
If you've just started doing these, or think you might want to go for it, I've got lots of advice. First, don't do
what I did, and just jump into these things if you've never tied anything but dry flies and nymphs. I would strongly
suggest that you start by doing some winged wet flies, as practice for the winging. I would start with basic wets like
the Blue Dun, with a simple wing cut from mallard slips. Then graduate to married winged wets like the Babcock. Finally,
try some of the easier salmon flies, and don't go with too small a hook, I think 2/0 is good. These are quite difficult
to do small. I started by doing Silver Doctors on #8 salmon fly hooks, which is very difficult. You want to avoid
as many frustrations as you can in the beginning. These flies can drive you crazy. Make yourself take a break of at
least five minutes between each stage. Just the tension alone that increases as the fly progresses (especially if it's
going well), can be enough to screw the thing up. Go into the fly with a general idea of what you're after, and try
to achieve that. Even if the fly doesn't quite pan out as a whole, if you achieve your general aims give yourself
credit. Try to get each stage looking exactly the way you want, and do a stage over again if you're even mildly unhappy
with it. And finally, know that as in regular fly tying, materials are everything. Get the best materials
that you can afford. Graduate from goose to turkey as quickly as you can, because turkey's easier. Swan's very nice
to work with too, but pretty much unavailable. Materials are at least as big a problem as tying the fly itself, and
many are available only once in awhile. Your fly shop will have next to nothing that you need. The internet is your
friend.
I myself have something of a love-hate relationship with the full dress salmon fly, and take long breaks away from
them. Every time I come back things get a little better, and a little easier. If you like a challenge, and enjoy
trying to reach unattainable perfection, these flies are for you. They really are a lot of fun.

Jock Scott (per Pryce-Tannatt)
Tag: Silver twist and yellow floss silk (Actually, Pryce-Tannatt's recipe specifies oval silver or flat silver
tinsel only, with no floss. Many tiers though combine the Kelson tag with the Pryce-Tannatt fly as I've done
here)
Tail: A topping and Indian crow
Butt: Black ostrich herl
Body: In two equal halves-first half, yellow floss butted with black herl, and
veiled above and below with six or more Toucan feathers; second half, black floss.
Ribs: Fine oval silver tinsel over yellow floss, broader oval silver tinsel or flat
silver tinsel and twist (in the large sizes) over the black floss.
Hackle: A natural black cock's hackle, wound over the black floss
Throat: Speckled Gallina
Wings: A pair of black white-tipped Turkey tail strips (back to back); over these, but
not entirely covering them, a "mixed" sheath of "married" strands of Peacock wing, yellow, scarlet, and blue Swan,
Bustard, Florican, and Golden Pheasant tail; two strands of Peacock sword feather above; "married" narrow strips
Teal and barred Summer Duck at the sides; brown Mallard over.
Sides: Jungle cock
Cheeks: Blue Chatterer; A topping over all
Horns: Blue and Yellow macaw
Head: Black Ostrich herl (Kelson) or black (Pryce-Tannatt
Note: In the text of How to Dress Salmon Flies Dr. Pryce-Tannatt describes a slightly
different wing for the Jock Scott, as follows: "Right" and "left strands of scarlet, lemon, and blue dyed Swan,
Bustard, Florican, cinnamon and grey Turkey tail, and green Peacock sword feather, and "right" and "left"
strips of Teal, barred Summer Duck, and brown Mallard-for the built wings.
Credits: How to Dress Salmon Flies by Dr T.E. Pryce-Tannatt;
~ EA
About Eric:
 Eric lives in Delaware, Ohio and fishes for brown trout in the Mad River, a beautiful spring creek. More of his flies
are on display here:
traditionalflies.com -- Classic salmon and
trout flies of Europe and the Americas.
Eric lives in Delaware, Ohio and fishes for brown trout in the Mad River, a beautiful spring creek. More of his flies
are on display here:
traditionalflies.com -- Classic salmon and
trout flies of Europe and the Americas.
|