This will be a two part step by step tutorial discussing the dressing of the king of the
salmon flies, the Jock Scott. I intend to get very in depth with each stage, with an emphasis
on material preparation, which is key to being able to pull off this very difficult and
complicated fly. The methods discussed will apply to more than just classic flies, and can
be applied to all sorts of flies, and applied directly to classic wets from the Mary Orvis
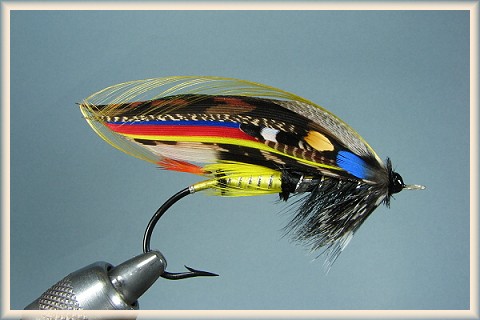
Marbury era to modern day European wets. For a photo showing the sections of the fly with names,
see the large photo at the end of the article.
The Gut Loop
Before mounting the hook in the vise it is advisable to protect it with either a business card
or better yet, a piece of plastic cut from a plastic enclosure of the kind that protects bakery products.
The latter method is recommended by Ronn Lucas, for protecting the mirror-like finishes on
his exhibition quality hooks. Many modern-day hooks can be damaged by clamping down too tight
with the vise as well.
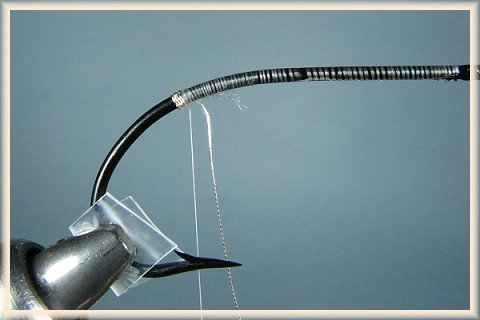
Attaching the gut loop is fairly straight forward, just be sure to lay down a layer of thread
first. The gut must be soaked for quite some time, at least 30 minutes, or you risk cracking
it when you bend it. You may taper the end at the tie in point, or not, depending on your
own philosophy. I like to tie one side on and then form the loop with a bodkin or other tool,
then tie down the far side. Others form the loop ahead of time. You may chew the ends of the
gut before tying on, a time honored tradition born of trying to get a secure attachment to
the hook. Shanks used to be roughened up as well to better hold the gut. It should ultimately look
something like this:

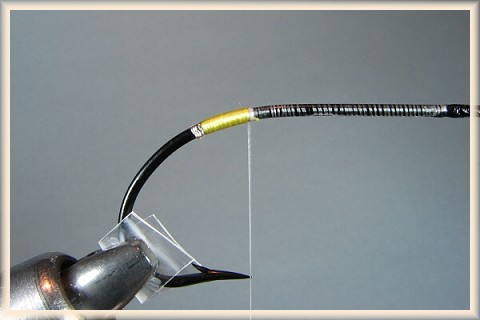
I tie my loop right to the sides of the hook, but others like to take the gut underneath
the hook at the rear. Ronn Alcott does it that way, as does Michael Radencich. Wayne Luallen
does it my way. Here's what mine looks like from the side:

Once the loop is formed and lashed securely to the hook, I like to take some cement or
lacquer and coat the assembly, resulting in this:

The Tag
The tag on this fly consists of two sections, what is commonly called twist in the
old recipes followed by yellow floss. The tag should start at a point on the shank
directly over the barb of the hook, and extend toward the eye no farther than, or
slightly short of, the hook point. The twist usually consists of fine oval or round
tinsel. The metal should be stripped off the core at the tie in point. Here is the
tinsel prepped and ready to be tied in on the far side of the hook. Notice how the
weight of the bobbin takes the thread straight down to the tip of the barb at the tie-in
point:

I like to catch just a little bit of the metal of the tinsel as I tie in, but just a
little, for security. If you don't you'll run the risk of the metal pulling away and
some of your core showing when it's wound. If you don't strip off the metal there
will be a bulge under your twist, extending into your floss possibly. That's why after
winding I strip off the metal as well, under tension after I secure the end with one
hard wrap. I tie on most tinsel on the far side of the hook, letting the thread torque
pull it underneath as I wrap. I attach a lot of materials this way, including floss. I
got this from Don Bastian and really like this method. Here's the twist wrapped and secured
and you can see that I've stripped the metal back, leaving only the core. I'll cut both
tags short after securing with three wraps toward the eye.
Once the twist butts have been cut off we wrap flattened thread edge to edge to the floss
tie-in point. Here I've wrapped to the floss tie-in and have tied the floss in on the far
side of the hook. Notice how the weight of the bobbin takes the thread straight down to the
point of the hook. That is because I've wrapped forward five wraps to secure the floss. I
actually tied in just short of the point of the hook.

Now the floss is carefully wrapped back to the tag, and then forward to the tie-in point.
The floss must be flat as you wind, and some floss has a twist in it (Pearsalls, Uni) making that
more difficult. It's important to let the floss slip through your fingers as you wrap, which
will pretty much eliminate breaking and fraying. I like the oriental floss (very expensive),
Lagartun silk (a little expensive) and Danville four strand rayon (dirt cheap). Use at the
most one strand if you're using Lagartun or Danville. You may build a little taper by over winding
more as you approach the front of the tag. You can burnish the floss after you're done, but
don't think you'll be able to burnish out bumps or lumps. The thread base must be pure, and
if you have lumps after you've wound the floss, do it again. There's no going back later on. After
winding my floss to the tie-in point, I hold it under tension and unwrap the five wraps of thread holding
the original tied in end, then wrap thread four wraps forward over both ends, making sure that I keep
both ends of floss under the hook shank. This wrapping and unwrapping is a method we use constantly
to keep thread bulk down to a minimum, and also to keep areas flat for future work. The four thread
wraps forward will be the area in which we mount our tail and herl butt. This is what the tag should
look like when you're done:
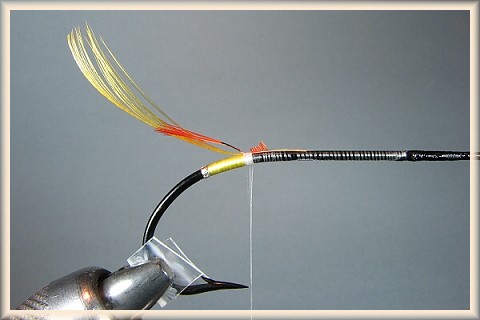
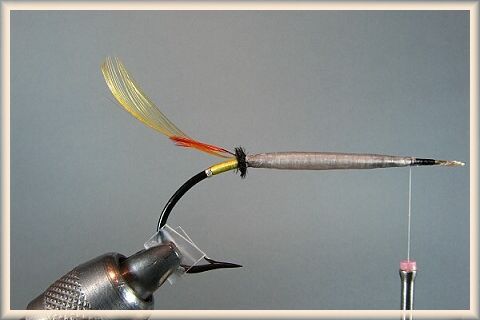
Now we should talk a bit about tail and topping preparation. If you're lucky, and have lots of golden
pheasant crests from which to select, you'll have a crest in the exact shape you want with no twists
in it. Your odds of winning the lottery are about as good. If this is not the case, soak some crests
that are close in shape to what you'd like, then flatten them on a pane of glass or other smooth
surface, over a thin layer of water. You can then, using a bodkin or other appropriate tool, fan them
out in order to get the desired waterfall effect on the topping, and spread the tail out as well. Let
them dry thoroughly and they should take on the shape you'd like. There will be some "spring back" so
you might want to exaggerate a little. Here are some I've done for this fly:
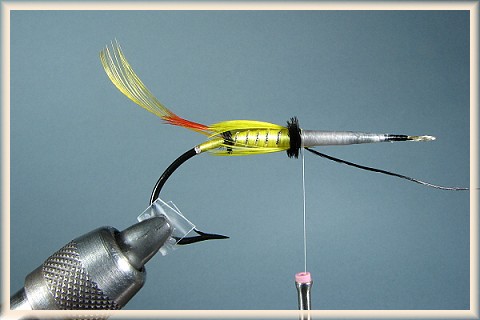
The Tail and Tail Veiling

Before tying in the tail, strip off some barbs and flatten the stem. Make sure no barbs are under your
tie-in point. You can look at the crest from the top while holding it in your pliers or tweezers, and make
sure it's not twisting. If it is, try twisting it forcefully the other direction prior to tying in.

Tie the tail on over the four wraps you used to secure the floss ends. Look at it from the top and
make sure it's dead straight, and in the center of the hook. The tail is very critical to the success
of the fly. There is no recovering from a faulty tail. As a general rule of thumb I like the tail to
be 1 1/2 times the hook gap, when measure from the tie in point diagonally to the tip of the tail. I learned
of this ratio in Ronn Alcott's book, and it's at least a good jumping off point. If the tail is too vertical, the wing will
be too high, too horizontal dictates a wing that is too low. Some tiers like a very vertical tail, and
that's fine, just don't make it too high. If you like a more horizontal tail, get a crest that curves up
quite a bit. This is subjective, but keep in mind that everything that follows follows the tail. If
it's not what you have in mind, neither will the fly be what you have in mind. This tail gave me
the exact shape of the fly I was expecting.

Now for the tail veiling, in this case an Indian Crow sub. In order to prep this for tie-in I now cut
close to the stem what I use to strip. In the past I would strip and flatten the stem, then put a
bend in it and mount it. I found that invariably, as I tied the rest of the fly, the veiling would
move, typically twist away from me. I recently read Pryce-Tannatt's book, and in it he talks about
cutting the barbs close to the stem rather than stripping them, and this seems to really help
the veiling to stay put after mounting. It looks like this:

If you just try to tie the feather down, you will invariably disturb the tail, so a small bend is
put in the stem before mounting. I do this by holding the stem horizontally with tweezers in my
right hand, and bending the feather with my right thumbnail, while pulling at right angles to the
tweezers. It looks like this:


The Butt and Underbody
Now for the ostrich herl butt, which is quite straight forward. It's just like wrapping hackle,
exactly. Make sure the fibers angle back as you wind, with the spine of the herl to the front.
Here is how I tie in, an we will wind over the same four wraps that bind the tail and veiling:

In this next shot I've complete the butt, cut material ends short, and laid the groundwork for
tapering the underbody. I've attached lengths of floss with the idea of building a thick tapered body.
It's now all the rage to make huge cigar shaped bodies,and I guess that's fine, but I'll try to
be a bit more moderate.

I should have added a fourth piece of floss closer to the center of the fly, and did so later.
The idea here is to wind the rightmost piece of floss to a point equidistant beyond the center of
the hook, and tie it off. Then wind the next piece to a point beyond that, again equidistant relative
to the center. Then the next piece is wound, almost to the front of the fly, and finally the last
piece, the one close to the butt, is wound all the way to the front. This gives a nice, fairly
symmetrical taper. There are other methods, each one more complicated than the one before.
Do whatever works. I use Equate dental floss, which is thinner, and CVS Advanced Fiber
Dental Floss which is wider. I also like Glide, which leaves my fly with a clean, minty smell.
Dental floss is great because it can almost be molded with your burnishing tool,
and lumps and bumps can be, to a small degree, smoothed out.
The Body
I'm afraid that I got so engrossed with the body veilings on the next section that I neglected to
take pictures along the way. That's all right though, because with the exception of the veilings
themselves we've already covered most of this. The ribbing is tied in first, close to the butt, just as
the twist was tied in, and then the thread is taken up to where the body veilings will be tied in.
This point should be at about the two-fifths of the way from the butt to the front of the fly.
The rear and front body sections should look about equal, and because of optical factors, the
rear section is made to be 2/5 of the entire distance.
Tie in the floss first with five wraps forward, and wind it back to the butt, then up to the tail
veiling tie-in point. Bind the floss down with four wraps, after
undoing the five original wraps holding it in place, just as we did with the tag. Now wrap the ribs,
being careful not to get the last wrap too close to the end of the floss. There is a reason for this.
If the last wrap ends right at the top of the end of the floss, it will cause the top body veilings
to jut up. Once the rib has been tied off, attach the top tail veilings. They should extend to just
beyond the butt. I've used burnt spey hackle as a sub here. Some like to use CDC,
and I've used it for toucan sub in the past, but I was never that wild about it. Here I've
used three spey hackles on the top, and three on the bottom, tied in right on top
of each other. They have a lot of natural curve, and can be just tied on, without having
to bend the stems. I cut the fibers close to the stems rather than stripped them before tying in. It
really makes them more stable after the fact. Once the veilings are in place, tie in the body joint,
or second butt, which will cover all our ends quite conveniently after it's wound over them. The final
rear body section should look something like this.
The front section is next, and is more of the same, but there are two ribs to be wound
side by side, and a black cock hackle from the second rib. You can see from the shot below
that I've tied in the lace (you can use oval tinsel too) by the mid joint, followed by the flat
tinsel, then, a little farther down the cock feather, and finally, at the front of the fly, the
black floss. You can see that I've wound the flat metal tinsel once already, and that was so I
could gauge the exact tie in point of the hackle, which is wound starting right up against the
second rib.

The materials are wound in the following order: First, wind the floss back to the butt, and forward
again to the front, carefully avoiding the ribbing and hackle. Next, wind the flat tinsel, being
mindful of spacing and avoiding the hackle stem so the metal doesn't cut it now, or when the hackle
is wound later. Now wind the lace or oval tinsel forward, right along side the flat. Finally wind the
hackle along side the lace, folding toward the rear as you go. Secure all ends but DON'T CUT
THEM yet. Make sure that everything butts up properly with everything, and check the other side of
the hook too. The reason you don't want to cut anything is that the hackle has a propensity to break
during this process, and you can backtrack if you haven't cut the materials. The same goes for ribbing
that's not spaced correctly or butted up against each other properly. Watch out for the
flat metal tinsel at all times, it will cut your thread too. If your hackle has survived the results
will look something like this. I've slicked it down here with saliva, but some tiers don't do this.
It makes it easier to get the underwing right. When it dries it will look normal.

The Throat
The final step in part one is the throat hackle. Here I've tied in an appropriate guinea hackle
after measuring its shortest fiber length against the longest hackle strand. Then I've wound it and
tied it off as shown:

And finally I've pulled all the throat fibers down into a beard, and wound a loop of thread
behind them, capturing them all. I then do a few more loops at the rear of the throat, resulting
in this:

If you look closely at the shot above, there is now a considerable lump on top of the hook where
the thick guinea stem is. I will slice this with a razor blade right on top, with the idea of
removing this thick stem, which will play havoc with my wings if I leave it in place. Before doing
this I glue the thread wraps behind, the ones holding the throat in place, with Griff's penetrating
cement. You could use crazy glue too.

Here we see the throat after the trimming operation has removed the stem from the top and sides
of the body. A bed of flattened thread has been wrapped forward and back, preparing a nice platform
for the next stage, the underwing. We will complete the fly next week. Below I've got the recipe
and a diagram that will help with identifying the various sections.


Jock Scott (per Pryce-Tannatt)
Tag: Silver twist and yellow floss silk
Tail: A topping and Indian crow
Butt: Black ostrich herl
Body: In two equal halves-first half, yellow floss butted with black herl, and
veiled above and below with six or more Toucan feathers; second half, black floss.
Ribs: Fine oval silver tinsel over yellow floss, broader oval silver tinsel or flat
silver tinsel and twist (in the large sizes) over the black floss.
Hackle: A natural black cock's hackle, wound over the black floss
Throat: Speckled Gallina
Wings: A pair of black white-tipped Turkey tail strips (back to back); over these, but
not entirely covering them, a "mixed" sheath of "married" strands of Peacock wing, yellow, scarlet, and blue Swan,
Bustard, Florican, and Golden Pheasant tail; two strands of Peacock sword feather above; "married" narrow strips
Teal and barred Summer Duck at the sides; brown Mallard over.
Sides: Jungle cock
Cheeks: Chatterer
Horns: Blue and yellow macaw
Head: Black ostrich herl
Credits: How to Dress Salmon Flies by Dr T.E. Pryce-Tannatt;
~ EA
About Eric:
 Eric lives in Delaware, Ohio and fishes for brown trout in
the Mad River, a beautiful spring creek. More of his flies
are on display here:
Traditionalflies.com -- Classic salmon and
trout flies of Europe and the Americas.
Eric lives in Delaware, Ohio and fishes for brown trout in
the Mad River, a beautiful spring creek. More of his flies
are on display here:
Traditionalflies.com -- Classic salmon and
trout flies of Europe and the Americas.
|