My sincere thanks to "Old Rupe" who sent a wonderful
old book to me for use especially in this section.
The book is Professional Fly Tying, Spinning
and Tackel Making Manual and Manufacturers Guide
written and illustrated by George Leonard Herter.
(Special Revised Fourteenth Edition, 1961.)
For those not familiar with George Herter or the Herter
Company, you missed one of the most prolific and interesting
writers ever. The Herters Catalogs were a work of art and
imagination.
The following is another from the book:
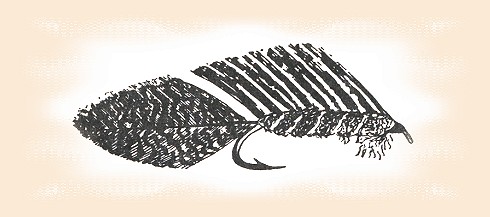
"The Matuka-type streamer originated in New Zealand.
It is used effectively there on big rainbow trout. It
is a very difficult type of streamer to make, and it
requires patient practice to tie a Matuka-type streamer
so it looks like it should. Note the illustration carefully.
There are two methods used in making Matuka streamers.
Using the first method, you take two barred cussettes or
wing covert feathers from the wing of a cock capercailzie,
a bittern or any of the feathers previously mentioned for
Matuka-type streamers. Some tyers use only one feather,
but it is usually better to use two. Incidentally, the
European bittern furnishes much poorer feathers for fly
tying than the North American bittern. North American
bitterns have soft, beautifully barred and mottled feathers.
Now take the two feathers you have selected to make your
Matuka streamer, (be sure they are both the same length
and width) and lay them together with the inside of each
feather facing to the inside. Cut off the downy fibers
at the roots of each feather. Then cut the fibers from
the bottom side of both feathers up to within about half
way to the tip. Leave the tips of both feathers full and
uncut. The tips of the feathers form the wide tail of the
streamer, as the illustration shows. On the rear of the
hook, tie on a piece of red wool yarn and a piece of tinsel
for making the body of the streamer. If you do not tie
these body materials on before you tie on the wing you
will not be able to after the wing feathers are tied onto
the hook shank. Now take the two wing feathers, (be sure
you have wound tying thread over and around the entire
length of the hook shank); hold them in place on the
hook shank so that the tips form a tail, and start
binding the feathers onto the hook shank, starting at
the base of the tail. Work forward to the head of the
streamer. This is a difficult job because you must wind
the tying thread through the feather fibers. This breaks
up the fibers but is perfectly all right, as they are
supposed to be broken up. Put cement on the windings.
Wind the red wool through the feathers and around the
hook shank to form the body and tie it down securely.
Then wind the tinsel spirally over the body, through
the feathers, and tie it down. Using a bodkin, pick
out the wool body at the front of the streamer to form
a rough hackle. You now have a real Matuka type streamer,
an unusually good fish getter. Some tyers take a few
turns of hackle around the head of their Matuka streamers.
This is a matter of personal choice. Some tyers also make
their Matuka streamers with silver tinsel bodies, leaving
out the wool. Some New Zealanders, in making Matuka
streamers, use large badger and cock-y-bondhu neck hackles
instead of bittern, or other wing feathers, to make the
wings and tails on these streamers. When hackle feathers
are used to make a Matuka-type streamer, two to four hackle
feathers are placed together, trimmed and tied on in exactly
the same manner as described previously for tying on the
bittern or other wing feathers.
Hackle feather Matuka-type streamers are also very effective.
It takes practice to make any kind of a Matuka streamer.
Your practice and patience will, however, be rewarded,
as they are unusually good fish producers.
Another method for making Matuka streamers is to tie in
the body material and tinsel, also a piece of heavy
tying thread to match the color of the body. Wind
the body material and the tinsel to form the body in
the usual manner. Then hold the feathers to be used
for the wing and tail of the stream (trimmed, as before
described) over the hook shank, and bind down the butts
near the eye of the hook with the tying thread. With
the piece of heavy tying thread left hanging at the base
of the tail of the streamer, bind down the rear wings
to the hook shank. This is all some tyers do. This
leaves the center part of the wind not bound down to
the hook shank. However, it is best to wind this
heavy piece of tying thread spirally forward, after
binding down the rear of the wings. Wind it around
the body and through the wings to the head of the
streamer with your regular tying thread." ~ DLB
Credits: Text and drawing from
Professional Fly Tying, Spinning
and Tackle Making Manual and Manufacturers Guide
written and illustrated by George Leonard Herter.
|