"It is many years since the bucktail fly first made its appearance.
So far as can be learned, the early attempts consisted merely
in tying a bunch of hair about the eye of the hook, much in the
manner of the treble hook bobs now used with spoons for Pike and
Muskellonge, only smaller. Doubtless, the first important step
toward converting this into a "fly" was that of Miss Westwood,
the well-known Wisconsin fly-tyer, who, starting at the bend of
the hook, tied in a half-dozen alternate bunches of brown and
white so that the hair, instead of completely surrounding the
shank, was confined below the hook for form a large, flat wing
which effectively covered the barb and bend, rendering the hook
substantially weedless. When thus tied, the fly rode with the
wing upright in the water with the hook turned up. These were
originally called "Miss Westwood's Bass Bugs," but they have
since become known as "Mississippi Bass Bugs," due to their
popularity along the upper reaches of that historic stream.
As time went on, others undertook to improve the pattern.
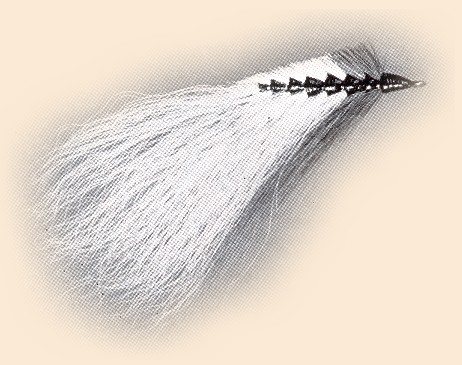
This eventually resulted in what is now termed the "Ozark
Weedless Bucktail," a product of the Stroud Fly Company of
Arlington Heights, Illinois. As tied by them there is an
oblique fringe of hair on the back or top of the hook. This
increases in width towards the eye as shown in sketch No. 19c.
This lure is tied in a variety of colour combinations, including
natural bucktail; alternate green and white; alternate black
and white; all yellow; all white; alternate red and yellow; and
all black. The first three are undoubtedly the most popular
at the present time, but tastes seem to change from year to year.
Suggestions For Tying The Stroud Weedless Bucktail
(Commercial Method)
The ensuing calaculations apply only to a hook having a shank space for
a body one and one quarter inches long. This may be a No. 1/0, or a
No. 2/0 ringed sproat, depending upon the manufacturer. For other sizes
of hooks, the figures should be modified as explained below.
Size "A" silk thread will be used, and this winds eleven close turns
per one eigth inch of hook shank; therefore, one and one quarter inches
equals one hundred and ten turns (10 x 11).
There will be eight ties of hair. Thus, each tie, (except the last) will
occupy a net space equal to fourteen turns; the last tie having
but twelve. All turns of thread should therefore be carefully counted and
applied snugly, one against the other, in order to have the ties of even
length and that they may end up properly at the eye of the hook.
Just a word about the hair: For best results, use fine bucktail
for all sizes up to No. 2/0. The No. 8/0 Muskellonge lure requires
hair that is twice as long as that for the No. 1/0, about to be described;
and for this purpose, coarse bucktail, moose mane, and skunk tail are
often used. Some bucktails are coarse near the body end and fine at
the outer end; but the very large tails are apt to be too coarse, even
at the outer end, to make good bass-size Ozarks. For small Ozarks,
calf tail works very well.
1. Place the hook in the vise and attach size "A" thread (waxed) to
the bend in the usual manner. When secured, the thread leading from the
hook is one and one quarter inches away from the eye of the hook. It is
well not to have the hook too deeply imbedded in the vise for the first
three ties. Later, it may be reset farther in, so that the barb and a
part of the shank are covered by the jaws.
2. Having decided upon the colour combination to be used, take a bunch
of hair about one eighth of an inch in diameter when it is tightly
twisted, and line up the tip ends.
With the butt end pointing to the right, grasp it with the left
hand so that the first turn of thread comes two and one eighth inches
from the tip. Wind fourteen turns to the right, letting the hair
slide around the hook. This completed, gather the butt ends in a bundle
on top of the hook, fold this over to the left, and, keeping it top
of the hook, wind thirteen close turns to the left, then twelve close
turns to the right (over the previous turns), and add a half-hitch.
3. For the second tie: Use a bunch of hair three thirty-seconds of an
inch in diameter. Having lined up the tip ends, hold the hair in the
left hand - but, this time, with the tips pointing to the right.
Keep the hair on top of the hook, so that the first turn of the
thread comes two and one half inches from the tip. Wind fourteen close
turns to the right.
Divide the hair carefully into two equal bunches. Bend them down
astraddle the hook, twist them together again (below the shank) in
order to facilitate holding it in a bunch beneath the hook, and then
take thirteen close turns of thread to the left. Keep this lower hair
entirely under the hook and pointing to the left as the thread is applied.
Then take twelve close turns to the right and add a half-hatch.
4. For the third tie: Use the same amount of hair as for the second.
Grasp it exactly as before (with the tips pointing to the right),
but hold it so that the first turn of thread now comes two and five
eights inches from the tip. Apply fourteen turns to the right.
Divide the hair as before and bend the two portions down, astraddle the hook.
Twist them together again below the hook, and then take thirteen close
turns of thread to the left, followed by twelve to the right, and add a
half-hitch. The in which all tis is done can be seen the sketches Nos. 19a
and 19b.
5. The fourth tie is made in the same manner as the second and third.
The quantity of hair is the same also, but it is held in such a manner
that the first turn now comes two and three quarters from the tips,
which, of course, as before, extends to the right along the top of
the hook. Apply fourteen close turns to the right. Then divide the
hair as before; twist it below the hook and apply thirteen close turns
to the left, followed by twelve to the right, plus a half-hitch.
6. The fifth and sixth ties are identical in every respect with the fourth.
7. In the seventh tie: The first turn comes two and five eighths inches from
the tip, otherwise it is the same as the fifth and sixth ties.
8. The hair for the eighth tie is held so that the first turn comes
two and one half inches from the tip, which, of course, points to the
right. Take twelve turns of thread to the right, or in any event to
the eye of the hook, then eleven turns to the left followed by eleven
to the right. When going to the right for the last time apply a whip
finish with the final six turns.
9. Trim the butt ends of the hair on a bias as shown in sketch No. 19c.
It is best to hold the hair between the left thumb and forefinger and to
cut towards the eye of the hook. There is a tendency for the scissors to
work in toward the hook shank, so take it slowly, with small snips.
Guide the scissors with the left thumbnail.
If a first-rate job has been done, there will be no hairs coming out from
either side of the hook, and all ties of thread (except the last) should
be of the same width, i.e. five thirty-seconds of an inch. If any hairs
have slipped around to the sides, take a good pair of tweezers and
snip or break them off close to the thread.
All the exposed thread should now be given two coats of lacquer. Try
not to let any of this get on the hair, but if some does it may be
combed out, when dry, with a sharp needle.
The common tendency, when starting to tie these Weedless Bucktails,
is to take too much hair for each tie. This not only means
that the excess must later be cut away and therefore wasted, but
it makes the tying doubly difficult as the hair works around to
the sides of the hook."
Credits: Quoted text and black and white photo and drawings from
Fly~Tying, by William Bayard Sturgis, published by Charles
Scribner's Sons (1940).
|