 October 20th, 2003 |
The Snowshoe Wedgie
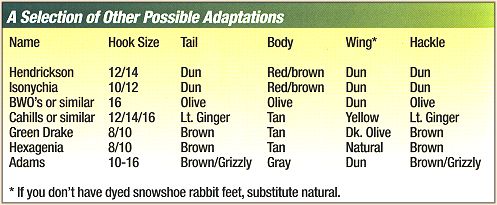
Materials - Yellow Drake Snowshoe Wedgie
Tying Instructions Yellow Drake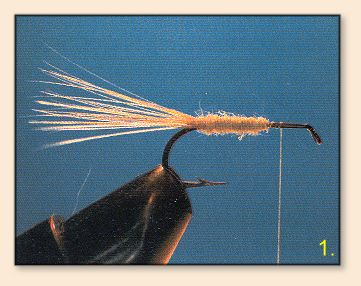 Step 1. Start the thread about 1/3 back from the hook eye. Lay down a layer of thread to the bend. Add a tail and dub an abdomen forward over the thread. This is the first of the subtleties. The wing will be tied in to take advantage of the difference in diameters of the hook shank and the abdomen. It must be tied in so the abdomen helps push it up at the correct angle. If it's not tied in correctly, the fly will come out looking like a tailed caddis.
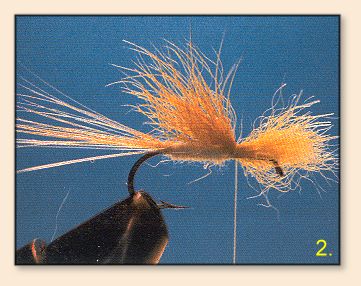 Step 2. Take a sparse bunch of Snowshoe rabbit foot fur and comb out the butts. Hold the bunch in your right hand between your thumb (on the bottom) and forefinger (on the top). Now, take the hair in your left hand by pinching it from the sides between your thumb and forefinger. This does two things. First, the hair is now held correctly for tying in and, second, the hair will be flattened between the thumb and forefinger of your left hand. This is important for tying in the wing and forming the wedge. Position the wing on top of the hook shank right in front of the abdomen. Secure using the pinched loop technique as if you were tying in a wet fly wing of duck quill slips. The wing should not extend past the abdomen. There are two very important point. First, the wind must be tied up against the abdomen to get the correct angle in the wing. Second, the hair must stack as it's being tied down, rather than allowed to spread out over the top of the hook shank. This takes a little practice. Putting down a couple of turns of thread just in front of the abdomen can help, but remember to maintain the difference in the hook shank and abdomen diameters. 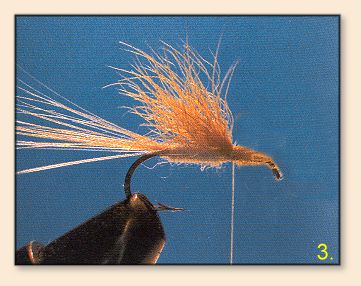 Step 3. Trim the butts of the hair at an angle and tie down neatly with thread. Select and tie in a hackle at the base of the wing. Before winding the hackle in front of the wing, you may optionally dub a sparse thorax over the wing base. This is especially useful if you are using a contrasting colour of thread. Wind the hackle over the thorax, secure with thread and trim the excess hackle. Form a small neat head and tie off. Coat with head cement and the fly is ready for trimming the wing and hackle. This will help the fly to sit up at the correct angle. Optionally, trim the trailing edge of the wing. Note the strong profile of the wing in the photo.
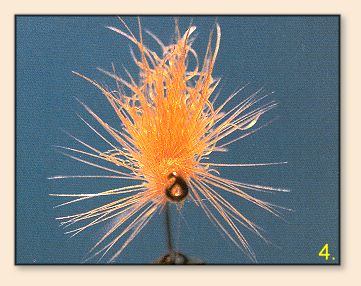 Step 4. Here is the completed fly from the front. Note the flatness of the wing on each side and notch cut out of the underside of the hackle. Until you get the feel of how much snowshoe to use, you may need to trim the sides of the wing to encourage the correct profile from the front. The notch can be adjusted on the stream.
Fishing Notes:
|
