Flowers River Charm
 By Sheldon
Seale
Why some Atlantic salmon fly patterns work better than
others is really anybody's guess. Nevertheless, some do
outfish others. One of these is the Blue Charm, especially
tied as a low water pattern. It's ranked at the top of the
list of a number of legendary salmon fishers from the time
it appeared over a hundred years ago. It was the favourite
pattern of A.H. Wood, who is accredited with the development
of floating or "greased" line fishing for salmon. Wood carried
all sizes of this fly from 12 to 1 and would not change to
another pattern until he had tried them all. Between 1913
and his death in 1934, Wood used it to tempt more than 3,400
salmon on Scotland's River Dee.
By Sheldon
Seale
Why some Atlantic salmon fly patterns work better than
others is really anybody's guess. Nevertheless, some do
outfish others. One of these is the Blue Charm, especially
tied as a low water pattern. It's ranked at the top of the
list of a number of legendary salmon fishers from the time
it appeared over a hundred years ago. It was the favourite
pattern of A.H. Wood, who is accredited with the development
of floating or "greased" line fishing for salmon. Wood carried
all sizes of this fly from 12 to 1 and would not change to
another pattern until he had tried them all. Between 1913
and his death in 1934, Wood used it to tempt more than 3,400
salmon on Scotland's River Dee.
Recently, I had the opportunity to fish on the Flowers River,
which is the most northerly scheduled salmon river in Labrador
located 166 air miles due north of Goose Bay.
The Flowers River Lodge, where I stayed, advised me what flies
to tie for my trip. Prominent among them was the Blue Charm.
I hit the tying bench, and by the time I arived in Labrador,
my boxes were full.
Unfortunately, not one of these raised a fish. It wasn't until
my guide slipped me one of his "specials" that I finally scored.
It was a Blue Charm variant with a sparse black hair wing in
place of the usual turkey, mallard and teal. Luckily, I had
my tying gear with me and spent my evenings tying up a good
supply of the pattern. These produced a number of hits and
hookups and two fish brought to hand and released. Not bad
for a first salmon trip.
This version of the old classic is used widely throughout
Newfoundland and Labrador and elsewhere on the East coast,
but because I first encountered it on the Flowers River and
because it was kind to me, I will always associate it with
that river. Here it is-the Flowers River Charm.
The Flowers River Charm
- Hook: Mustad 36890 (or similar), sizes 12-2.
The preferred hook sizes appear to be 4-6-8. I rose all of my fish on size 4.
- Thread: Black 6/0.
- Tip: Oval silver tinsel, fine or small.
- Tag: Yellow floss.
- Tail: Golden Pheasant topping, short.
- Rib: Oval or flat silver tinsel, fine or small.
- Body: Black floss.
- Throat: Medium blue hackle fibers, length of body.
- Wing: Moose hair or Black Bear hair, sparse.
Tying Instructions
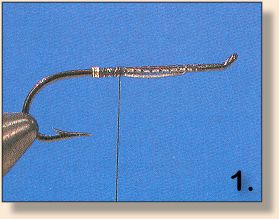
Tie the tip in first. Start your thread on the part of the
hook where the eye loops back but leave room for the wing and
head to be tied in. Attach the tinsel for the tip just where
the loop from the eye ends. Wind the thread back on the shank
to a point immediately above the hook point, securing the tinsel
for the tag along the hook shank as you go. Take about 3 wraps
of the tinsel forward to form the tip and secure it with the
thread. Trim the excess tinsel.
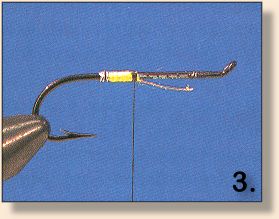
1. The tag is tied in next. Advance the thread to a point equal
to about three times the length of the tip. Tie in a single
strand of yellow floss. To form the tag, wrap the floss back
to the tip and forward again forming a slightly tapered shape.
Secure with the thread and trim the excess floss.
2. Next is the tail. Tie in 1 or 2 Golden Pheasant topping
feathers as the tail. The tail should not extend beyond a
point directly above the hook barb. Secure the excess feather
along the top of the hook (trim only if necessary). Advance
the thread to the end of the eye loop.
3. Next is the ribbing. Tie the ribbing on the far side of
the hook and close to but not directly underneath shank.
Wind the thread back to the start of the tag, securing the
ribbing along the shank as you go. Leave it there for now.
4. Next is the body. Advance the thread back to the end of the
eye loop. By now, you should have built a smooth thread underbody
for the fly. The smoother it is, the better looking the fly will
be when its completed. Tie in a single strand of black floss.
Form the body by wrapping the floss back to the tag and forward
again to a point just onto the doubled section of the eye loop.
Try to make it fairly narrow and even throughout its entire length.
Secure with thread and trim the excess floss. Wind the ribbing
forward (tradition calls for 5 turns) and securing it under the
hook shank at the front of the body. Secure with thread and
trim the excess ribbing.
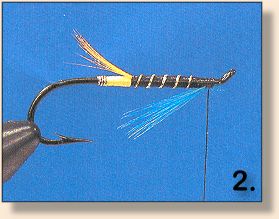
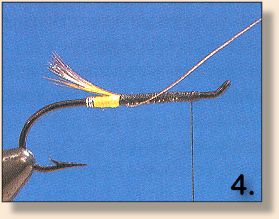
5. Next is the throat. Remove a "tuft" of fibers from a medium
blue feather (sort of a deep sky blue) and tie them under the
hook immediately in front of the body. Secure with thread
and trim the excess material.
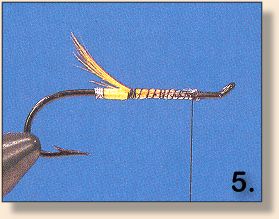
 6. Last is the wing. Cut a small "clump" of fibers from a
moose hide or black bear hide. Remove any underfur and even
the tips in a stacker. Tie in the wing on top of the hook shank,
immediately above where the throat was tied in. You may need to
take a couple of turns of thread to make a nice, even foundation
for the hair. The wing should angle back low over the body to
the end of the tail. Keep it sparse. You want just enough hair
to suspend the fly in the water. Secure with thread and trim
the excess hair. Form a small, neat head, tie off and trim the
thread. Coat the head with lacquer and the fly is complete.
~ Sheldon Seale
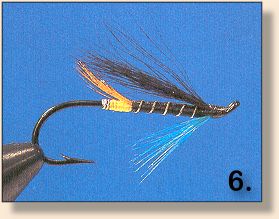
6. Last is the wing. Cut a small "clump" of fibers from a
moose hide or black bear hide. Remove any underfur and even
the tips in a stacker. Tie in the wing on top of the hook shank,
immediately above where the throat was tied in. You may need to
take a couple of turns of thread to make a nice, even foundation
for the hair. The wing should angle back low over the body to
the end of the tail. Keep it sparse. You want just enough hair
to suspend the fly in the water. Secure with thread and trim
the excess hair. Form a small, neat head, tie off and trim the
thread. Coat the head with lacquer and the fly is complete.
~ Sheldon Seale
We thank the
Canadian Fly Fisher for re-print permission!
Our Man In Canada Archives
|
