Great Canadian Flies,
West: The Carey Special
By Sheldon Seale / Glen Hales photos
There have been many great fly patterns developed in and for the Canadian
west. The Carey Special is one of the best known and also one of the most
versatile and adaptable. In the literature it is usually referred to as a wet fly
or a nymph and occasionally as a steelhead fly (especially the Orange Carey
Special). Yet, it isn't that well known to anglers, except in those regions
of western Canada where it is a staple.
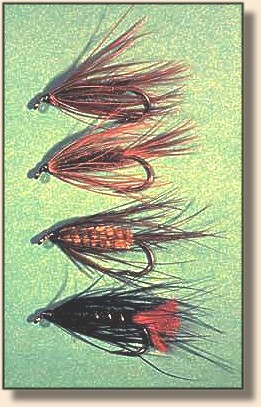
Hook: 3x long nymph or streamer, sizes 2-8.
Thread: Black 6/0.
Tail: Pheasant flank feather fibres (optional).
Rib: Copper wire or similar (optional).
Body: Peacock herl, dubbing or chenille (optionally weighted).
Hackle: Pheasant flank feather, tied back.

The pattern was developed about 1925 by a Dr. Lloyd A. Day of Quesnel, British
Columbia. Its original name was The Monkey Faced Louise. However, a Colonel
Thomas Carey popularized the pattern and the fly was eventually renamed in his
honour. [Author's note: I have no way to be certain, but I wonder if the timing of
the Carey Special's development is somehow related to the introduction of ringneck
pheasant to North America from China. This would explain the use of pheasant flank
for the collar rather than grouse or one of the various members of the duck family.]
Primarily thought of as a lake and pond fly, the Carey Special is at home in many
kinds of water. Its adaptability allows it to suggest a wide range of fish foods.
These include damselfly and dragonfly nymphs, cased caddis, small fishes and
even crayfish. The pattern can be weighted or not and tied in a wide variety of
materials.
The pattern is a straightforward tie as so many truly effective flies are.
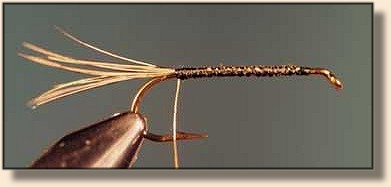
Step 1 - Start your thread back of the hook eye and lay down a bed of thread
to the bend. If you wish to weight your fly, wrap some lead wire (approximately
the same diameter as the hook wire) over the middle half of the hook shank.
Secure the lead in place with some extra wraps of thread. If you're putting
on a tail, strip a dozen fibres from a pheasant flank feather and tie them in.
The tail should be equal tothe length of the hook shank. Tie in your ribbing (optional
with dubbing or chenille).
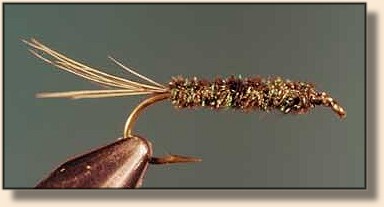
Step 2 - Select 6-8 long strands of peacock herl and tie in. Advance the
thread to the original tie-in point. Twist the herl into a rope and wrap
forward in touching turns to form the body. Secure with thread and trim
excess herl. Wind copper wire forward, in open winds, to form the rib
(optional with dubbing or chenille).
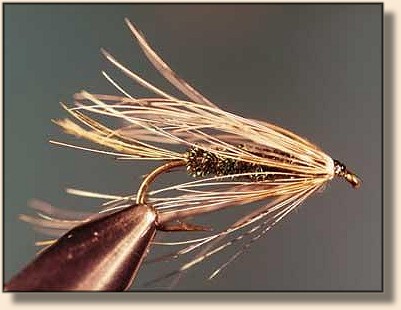
Step 3 - Tie in the pheasant flank feather by the tip. Trim the excess. Fold
the fibres towards the rear of the hook and wrap 2 or 3 turns to form a collar.
Secure with thread and trim excess hackle. If the hackle doesn't lay back
sufficiently, secure it in place with a couple of thread wraps (see picture).
Form a small neat head, tie off, clip the thread, and coat the head with lacquer.
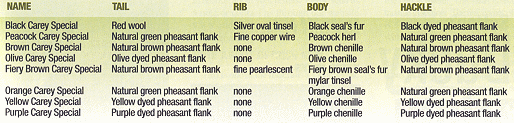
The variations are endless. You can dub a body using your favourite material
or use chenille, wool or floss. You can use different materials for the tail,
including some red wool for a brighter fly. I recently came across dyed
pheasant flank in small packages, so you can even match the collar to the
body or not! All in all, an excellent pattern. A couple of my favourite
variations include:
While the Carey Special is indeed at home in a pond or lake, it is a very useful
fly in rivers especially the slower and deeper portions. In streams and rivers,
fish it as any wet fly or strip it in as you would a small streamer. In ponds, a slow,
hand twist retrieve on a sinking line can prove deadly!
Try your own variations of the Carey Special. While most of the colours I
have suggested above are intended for trout, I believe some of the brighter
colours would be just the ticket for smallmouth bass. I'll have to give them
a try this summer in some of the Haliburton Hills rivers I like to fish.
~ Sheldon Seale
|
