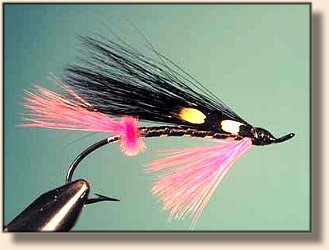
Jack Sutton's Ducky Darling
By Sheldon Seale
Glen Hales Photos
 Most Ontario fly fishers will be familiar with Jack Sutton's My Despair
(see the Premier Issue of The Canadian Fly Fisher, Spring
1999). The fly is a very effective caddis emerger pattern. The Ducky Darling
is another of Sutton's creations. It's an excellent spring brook trout pattern.
Most Ontario fly fishers will be familiar with Jack Sutton's My Despair
(see the Premier Issue of The Canadian Fly Fisher, Spring
1999). The fly is a very effective caddis emerger pattern. The Ducky Darling
is another of Sutton's creations. It's an excellent spring brook trout pattern.
Sutton most likely developed the Ducky Darling sometime in the late 1930s or
early 1940s. Despite my asking around of people who knew Mr. Sutton, the
origin of both the pattern and its name seem to have been forgotten. If any of
the readers can fill in some of the history of this pattern, I would be delighted
to hear from you, and we'll publish it in a future issue of The Canadian Fly Fisher.
Although we know little of its origin, we do know something about its effectiveness
as a brook trout pattern. I have used this pattern on resident brookies in a variety
of situations, from small northern Quebec lakes to the local streams and stocked
ponds of southern Ontario. In both places it has proven quite effective. It can be
fished as a wet fly or as a small streamer. I have also "trolled" it behind a float tube
on the point in a cast of three flies, where it has taken its fair share of fish. In
streams such as the Credit and Rocky Saugeen, it often accounts for the best
fish of the day.
The Ducky Darling most likely suggests a small brook trout or any of the
minnows with a little colour in the fins or body. Therefore, it often attracts
the larger fish in the stream. Fish it when there is no obvious feeding going
on, by swinging it along undercut stream banks or log jams anywhere you
might expect to find a good sized trout lurking.
The pattern is straightforward with the only relatively difficult step being the butt.
|
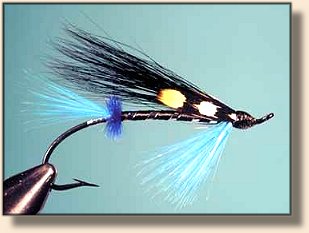
Hook: 2X to 4X long nymph/streamer style, sizes 10-6.
Thread: Black 6/0.
Tail: A bunch of orange hackle fibres.
Butt: Orange ostrich herl.
Rib: Fine flat silver tinsel.
Body: Black Floss or similar.
Throat: A bunch of orange hackle fibers, beard style.
Wing: Black bear or black squirrel tail hair.
Head: Black thread.
|
Tying Notes
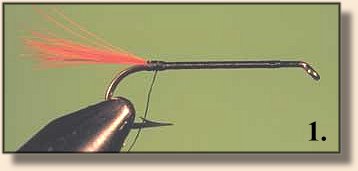
Step 1 - Lay down a bed of black thread and tie in the tail. The tail should
be about half the hook length.
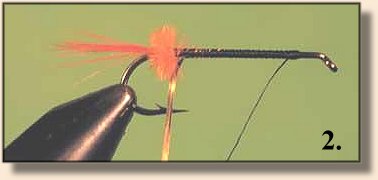
Step 2 - Prepare an ostrich herl by stripping a little flue from the stem. Tie
in and form a small, neat butt with 6 close turns of herl (see note about wrapping
Ostrich herl). Tie in the ribbing.

Step 3 - Advance the thread to the original tie-in point and secure a length of floss.
Wind the floss in touching turns back to the butt and forward again, forming the
body of 2 layers of floss. Wind the ribbing forward and secure with the thread.
Remove excess ribbing and floss.
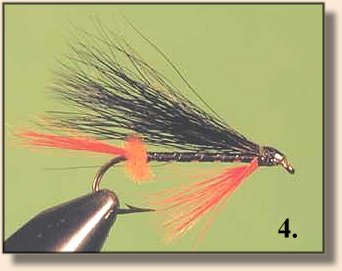
Step 4 - Tie in the throat. The throat should extend back to about the hook point.
Step 5 - Take a small clump of hair and remove any short fibres from the base.
Stack the hair to even the tips. Measure the hair to length and trim the butts.
Tie in the wing. Be very careful about tying in the hair. After trimming the hair
to length, put a little head cement on the butts to help secure it. Most hair is
quite slippery and the addition of a little cement will add greatly to keeping
it in place during tying and to the durability of the fly. Form a small neat head
with thread and whip finish. Coat the head with lacquer and the fly is complete.
Variations

The Ducky Darling is a very adaptable pattern. I have included a blue and pink
version of the Ducky Darling (the Blue Darling and the Pink Darling) to illustrate
this point. The blue version should make a good Atlantic salmon fly on any "blue"
river (you salmon anglers will know what I mean) and surely no self-respecting
steelhead would pass up the pink version. Both of these patterns have been tied
on Bartleet style hooks and "dressed up" a little by the inclusion of a tag and a pair of jungle cock eyes (optional). The original pattern, tied on a salmon "iron,"
should do well in Atlantic Canada, where many of the successful patterns have
a little orange in them.
As always, I encourage the readers to experiment with the patterns illustrated
in these articles. The editor and writers are also interested in hearing about your
results. Please send us a note or contact us through our
website or by E-mail canflyfish@on.aibn.com
Note about Ostrich Herl
This is one of the materials a lot of people have trouble with. If, however,
you tie it in correctly and wrap with close winds, the results will always look
good. The secret is the way the herl is made. The stem is shaped like a
triangle in section. The flue comes off from two of the points. If you wind
the herl so the point without flue is always directed forward (that is towards
the hook eye), the herl will stay upright and each wrap will snug into the
previous. Taking a look at some ostrich herl with a magnifying glass will
help you see this. ~ Sheldon Seale
|
