"Everyone's Guide to Fly-fishing Photography"
by Clive Schaupmeyer
Photographs are a great way for you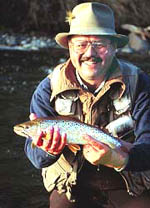 to preserve memories of fishing trips, friends and
fish. I have more than two thousand pictures of various fishing trips with our kids,
my brother, father and friends. My water-proof camera is almost always around my
neck when I am on the river and the rewards are worth the effort. Right above my
computer monitor are two nighttime pictures of me holding two different, fat 22
1/2-inch, 4-pound-plus brown trout caught in "Frenchman's Creek" on the evenings of
July 15 and July 16, 1995. Good pictures. Great memories. to preserve memories of fishing trips, friends and
fish. I have more than two thousand pictures of various fishing trips with our kids,
my brother, father and friends. My water-proof camera is almost always around my
neck when I am on the river and the rewards are worth the effort. Right above my
computer monitor are two nighttime pictures of me holding two different, fat 22
1/2-inch, 4-pound-plus brown trout caught in "Frenchman's Creek" on the evenings of
July 15 and July 16, 1995. Good pictures. Great memories.
Great on-stream pictures are simple - literally!
Learning to take appealing photos is not unlike learning to fly-fish.
It's not as difficult as it seems, and great improvements result from understanding
a few simple techniques. Learning a few methods will help you take pleasing,
high-quality on-stream pictures. Here are a few ideas that will help you improve
your fly-fishing and outdoor pictures.
Composition.
Art and photography composition is the subject of season-long classes so
we can hardly do it justice here. But here goes. First of all, the
KISS principle applies to composition: keep it simple, stupid. What
are you taking a picture of? Is there a bunch of extra stuff in the picture that
does not contribute to the actual subject? If so, do something about it: change your
position or that of the subjects. Have a close look through the lens. Are the
subjects arranged in a way that is pleasing to look at? But perhaps you don't know
what is pleasing and what's not.
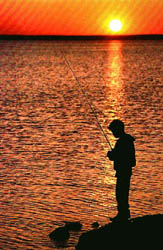
Here's a simple way to compose pictures that are easy to
look at and have impact. It is called the 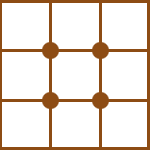 Law of Thirds. Imagine the scene you want to photograph
has a grid over it like shown in the diagrams. Visually strong locations on this
grid are where the lines intersect. Rarely will you want fish and faces dead center
in a picture. Mentally arrange the scene in thirds and place your center(s) of
interest near these imaginary spots. See how the accompanying pictures are arranged
in this manner. The horizontal lines are also good spots to locate the horizons as
they don't look right when dead center. Law of Thirds. Imagine the scene you want to photograph
has a grid over it like shown in the diagrams. Visually strong locations on this
grid are where the lines intersect. Rarely will you want fish and faces dead center
in a picture. Mentally arrange the scene in thirds and place your center(s) of
interest near these imaginary spots. See how the accompanying pictures are arranged
in this manner. The horizontal lines are also good spots to locate the horizons as
they don't look right when dead center.
Move in close.
The best way to 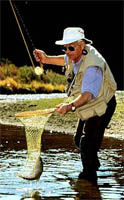 get detail of facial expressions and fish is to move in close. Or, if you
have a zoom lens, zoom in close. Many pictures are taken from too far away and have
low impact or detail. If you want some scenics of the river or lake taken from far
away, that's fine, but for the shots of fish and friends move in. get detail of facial expressions and fish is to move in close. Or, if you
have a zoom lens, zoom in close. Many pictures are taken from too far away and have
low impact or detail. If you want some scenics of the river or lake taken from far
away, that's fine, but for the shots of fish and friends move in.
Get vertical!
Perhaps the least used, but easiest method, to improve picture quality is
to tip the camera sideways and take a vertical picture. 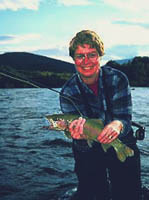 I'd guess that three quarters of my fishing
pictures are vertical because people are usually upright. This does not mean you
still can't use the horizontal format. The point is, have a look and decide which
format best suits the scene and subject. We talked about moving in close. If your
subject is tall, you can get in closer with the vertical format and still fit
everything in. I'd guess that three quarters of my fishing
pictures are vertical because people are usually upright. This does not mean you
still can't use the horizontal format. The point is, have a look and decide which
format best suits the scene and subject. We talked about moving in close. If your
subject is tall, you can get in closer with the vertical format and still fit
everything in.
Background clutter.
Another distracting feature of many pictures is background clutter like
trees, wires, posts and bright sun spots on background leaves. Some objects protrude
from heads and out of ears. Pay attention before clicking that shutter. The problem
arises because we become so concentrated on the subject we forget to look behind and
around the subject.
The three L's of photography: light, light and light.
 Light makes all pictures, and some light is better than other. There is
not enough space to go into all the details here, so you may want look up lighting
in photography books at your public library.
Light makes all pictures, and some light is better than other. There is
not enough space to go into all the details here, so you may want look up lighting
in photography books at your public library.
First of all, sunshine results in brighter, more colorful
pictures compared to those taken on dull, overcast days. Clearly you can't wait for
the sun to come out when you want your buddy to take a picture of your first
over-20-inch brown trout. One reason to use a flash. But if you want some general
on-water shots and have a choice, do it on a sunny day.
But sun can also ruin pictures. 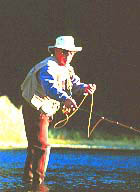 Usually it is best to have the sun in front of the
subject or off to either side. Unless you are trying for moody special effects
bright sun from behind the subject often results in sun flare blemishes on the
picture and poorly lit subjects. Your partner with the camera, you and that 20-inch
brown trout should position yourselves so the sun shines on you from the front or
side. Again an on-camera flash can help by removing shadows created by the overhead
sun. Usually it is best to have the sun in front of the
subject or off to either side. Unless you are trying for moody special effects
bright sun from behind the subject often results in sun flare blemishes on the
picture and poorly lit subjects. Your partner with the camera, you and that 20-inch
brown trout should position yourselves so the sun shines on you from the front or
side. Again an on-camera flash can help by removing shadows created by the overhead
sun.
Fill flash.
Bright sun is good. However, bright mid-day sun shining down on your
angling subjects can result in harsh shadows on faces and missing detail in the
shade. Virtually all of my closeup portrait-type outdoor pictures are taken with
fill flash-even in the brightest sun. The flash fills the shaded areas like those
below eyebrows and under hats. The flash adds sparkle to parts of the subject that
otherwise would be dull or almost dark. And of course, a flash adds color and
brightness to subjects on overcast days.
The magic hours.
We said that bright sun is usually better than shade or dull overcast,
and fill flash can be used to reduce shading. But the best light of all is natural,
low angle, soft, warm light from the sun an hour or so after sunrise and an hour or
so before sunset: a photographer's happy hours. Some call these the magic hours. The
physics here are simple. First, the low angle fills in all nooks and crags of
vertical subjects-like people's faces-so there are no harsh shadows. The second
reason these are the magic hours is the color of the light. Whereas noonday light is
white, early morning and evening light is warm - it takes on a subtle orange color.
So if you want a classic shot of your buddy on the stream wait till the sun is low
in the sky. (Of course, if you wait too long the light intensity will drop
dramatically and the picture could end up blurred because the shutter speed is so
slow.)
Action please.
How often have you seen vacation pictures that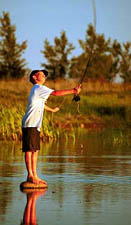 show Bob standing by the river; Bob standing by the truck; Bob standing by the trailer? Get some action in
to your shots. The action doesn't have to be blistering, but when your "people subjects" are people doing things you'll enjoy the pictures more and so will your friends. Take pictures of your gang wading in the river; casting, perhaps with a scenic mounta
in in the background; landing fish; or perhaps tying flies at the trailer. show Bob standing by the river; Bob standing by the truck; Bob standing by the trailer? Get some action in
to your shots. The action doesn't have to be blistering, but when your "people subjects" are people doing things you'll enjoy the pictures more and so will your friends. Take pictures of your gang wading in the river; casting, perhaps with a scenic mounta
in in the background; landing fish; or perhaps tying flies at the trailer.
You old pro!
Do you think of yourself as an up-and-coming outdoor photographer? Perhaps thinking of taking pictures next summer to submit to a regional fishing magazine? Then use a tripod whenever you can. No, I do not use a tripod for general stream shots
that are for my own use or perhaps used for small prints in magazine articles. But when I know pictures may be for sale, or perhaps for possible use on a magazine cover I almost always use a sturdy tripod. There is a big difference in sharpness between ha
nd held pictures and pictures taken with a tripod.
A few final suggestions about taking fishing pictures. If you are taking a picture of your partner with a fine rainbow, 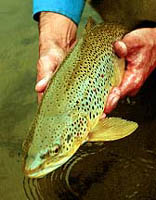 first get the fish under control with a net. Remove the
hook and, if the fish is not tired, you have a few seconds to take a picture or two. Have your friend cradle the trout (usually in both hands) and position the fish to the camera so that it is in the light and in an appealing position. Don't clamp hands
all around the fish and hide it. Check out the pictures in popular fishing magazines. For closeups it's a good idea to remove sunglasses. This is a problem if you or your friends wear prescription sunglasses. You'll have to figure that out yourself. A wid
e smile - after all, you are having fun - tells a story all by itself. And one more thing guys, don't jam the fly rod between your legs - looks really funny. first get the fish under control with a net. Remove the
hook and, if the fish is not tired, you have a few seconds to take a picture or two. Have your friend cradle the trout (usually in both hands) and position the fish to the camera so that it is in the light and in an appealing position. Don't clamp hands
all around the fish and hide it. Check out the pictures in popular fishing magazines. For closeups it's a good idea to remove sunglasses. This is a problem if you or your friends wear prescription sunglasses. You'll have to figure that out yourself. A wid
e smile - after all, you are having fun - tells a story all by itself. And one more thing guys, don't jam the fly rod between your legs - looks really funny.
What type of camera?
Buy the best camera you feel you can afford. Good quality, point-and-shoot cameras are ideal for fishing. They have good lenses, are lightweight, rugged and fit in a large pocket of a fly-fishing vest. For a few extra dollars you can buy a spla
sh-proof or water-proof camera, and for fly anglers it's a worthwhile investment. Sooner or later you are going to dunk it.
All point-and-shoot cameras come with built-in flashes, but look for one that has a "force flash" or "fill flash" that lets you choose flash even when it's bright out-and still give the correct exposure.
Other things to look for are auto-exposure and auto-focusing, DX coding, macro or close-up mode, and remote control or self-timer. Expect to pay $200 to $300 or more for a point-and-shoot with all the toys. Well worth it.
Note:
Whereas you want great fishing pictures, especially of those big 'bows, browns and bass, your primary objective is the safety and care of the fish. Use common sense. If it's a matter of stressing the fish or getting a photo, take care
of the fish. And get your picture later with another less-stressed fish.
Return to Index
Copyright ©1998 Clive Schaupmeyer
Clive Schaupmeyer is an outdoor writer and photographer. He is the author of
The Essential Guide to Fly-Fishing,
a 288-page book for novice and intermediate fly anglers. His photo of a boy
fishing was judged the best outdoor picture of 1996 published by a member of
the Outdoor Writers of Canada. He fly-fishes for trout in Alberta's foothill
and mountain streams and for pike near his home in Brooks, Alberta.
Our Man In Canada Archives
|
