Making Bamboo
By Lou Burhart
I think there are two types of fly fishers. Those that
enjoy the activity on a fairly well-balanced, rational basis – they
are very happy with a rod and reel – one of each will do just
fine – they buy a handful of flies and go out and catch trout or
bass or whatever.
Then there are the type 'A' s – we can't just buy a
handful of Blue Winged Olives. No, we have to count hairs
on the right foreleg and blend a combination of 14 different
natural and artificial substances to get that egg sac dubbing
ball just right. We can't just buy a couple Cortland tapered
leaders – no, we need to buy 26 spools of monofilament and
after sorting with a micrometer to insure that all the sections are
within .0001" of formula, fumble with bloodknots to piece
together 9 whisps into one perfect leader.
We can't just buy more rods and reels – we need to
scratch and claw and plot and connive and even then they are
just not quite right. I could go on and on, but I think you get the idea!
I build bamboo fly rods because there are some
things you just have to do for yourself.
I really enjoy fishing for trout, but like a lot of other
folks, I don't need to catch trophy fish to have a good time.
I really enjoy the whole experience. The scenery and serenity,
the challenge and anticipation, the endless opportunity to learn
more and more about what appears to be a fairly straightforward
pastime. I enjoy tying flies, working with my hands to build
landing nets and fly boxes and other simple things. And now
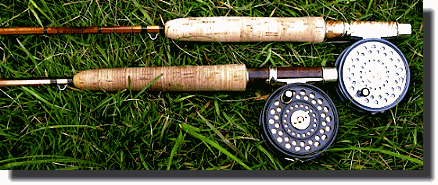
most of all, I really enjoy building and fishing bamboo fly rods.
I have been trout fishing for close to 30 years now - started
on the South Branch of the Au Sable River near Grayling Michigan
1969. I knew right away that I was hooked. What a great outlet for
my somewhat obsessive nature.
I assembled my first fiberglass rod around 1975 and though
that was pretty cool. From there I built another 40 or so glass and
graphite rods until the spring of 1997.
Lightning struck.
I purchased a vintage Orvis Battenkill bamboo rod, followed
up with building the Twin Bridge Midge - 6'6" 4 wt based around a
Partridge blank (pardon me Mr. Winston - there is also a Twin Bridge
in Michigan on the North Branch of the Au Sable system). But I still
wasn't quite finished. I knew that my days of Hi Mod graphite and
high-speed casting were over, but I wasn't happy until the spring of
1998 when I MADE the whole thing.
Fishing around Grayling Michigan is really outstanding
not only because of the rivers but also because of the people.
One of which is Mr. Wayne Cattanach - many of you know him
from the Thursday night Bamboo Chat here on FAOL.
Wayne spends a lot of time around Grayling and conducts
bamboo rod making classes next door to the Fly Factory. Wayne
makes some truly excellent bamboo rods. I was lucky enough to
be able to spend several days with Wayne over a few months time
putting together my first rod, a 7'6" 4 wt parabolic action. Since
then I have finished seven more rods (actually sold five), have orders
for several more and hope to build about 273 for myself.
I was surprised at the ease of gathering the tools,
building the planing forms, binder, furnace and dip tank that
I felt I needed to do a first class job, and finally, pleasantly
surprised at both the appearance and the feel of that first rod.
Someone once said, "Bamboo Rods are things which
dreams are made of." To me, dreams are truly what separate
bamboo from production factory rods. I don't claim to be an
expert on fly fishing history, but I do love the feel of many of
the vintage Dickerson, Payne, Paul Young, Winston and other
bamboo rods I have held. I appreciated the history and dream
of the prior owners and their joy and anticipation while casting
to trout wherever they may have been. I dream of these master
rod makers in their workshops and think they experienced the
same anticipation that I do when they halved the culms and
prepared to flame and split into the strips prior to planing. The
end result is still weeks away and the anticipation is very high
during these beginning stages.
Another aspect of bamboo rod making is the varied
challenges you face during the process. Building a rod is a
series of many different steps, each requiring unique skills.
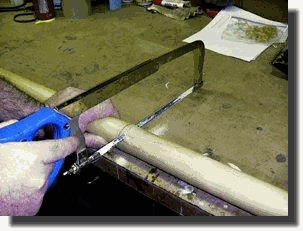
Splitting a 2 1/4 " culm into 24 equally spaced strips is great
fun and really starts the whole process. After some early
straightening, flattening the nodes and laying out the stagger,
you pick up the plane for the first time to rough the strips into
straight triangles - the beginning of the hexagon rod.
 After binding the 6 strips of the butt and each tip
sections, a quick trip through the tempering oven is needed
to reduce moisture, relax the fibers and prepare the sections
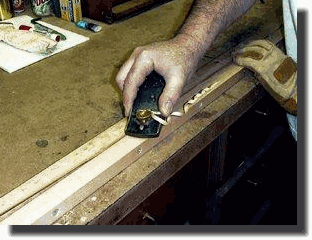
for finish planing. Now it gets interesting. After carefully
adjusting steel planing forms to your desired taper, maybe
the same dimensions used by these past masters mentioned
earlier, you are ready to finish plane and scrape these strips
into very precise tapered 60 degree triangles that will be glued
together to form your bamboo blank.
After binding the 6 strips of the butt and each tip
sections, a quick trip through the tempering oven is needed
to reduce moisture, relax the fibers and prepare the sections
for finish planing. Now it gets interesting. After carefully
adjusting steel planing forms to your desired taper, maybe
the same dimensions used by these past masters mentioned
earlier, you are ready to finish plane and scrape these strips
into very precise tapered 60 degree triangles that will be glued
together to form your bamboo blank.
I should point out that the size of the strips is the
most critical phase of making a rod. The finished tips are
.065" - .075" assembled - this means each of the six strips
are half that size - thinner than the thickness of an old dime.
If done correctly, each strip must be within .001" of each
other. This is one-third the thickness of a sheet of newsprint.
I find that during this phase some soothing music calms the
nerves and helps achieve that Zen state necessary to accomplish
this task - maybe some Hendrix or Willie Nelson.
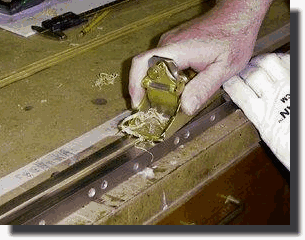
Now its time to glue up, bind tight, and straighten
again and one more trip through the oven sets the adhesive
forever. A little sanding and a rod is born. The rest of the
journey is pretty straightforward. After some lathe time to
prepare the butt and tip sections for attaching ferules, turning
the cork grip and preparing the butt for the reel seat you are
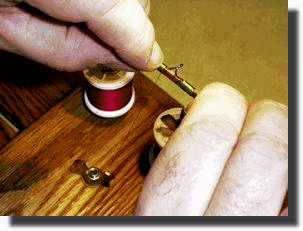
soon sitting at the kitchen table carefully winding silk around
the feet of the guides with a finished rod a mere few weeks away.
I like my rods glossy. This means that the spar varnish
I use has to be applied very carefully in a totally dust free
environment, the final challenge. This is accomplished by
submerging the finished rod into a tube of varnish and then
slowly lifting it out of the tank. This whole affair is located
within an enclosure to prevent dust or evil insects from finding
a sticky landing place. I was lucky enough to find a 14" diameter
plastic sewer pipe to build my dip tank inside of. I was assured
that this pipe had never been used for its intended purpose. It
takes 3 or 4 coats of varnish to complete the rod and sanding
between coats with 1500 grit paper is what produces a flawless
glass smooth surface. A week or two to dry, a light clean up
and there you go.
Some folks would think that this is a lot of work
- sometimes painful and heartbreaking work - but not me.
When first you press the sections together, hold it
and admire the amber glow of varnished bamboo. Then dream
of all the times and the special places where this has happened
before, and finally feel the line load the tip and hear the special
sound of a hex rod being cast - It's the thing which dreams are
of!
~Lou Burhart
|