
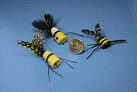
OH, WOW! - ANOTHER DREMEL POPPER FLY?
Decoux was a wealthy man. A reporter interviewed him on his success.
 "Mr. Decoux, what is the secret of your success?"
"Two words"
"What are they?"
"Right decisions."
"Okay, but how do you make right decisions?"
"One word."
"Alright, what is that?"
"Experience."
"How do you get Experience?"
"Two words"
"Which are?"
"Wrong decisions"
Foam poppers are not new. Foam poppers made from scratch are not new. After years of experimentation with failures too grotesque to explain, this method for a Dremel popper fly emerged around Y2K. Of course, it is possible to make a foam popper very quickly, if a rough finish is all you need. Any novice tyer can do this. I'll explain how later. Rough poppers catch fish, but, maybe not as many or maybe you'll feel less bona fide.
 For some tyers, the Dremel serves as a lathe and shaping is done with sandpaper. I was headed that way until I saw a man carving wooden key rings with a Dremel. For the next months, ghastly blobs of misshapen foam were born. More months of getting advice from experts in specialties as varied as chemistry and carpentry finally produced a method for creating good foam poppers with a Dremel tool. I took the experiment to several Conclaves and they were a hit with everyone but the tyers sitting right next to me who had to deal with the noise of a screaming fast Dremel. If you want to try making your own flies, this method won't be the easiest thing you've ever done, but it is actually a lot of fun.
What we're going to discuss is making flies small enough for panfish or large enough for saltwater species. The basics of making the fly are the same, but there are a few issues. For instance, almost no hooks come in all sizes for all species. Also, tail materials will differ significantly for different species. I'm going to give you my secrets and suppliers, which, hopefully, will answer some of your questions.
Hook: For saltwater try Daiichi X742; Eagle Claw 066NF-1 or 202F; Gamakatsu SP11-3L3H or any other 2x-4x long hook. (A long hook is important to make sure you get enough gap for hooking purposes.) For bass, try a saltwater hook or a Mustad 37187 Stinger or Gamakatsu B10S hook and gap will never be a problem. For panfish, one option is the relatively inexpensive Dai-riki #710 (www.bluequillanglers.com ) or the really cheap Mustad cricket hook 3261or 3261D (www.lurecraft.com ).
- Body: Thick closed cell foam (flip flops or play mats) plus sheet foam (fun foam)
- Tail: Any of these: bucktail, maribou, krystal flash, flashabou, grouse, hen or saddle feathers
- Eyes: 3D Stick-on, holographic or doll eyes
- Legs: (For bass/panfish poppers) Silicone skirting or rubber leg material
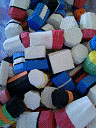
Finding Foam: I would have nothing in particular against flip flop foam. A better alternative is thick closed cell foam available as floor mat material over the Internet. Mats are 5/8" thick and come in 1'x1' or 2' x 2' widths for $1.45/sq. ft. from www.softtiles.com, The mats are smooth on one side and have a rough texture on the other. They may be cut with a mat knife, razor blade or heavy duty scissors. Because you will often be dealing with two or more pieces glued together, cutting one inch (1") squares (or smaller) is the best approach. A few mats will last most folks for years (and you do want to order a few to make shipping costs worthwhile). Closed cell foam sheets (from Wal-Mart, Michaels or Hobby Lobby) are generally 2-3mm thick, are available in many colors and may be easily cut with scissors. Individual 12"x14" sheets frequently go on sale for under $1 each, multi-colored packs are cheaper per sheet and come in various sizes. 6mm sheets are another Internet item and for ninety cents each can be purchased from https://www.craftsuppliesforless.com.
 The Dremel tool: A Dremel tool is the best known brand of hand held rotary tool for which many varieties of bits are manufactured. I recommend two: (1) a corded variable speed multi-pro tool [item #300 – $55] is the model I primarily use. An 8000 Series 10.8V Lithium-ion Cordless [$75] will also produce the variety of speeds needed for shaping the closed cell foam. Tools and bits are available from most hardware stores, but the correct bits are usually limited by the store's inventory. The Internet comes to the rescue with https://www.mytoolstore.com/Dremel/drmindex.html and their vast inventory of rotary tools (corded and cordless) and bits. You want to use a flat grinding stone (#8215). Experiment if you want, but you will always come back to the #8215. When you order, order more than one.
 Preparing the foam body: So far all you've done is buy stuff. Now we start to make stuff. The smaller the intended final product, the smaller the squares of foam. Alternatively, for small flies, a cylindrical plug can be punched out of the foam with something like the hollow punch set from www.harborfreight.com (Item #3838 for $7.99) or their cousins that fit on an electric drill (item#67030 for $9.99) – and harbor freight has 20% off coupons all the time. The largest punches make bass flies. The small ones are great for panfish poppers, or even smaller ones for ant or hopper bodies. This is the very easy rough fly option I mentioned above, because you actually don't have to do any shaping, just punch out the plug. If you do not shape the foam it will still move water and catch fish. [Note: I do occasionally sharpen the punches with #952 Dremel grinding stone by sticking it inside the tip of the punch and letting it do the work. Wear your protective gear for sharpening because you will get sparks.
Glueing: See https://www.flyanglersonline.com/oldsite/articles/bobboese/2010/bobboese20100118.php. To adhere pieces of closed cell foam to each other, you want to use CA (super) glue which instantly adheres foam to foam. Craft stores sell "foam glue" but it performs poorly compared to CA glue.
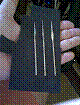
 Assembling the foam: To make a basic fly (one or two color) glue the smooth sides of two ½"-1" squares of foam together. You need only coat one piece of the foam with super glue and squeeze them together. A chemistry professor explained to me that the solvents in super glue actually breakdown the surface molecules of closed cell foam and create a new surface layer permanently adhering the foam pieces together. All I know is that it works fast and sticks forever. Apply pressure for about 10 seconds. To make multi colored flies, sandwich layers of contrasting colored foam. Flies may also be made using nothing but layers of fun foam. When the foam is glued together, use scissors (easiest method) or a razor blade to trim down the corners of the foam stack, thus starting to round off the foam to a cylinder. (Note: don't try to do this with your Dr.Slick fine point scissors. (Get a pair of hair cutting scissors if you can) You now need some form of shaft to impale one end of the foam cylinder so that you can hold it while you carve. I buy small steel crochet/embroidery needles (Boye 7/1.65mm) and use a Dremel grinding bit to hone off the hook end of the needle and sharpen it to a point. The foam should not spin around the needle. Another good option is to buy a set of fine rat tail files from Harbor Freight (or similar store) and stick one of them in the foam. The rough edge of the file keeps the foam from rotating.
Safety gear: At this point you have to imagine you are in a woodworking shop. Safety first!! Put on an apron, pair of safety glasses and bandana/buff over your mouth/nose before proceeding to grind the foam. I probably inhaled enough foam dust to coat a battle ship before someone reminded me it probably was worse than the smoking habit I quit in 1990. Protect yourself.
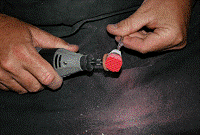 Grinding the foam: Generally, larger flies can be accomplished much faster at a higher Dremel speed because of the amount of foam being removed, but it takes practice to work at the highest speeds. Pierce the foam block exactly in the middle with your sharpened needle until the foam doesn't spin around the needle. If the foam is being difficult, you can pierce it until you get to the flat part of the needle, and then it is almost guaranteed not to spin. Get a good grip on the shaft in the fingers of one hand and the rotary tool in the other, then turn on the Dremel to a speed you can control. (As you get more practice, you can work at higher speeds, but be warned that a mistake at high speed is usually fatal to the fly.) Bring the foam and Dremel bit together in your lap and slowly rotate the needle to make the foam move against the grinding bit.
  (Don't move the Dremel except to get a flat face against the foam.) You can rest the forearm of the arm holding the Dremel against your stomach or thigh to provide more support. As you apply pressure, foam will come off in a fine dust, coating everything in a one foot radius. Wearing a bandana or buff is a REALLY good idea. By spinning the shaft and slanting the angle of the Dremel bit (with your wrist) and/or the foam, you can shape the foam into a smooth cylinder or cone or oval, or anything in between. When the foam is shaped, take the foam off the needle and carefully hold each end of the foam flat against the bit to take the rough texture off of the ends of the foam. The hole you made with the needle will close and not affect the fly. To make the face of the fly concave (for more dramatic popping) you can use a #932or #8175 grinding stone and take a divot out of the face. This step takes great care and control. Flies will work fine without a hollow face. Alternatively, slightly tapering both ends of the body will result in a slider rather than a popper.
Making a hook hole: I am no fan of slicing open the bottom of the foam and sliding in the hook shaft. Why? Because I'm no good at making the slit match up after glue is applied. I prefer to make a hook hole. When you have completed your desired shape, there are three options: for larger flies and big hooks, drill a hole the length of the fly with a high speed tile cutting bit (#562). This again takes great care and control and is best done by putting the fly face down on a solid surface (preferably on more thick foam to protect against "drill through" onto your desk) and (using the Dremel like a drill press) moving straight down. Or, you can heat a bodkin and push the hot needle through the foam. This works well, but extreme care is required because burning your fingers on the bodkin is a distinct possibility, and the foam melts instantly when the hot needle touches it. Wiggling the needle can produce some really ugly results. Or, you can use a small diameter rat tail file and twist and push it through the foam. This will take a while, but can produce good results and is a whole lot safer. For smaller flies merely pierce the foam with a large upholstery needle or small knitting needle. The hole should allow the eye of a fine wire hook to snugly slide through. Note: You want to put the hole off center toward whatever edge you want as the bottom of the fly. Making the hole centered in the foam generally creates a problem with the foam impinging on the hook gap.
Preparing the tail: Tail components are at the whim and option of the tyer. Use a sturdy thread (flat waxed nylon is preferred), lay a layer of thread on the entire hook shank down to the beginning of the bend. Measure your popper head against the hook shaft and mark with Sharpie. This is how far your tail will extend up the shank. For a saltwater fly I start with bucktail and tie just behind the mark. Take several strands of krystal flash or flashabou and tie in. Take additional bucktail or maribou and tie in. Select two or four well shaped long cape or saddle feathers and tie in on either side of the bucktail with curvature of the feather flaring out from the fly for more action or into the fly for a sleeker profile. You don't have to trim the hackle stem too short because you are going to let some of it extend down the hook shaft and cover it with thread. To make a "collar" you can wrap a large saddle hackle over the thread base covering the end of the maribou/bucktail. Cover the remainder of the shank with thread to make a smooth base. Whip finish the thread wraps and trim the thread. For freshwater flies tie in similar, but shorter and less dense tail components. Panfish poppers can have a much sparser and simpler tail, sometimes as little as a few leg strands or puff of maribou.
Combining Parts: Push the foam body over the hook shank to make sure it will fit snugly. If not, make the hole slightly larger or, if it is not snug at all, you will need to build up the materials on the hook shank. You can do this with thread or tie down another feather stem to increase the diameter of the hook shank. Make sure the entire finished shank is covered with thread. Test the foam bodies again, take it off and coat the entire hook shank with super glue. In one quick motion, push the body of the fly over the hook shank until it meets up with the tail. Make sure the eye of the hook is sticking out of the face of the foam. Embedding the hook eye in the foam is embarrassing. Coat the entire body of the fly with Sally Hanson's Hard-As-Nails, fingernail polish, or epoxy. I use Sally Hanson's, and three coats usually do the trick.
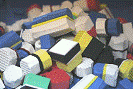
 Legs and eyes: For bass/panfish poppers, rubber/silicone legs may be added. (I use www.jannsnetcraft.com for inexpensive rubber legs.) For frogs, rubber or bucktail legs work well. The easiest way to put on rubber/silicone is(once you have made the hole in the foam) to thread two or more round rubber legs or pieces of silicone skirt through the eye of an upholstery needle. Pierce the foam from the side and pull the legs through, making sure you have threaded them across the hole (so they pass through the hole opening). When you glue the foam to the shaft, you will also be gluing the legs, so they are permanent. Make sure the legs are equal length on both sides or your popper will walk toward the longer legs. Here is a quick phone pic of one of my bass popper boxes. If it helps your appreciation of fly size, this is the largest Bugger Barn made. Note a few of the things you can do with the dremel. On the right you can see a few rounded heads (big sliders) and on the left you will see a red/white and yellow/white dalberg type fly made by forming two cone shapes and gluing them together. The large frogs have bucktail legs and on several flies at the top of the right you will see double monofilament weed guards. Below one of the frogs is a striped bumblebee made entirely of fun foam with a double weed guard and at the bottom right is a lizard with rubber legs and tail. Note that there are a lot of ways to combine colors and tail materials, and perhaps half of the flat faced flies in this box have a concave face (you probably can't see). Most of the eyes on these flies are 3D holographic eyes from fly shops, the rest are doll eyes from a craft store. Do not trust that a "stick back" will actually keep an eye on a popper. Use CA glue.
Time Requirements: When I do these poppers at an exhibition, I take a lot of time carving, but all the pieces are pre-done. When I do them for myself, I use a method that is very efficient. First, I make up a bunch of tails. If I want a weed guard, I make sure to tie it in first. Next, I cut the foam and glue foam squares for several potential flies. If I'm bored, I may glue a LOT of foam. Why? Because my mood may change from fly to fly and I'm particularly bored by tying a box of identical flies. Next I shape several heads in a row. You probably know what size head you want and when you're in a grove doing that size it's easier to keep doing that size. It's a phenomenon of hand/eye coordination that you can repeat a size closer if you are doing several in a row rather than changing sizes from fly to fly. Next, I create holes in the heads and put on eyes and legs, mainly because I want to fiddle with that part of the CA gluing all at one time. At this point you will concentrate on one fly. Coat the threaded shank with CA glue and slide on the popper head. If you are putting on a weed guard you must leave 1/4 inch or so of open shank behind the hook eye. If you are using a big eyed hook, you can run the weed guard through the eye and back toward the fly to tie down. If not, tie down the guard on the shank, fold it back and overwrap. In either case, coat the wraps with SH. Each fly takes about 10 minutes assembly time with this method (not counting prep time). Doing more complicated work, like rounding off a fly, can be much more time consuming, because it's hard. I made a perfectly round fly once just to prove I could, but it was a LONG process and made for a pretty unsuccessful fly.
Storage: Foam will take up more space than you ever imagined. When you start accumulating mats and sheets you will undoubtedly need a plastic tub. Then you discover foam sheets come with sparkle on one side and you have to have some. And then you make up a large batch of potential popper heads and need to store them, but you find a perfect color that's only available in a pack of 50 sheets, and then you glue up some more....
When Gaston returned from lunch, he noticed his clerk's hand was bandaged, but before he could ask about the bandage, the clerk said he had good news.
"Guess what?" the clerk said. "I finally sold that terrible, ugly suit we've had so long!"
"Do you mean that repulsive pink-and-blue double-breasted thing?" the manager asked.
"That's the one!"
"Great!" the manager said, "I thought we'd never get rid of that monstrosity! That had to be the ugliest suit ever made! But tell me, why is your hand bandaged?"
"Oh," the clerk replied, "after I sold the guy that suit, his guide dog bit me."