|
Last time we talked about natural lighting and how to
control it. Many of the same rules apply to artificial
lighting, but in a different way. It's still important
to control shadows and background, but the controls are
very different. With artificial light, you control the
intensity and angle of the light. You also have a little
more control over the background. However, there are some
complexities with artificial light that are difficult to
control.
First, you're going to have more difficulties getting enough
light on your subject for crisp, clear shots when you use
artificial lighting. Natural light is very intense compared
to artificial light, so partial shade isn't a serious problem
and you can control that. However, artificial light requires
direct lighting for the most part, so glare and poorly lit
parts of your subject are a problem. Having a properly lit
background is another problem.
Since artificial lighting is a requirement if you're going to
take photos of artificial flies, we first need to discuss a
few critical issues. For instance, what type of lights will
you use, how many of them are you going to use, what angle
to the fly are they going to be, etc? Believe it or not,
all these issues must be resolved before you can hope to
take quality pictures under artificial light. We'll tackle
them a couple of items at a time.
What type of camera are you using? If you're using film
(either slide or print), you need lighting balanced to that
film and sunlight. Your problems are compounded compared
to the problems you'll encounter with a digital camera.
You can't balance your camera and film to the existing
light, so you must balance your light to the film.
First, you can always use natural light from the sun. Film
is designed to work with the sun's light, so you won't encounter
a color shift from that light like you'll encounter with artificial
lights. I don't know about you, but waiting for the perfect
sunlight and finding a place to use it that's out of the wind
and weather is a real problem for me. If this is your game
though, most of your problems are over if you provide the
right reflectors in the right places to fully illuminate
the subject and background.
Since most of us will be using artificial lighting at some
time or another, and that is the subject of this article;
we need to look at the problem of color shift. Color shift
is a distortion of colors caused by a light source other
than the sun. It concerns the light spectrum and how
different types of artificial light fall into that spectrum.
If you don't know what I mean by light spectrum, look at a
rainbow sometime.
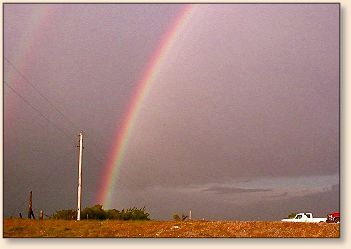
All those colors are equally balanced in natural sunlight
to create the white light that standard film was designed
to use. If your lighting source produces more of one light
frequency than the rest, the results will be a color shift
toward that color on film. God designed your eyes to naturally
balance that color shift out, but the film in your camera will
capture that shift and display it in your pictures.
Incandescent lights (normal and halogen light bulbs) produce
a color shift toward the yellow and orange side of the light
spectrum. Fluorescent lights produce a shift towards the green
end of the spectrum. The Ott light produces light closer to
natural light, but it still shifts toward the green end of
the spectrum because it is a type of fluorescent light. Just
to demonstrate the point, I took some pictures using different
types of light. The fly and the background are the same in
each picture, but the lighting changes in each picture.
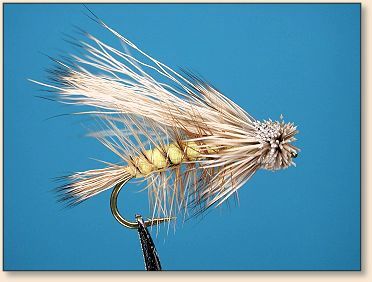
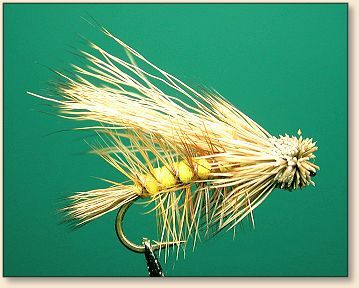
In this first photo, I used a digital camera that has been
white balanced. The colors are very true to what they would
be with natural sunlight.
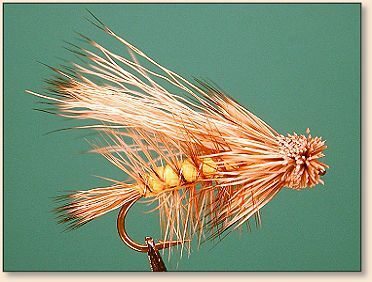
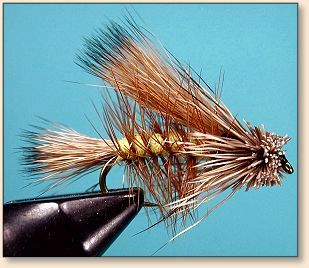
In this photo, I balanced the light of the camera to natural
sunlight (that is how film is balanced), but used standard
incandescent lighting like you would use to light your home.
In fact, the lights are the same as I used in the last photo,
but the camera is color balanced to the sun, not the lights.
This is the same color shift you would see on film if you used
a 35mm camera and either print or slide film.
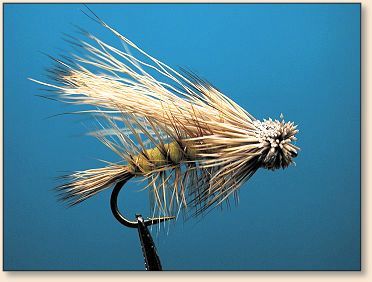
Next, I replaced the incandescent lights with fluorescent
lights. The effects are extreme. You might note that I
didn't have enough fluorescent lights to illuminate the
fly as well as I did with the incandescent bulbs, and the
mirror I used to reflect light on the bottom of the fly
wasn't positioned well, so the contrast and glare are blown
out a bit. But, that is usually the case (most of the time)
with fluorescent lighting.

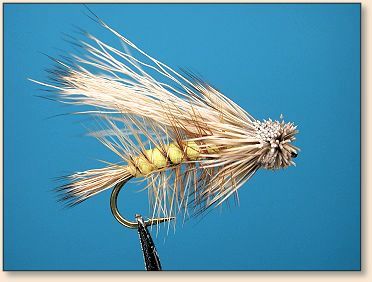
Then I used an Ott Light to illuminate the subject. I adjusted
the mirror to bounce light onto the bottom of the fly and reduce
the unbalanced lighting effect. The Ott Light is more closely
matched to sunlight than the other types of lighting, but there
is still a color shift. The folks at Ott Light were working
on a lighting system for photography, but I haven't heard if
they have perfected it yet. Still, the Ott Light produces
the best natural colors I've found for tying, even if there's
a color shift on film.
Finally, I dug back in my slides from the fly tying series I did
here on FAOL, and found a slide shot of the same type of fly taken
under photo bulbs designed to closely replicate the light waves
of the sun. (Sorry, I couldn't find the exact same fly.) The
background is the same background I used in the first photo you
saw in this article, and the lights are at the same angle. If
you notice, there is still a color shift. I've found that this
is the same type of shift I get with an elaborate flash setup
or a ring light. In the case of the ring light and flash setup,
the glare is more severe and it's hard to properly light the
background.
As you can see, the best results with film came from photo-bulb
lighting, but those types of bulbs have problems. First, they
cost a bundle and don't last very long. I pay about $6 a bulb
for photo-bulbs, and they last roughly two hours of continuous
use. Second, they are extremely hot to use. They produce more
heat than 20 of the regular bulbs, so you can't work very long
under that light. The heat isn't all that great for your camera
equipment either. Finally, they still shift the colors a little.
So far, nobody has produced an artificial lighting system that
accurately reproduces the light of the sun.
Paul Dieter wrote an article for Fly Tyer magazine a few years
ago that detailed a setup that uses a plastic dome and natural
sunlight to illuminate his photos. If you want to know more
about his system, you should either find the article, or write
him directly. He is a regular here and a nice enough guy to
give you some sound advice. Other methods to get good lighting
with natural light involve mirrors, reflectors and white,
reflective poster board. Maybe someday we can get Ronn Lucas
to disclose his setup too. Since that isn't the thrust of
this article, and natural lighting isn't very convenient for
the fly bench, I won't go any further into that subject except
to say that if you want exactly true colors on film, you need
to use natural sunlight to illuminate your subject.
Another problem with artificial lighting is light intensity and
angle, even with a digital camera. Sure, digital has the
advantage of balancing itself to the light source, but you
still need to control the intensity of the light and how it
illuminates the subject and background. This next series of
photos looks at that problem and what is required for good,
crisp photos that are pleasing to look at. Please note that
I balanced the camera's light meter to the available light
before each shot.
First, I turned off all my lights but one, and moved that one
directly overhead. As you can see, this won't work. The
camera's light meter averaged the light so that the wing
is too light and the body is too dark.

Then, I turned on two more overhead lights. The problem is
a little less severe, but it is still a problem that must be
resolved.

Next I moved the lights to the front of the fly and over the
camera. This is much better, but the bottom of the fly isn't
illuminated very well, and there is still a slight problem
with the camera averaging the light read by the light meter.
In other words, this is better, but the top is still too bright
and the bottom is still too dark.
In this photo, I turned on a light on the bottom left of the
camera and fly. As you can see, the lighting is more balanced
and the earlier problem is less severe, but the head of the fly
is still dark on the bottom.
Finally, I turned on a light to the right and below the fly
and camera. Now all the lights are turned toward the fly
and there are very few shadows. This is how I want my fly
photos to look. I am using five lights now. One is directly
above and behind the camera, one is on the upper right, one
on the upper left, one on the lower left and one on the lower
right. All the lights are angled toward the fly and also
provide even light for the background. Notice how many more
details of the fly you can see?
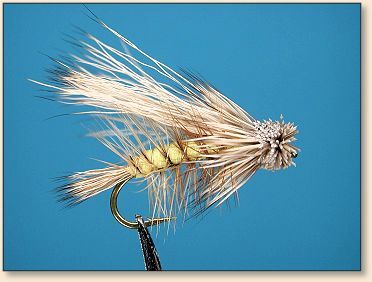
As you can see, good lighting and a color-balancing feature
are both important to good photos under artificial light.
I'll end this article with a couple of shots of the setup I
use to take my indoor photos of flies. You'll probably see
that the flash I used on my camera also shifts the light a
little bit, but the color shift from blue to green on the
background is caused more by the artificial lights I'm
using than by the flash.

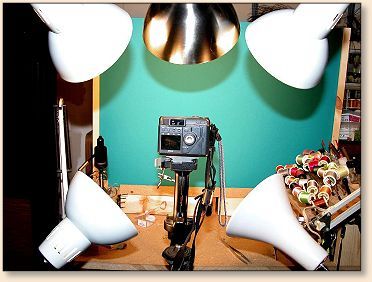
This is a front view of my lighting setup. You can see how
the five lights are pointed toward the front of the fly from
all angles to produce crisp, clear images.

Another shot from a closer angle.
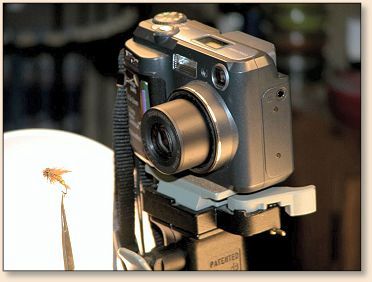
A close-up shot of the front of the camera; and its
relation to, and distance from the fly.
This is the view from the back of the camera. Notice
the position of the lights?
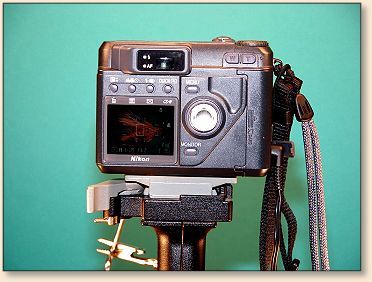
Finally, a close-up view from the back of the camera.
You can barely see the fly on the camera's screen.
That's artificial lighting in its abbreviated form. There
is a lot more to learn, but this will give you a good idea
of the requirements and problems involved with this type
of lighting. It's also a good start on the road to better
photos.
Next time we'll look at focus and how it is different with
macro photography. ~ AC
|