|
If you want good close-up pictures, lighting is something
you need to understand and control. That doesn't mean you
have to control the intensity of the sun or anything like
that, but it does mean you have to control the angle of
the light and how it effects the light meter on your camera.
If you don't control the lighting situation, your close-up
photography will be hit and miss at best.
I don't think every shot will turn out perfectly. I rarely
get more than a couple of really good pictures from a standard
roll of 36 exposure film, and the results with digital cameras
are pretty close to the same. Focus (something we'll talk about
in a later article) and lighting are very important items that
must be controlled if you want good pictures, but you'll still
have plenty of shots that just don't turn out well. Use those
mistakes to learn more about your equipment and how it works.
Practice is very important to success.
We'll discuss outdoor lighting first. You might think you don't
have any control over that situation, but in some ways, you have
more control over natural light than you do over artificial light.
You can control the angle better, and the shadows and background
can be manipulated easier. Since natural light is often brighter,
you usually get a faster shutter speed, so you can reduce the
aperture opening for greater depth of field, and still have
less need for a tripod. There are a few other tricks that
can help too.
First, you need to control the shadows. Allowing a shadow to
dissect your subject will ruin the picture every time. Rotate
that branch until the insect is in the light you want. While
you're at it, hold that branch so the wind can't make it wiggle
and ruin your focus. Maybe bending the branch will produce the
best light. Take control of the situation and create the best
lighting you can.
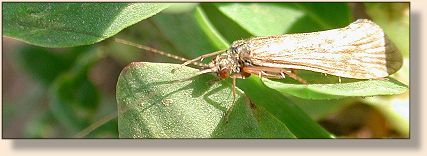
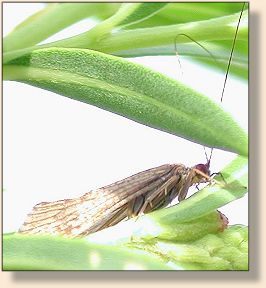
The focus on this caddis is fair, but the shadow on the back
of the wing won't work. Obviously the camera measured its
light from the dark area just below the insect, so most of
the fly is too light. The background is fair, but it would
look even better if the light was measured on the insect and
not the background. Bending the branch to the right angle
could have improved the background, changed the measured
lighting, and removed that shadow.
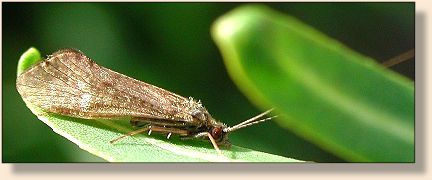
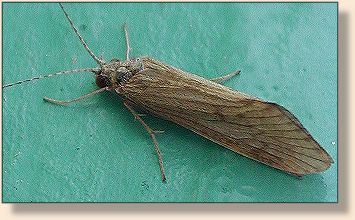 This caddis in the shade on a bridge railing. The focus is right,
the details are ok, but that painted surface isn't at all
interesting to look at. Once again, the lighting was measured
off the background, but this time the results are a caddis
that's too dark. Using one of those reflective window shades
you put in your windshield would have reflected enough light
to fix the dark insect and maybe save this photo (except the
poor background).
This caddis in the shade on a bridge railing. The focus is right,
the details are ok, but that painted surface isn't at all
interesting to look at. Once again, the lighting was measured
off the background, but this time the results are a caddis
that's too dark. Using one of those reflective window shades
you put in your windshield would have reflected enough light
to fix the dark insect and maybe save this photo (except the
poor background).
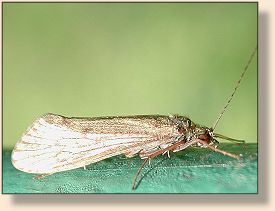
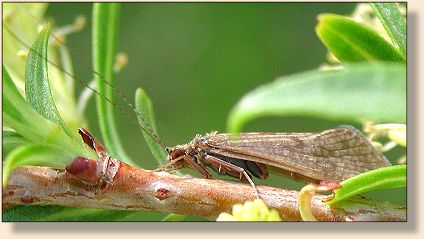
The caddis is in focus, the light metering is ok, the background
isn't bad, and even the bridge railing under the caddis isn't
too much of a distraction. However, the angle of the light
is producing a nasty glare off the wing of the caddis. A
soft shade like a cheesecloth net would have subdued the light
enough to soften that glare. A thin cloud will also subdue
the light well, but still allow good lighting for photography.
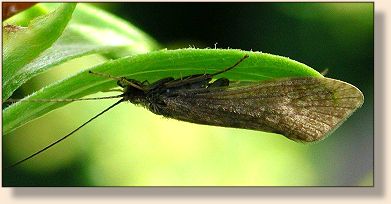
Throw this one away. The background won't do at all. There
is a shadow on the insect, and that is where the light was
metered. Everything else is too light to work. It will take
a lot of branch bending and maybe a soft shade to improve this
picture.
Control the background. Move the camera's angle around to get
the best background. Deep green leaves and such are almost
always pleasing to the eye. Painted bridge rails just don't
look right. Slip a twig under the insect and try to get it
to crawl onto the twig so you can move it to a better location
for light and background. Use your view through the viewfinder
to choose the right location and angle. The background can
make or break any photo.
In this picture, I pulled the branch down carefully until it
was horizontal and the background was right. The bonus was
that I was able to pull it into the subdued lighting of partial
shade so the colors are more full and there aren't nasty shadows
and glare. The green background is delightfully out of focus
to give depth to the picture adding a third dimension.
Controlling the branch that way helped overcome the wind and
allowed me to carefully manage the camera's light meter and focus.
By moving the branch around, I was able to place the direct
light of the sun above and behind this caddis to remove the
reflecting glare from its wing. By using direct light this
way, I was able to get a darker and deeper green background
that focuses your attention on the subject. A bonus is that
the direct light is brighter, so shutter speeds are faster
and there is less chance for a blurry image due to movement.
Experiment with backlighting. Sometimes the best picture is
a silhouette. Super-detailed photos are nice, but nothing
sets a mood better than a silhouette. I've had just as many
oohs and ahhs at slide shows over good silhouettes as I've
heard over detailed photos that showed every muscle and hair
on an insect. There's just something about a good silhouette
that can't be found in any directly lit photo.
Here I used the natural shade of a leaf and the selected background
of a well lit leaf to create a silhouette of a caddisfly. The
partial lighting of the wing provides just enough detail to
identify which variety of caddis we are looking at, but the
est is merely outlined on the lighter background. Move your
camera or subject around until you get the right background
for this type of shot.
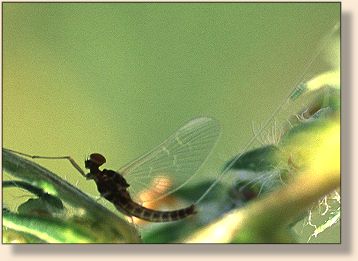
This baetis spinner (mayfly) photo was captured on slide film.
I eased the branch it was on down and over into the partial
shade of another branch and in front of a well-lit branch.
The branch in the background is out of focus to provide depth
to the photo. The lighter background illuminates the veins
in the insect's transparent wings and tails, while the body
is a dark silhouette of a very small mayfly.
Many insects are transparent in bright light. Placing the
light (or in this case, the subject in relation to the light)
at the right angle will allow the light to shine through
the insect's body. More than a mere silhouette, it
illuminates details that would otherwise be lost to
direct lighting.
If you decide to use a 35mm camera, invest in a monopod to
help you hold the camera steady while you move things around
for a better picture. A monopod will really help you minimize
shake that can blur what would have been a great photo.
Monopods are much lighter and easier to use than tripods,
and they allow a greater amount of flexibility to capture
the best angle and background.
Digital cameras are usually much lighter and more compact
than 35mm cameras, so holding them in one hand while you
manipulate the image with the other hand is easier. However,
a monopod will ease the weight your arm must carry and help
you steady the camera for crisper shots.
Hopefully you can see something I have hinted at all through
this article. Good photos are made, not just captured.
Your best close-up photos will be the ones you made happen
by controlling the elements of the photo like background
and lighting. You may spend hours just to capture one or
two great photos, but that sure beats spending hours just
to capture a hundred poor photos. Practice is the only
way to learn how to get the best photos with your gear,
but knowing how to create those photos will save you many
hours and dollars. It's worth the time and effort to
control the picture before you snap that shutter.
Next week we'll look at artificial lighting and how to
get the best results. ~ AC
|