|
Due to popular request, I'm going to take a break from
the dull and boring stuff I write each week and do a series
of columns on close-up photography. It seems there are
number of readers who think they want to learn stuff like
fly tying and such, to include photography of tiny subjects.
It also seems that some of the same people think I know
something about that subject. I'm not really sure this
will be any less boring to you than the stuff I usually
write, but I'm willing to give it a try.
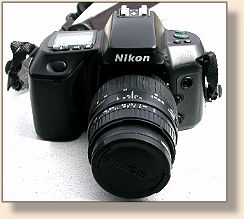
First of all, if you want to take pictures of something,
you need a camera. If you want to take pictures of
something tiny, you need a camera that works in a type
of mode called macro. That usually means either a digital
camera or one that can use interchangeable lenses (called
Single Lens Reflex (SLR)). Granted, some cameras that don't
have interchangeable lenses have a macro mode, but they
usually won't focus close enough to something as small as
an insect or artificial fly to do a lot of good. That's
why you need something that has lenses that can be changed.
 I'll discuss digital cameras and their benefits/drawbacks
in a later column. Right now, I want to focus this article
on a type of camera known as a 35mm SLR camera. That's the
type of camera that's most often used in outdoor photography
and macro photography. What makes this kind of camera so
adaptable to macro photography is the fact that you can
change lenses or add accessories to your lenses that bring
tiny stuff into focus at a close range. All you need is
the camera body and some lenses adapted to the task you
have in mind.
I'll discuss digital cameras and their benefits/drawbacks
in a later column. Right now, I want to focus this article
on a type of camera known as a 35mm SLR camera. That's the
type of camera that's most often used in outdoor photography
and macro photography. What makes this kind of camera so
adaptable to macro photography is the fact that you can
change lenses or add accessories to your lenses that bring
tiny stuff into focus at a close range. All you need is
the camera body and some lenses adapted to the task you
have in mind.
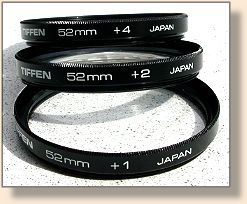
The first and least expensive way to get close-up pictures
of tiny stuff is to add magnifying filters to the end of your
camera lens. These filters can be purchased in just the right
size to fit over or in the end of the camera lens you already
have on your camera. They will magnify the image your camera
sees, and allow you to focus the lens closer to your subject
than you could normally focus. Pretty easy, huh? Well, not
that easy.
Magnifying filters have several drawbacks. First, they create
an image on film that might be sharp in the center, but is almost
always fuzzy and out of focus around the edges. The additional
layers of glass cause a slight distortion of the image and
reduce the sharpness of the picture. Added lenses reduce
available light so you'll need more light and a good tripod
if you want pictures that are even slightly close to sharp.
Another problem you'll encounter is something called depth
of field. That is the space of air that's in focus in front
of your lens. As you move your camera closer or further
away from your subject, the image will come into focus and
go out of focus. That thin slice of air where the image is
in focus is called depth of field. The more you magnify
the image, especially with magnifying filters, the thinner
that depth of field becomes. Depending on the lens you're
using, and the types and numbers of filters you're using,
that slice of air can be reduced to less than a millimeter.
That means the legs on that insect or the hackle closest
to you on that fly you just tied is in focus, but the body
and everything else is fuzzy.
You can move farther away from your subject before you focus
the lens to increase the depth of field, but then you reduce
the size of your image and the details in the resulting photo
you want to take. You can reduce the size of the lens's
aperture (the small opening in the lens that the image
passes through) to increase the depth of field somewhat,
but that sometimes reduces the sharpness of your photograph
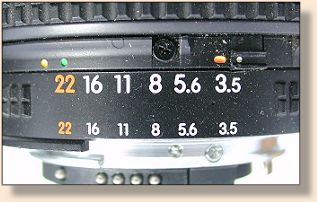
proportionately. By the way, reducing the size of the
aperture (setting the lens to a higher aperture (F-Stop)
number) always increases the depth of field, but on the
outside ranges of the aperture settings the image is the
least clear. The best aperture setting for clarity is
somewhere in the middle like F8 to F11, but that often
doesn't provide a usable depth of field.
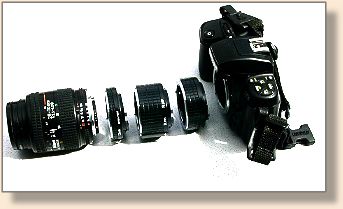
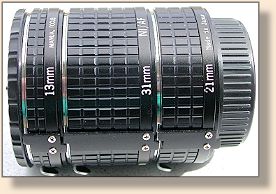 A better way to bring that image in close for photography
is to add a bellows or some extension tubes between your
camera body and the lens. That moves the aperture of the
lens further from the film, thus increasing the size of
the image; and improves the depth of field slightly over
what you get through magnifying filters. It also keeps
the image sharp all the way to the edges, unlike what
magnifying filters do to your image. The more powerful
your lens, the further from the lens the image will come
into focus, and the larger that image will be; but also,
the thinner the depth of field.
A better way to bring that image in close for photography
is to add a bellows or some extension tubes between your
camera body and the lens. That moves the aperture of the
lens further from the film, thus increasing the size of
the image; and improves the depth of field slightly over
what you get through magnifying filters. It also keeps
the image sharp all the way to the edges, unlike what
magnifying filters do to your image. The more powerful
your lens, the further from the lens the image will come
into focus, and the larger that image will be; but also,
the thinner the depth of field.
Another drawback to either of the above mentioned ways to
get close to your subject is the fact that either method
reduces the light that gets to the film, so the shutter
speeds will be slower and the need for a good tripod will
be greater. Any movement will create a fuzzy picture.
You'll need a lot of light if you want anything close
to sharp pictures.
If I lost you with the word aperture, you can see what
I mean if you conduct a small experiment. Take a small
nail and punch a hole in a piece of cardboard. Then,
take another, larger nail and punch a bigger hole in
another piece of cardboard. The diameter of each hole
is the aperture that any image will pass through. Now,
place a subject in a well-lit area, grab a piece of
waxed paper or tracing paper and cover your head and
the paper with something dark. Next, place the hole
in the cardboard fairly close to your subject. Now,
move the waxed or tracing paper behind the cardboard
close enough to the hole that any image passing through
the hole will appear on the paper. You will notice that
the (inverted) image passing through the smaller hole
will be darker, but will be in focus at more variable
distances from the hole (aperture) than the image passing
through the larger hole (aperture). You will also notice
that you'll have to place the waxed paper further from the
cardboard with the small aperture to get a good focus, but
the image will be slightly larger. That is the effect of
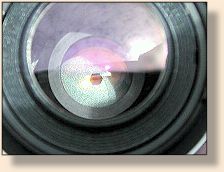
aperture. You can see the aperture of a real lens in the
attached photograph.
Perhaps the best way to capture a small subject on film
is to use a lens dedicated to macro photography. This
is also the most costly way to do it. Macro type lenses
offer the greatest image control and best image quality
of the three methods of taking close-up pictures. They
also pass the most light to the film and give you the best
depth of field possibilities of the three methods.
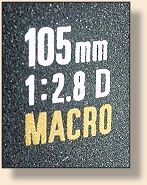
Unfortunately, they cost money, and a good macro lens
can cost a bundle. The 105mm macro lens I used for some
of my intermediate tying series photography costs roughly
$600 at most photography stores. Some lenses can cost a
whole lot more. I guess you get what you pay for, but
the cost isn't something to take lightly.
Another consideration you need to think about when capturing
images on film is something called grain. All types of film
are made with a substance placed on that film to capture the
image and store it for developing. The faster the film,
the less light you need, but the larger the grain of the
substance that captures the image will be. That means you
want a slow film if you want sharp pictures that don't
appear coarse or grainy. Faster film also has less color
density, so pictures taken on fast film won't have the
brilliant colors of pictures taken on slow film.
You should be aware of the fact that slide film offers
better color quality than print film. The process used
to transfer images from color print film to paper almost
always produces a color shift that, depending on the
quality and care of the machinery and person developing
the film, can lead to colors that aren't true to the item
you took the photo of. Some print labs will have a color
shift to the blue side of the light spectrum, and others
will shift towards the red side. Many labs will blow out
the hot colors like red and orange and subdue cool colors
like green. The resulting photo won't be true to the colors
and shades of the subject. This is especially true with
fast labs like one-hour shops use. If you want better
prints, plan on paying substantially more for quality
developing than the fast labs cost. Slide film doesn't
have the color shift problems that print film has; at
least, not as often.
As you look at my fly tying series, the beginner series
was photographed using a telephoto lens and extension tubes
with print film. The intermediate series is where I shifted
to a dedicated macro lens, and near the end, I started using
slide film after I purchased a slide scanner. You'll see the
difference each upgrade had on the quality of the pictures you
look at. The advanced series has been photographed using a
(good, costly) digital camera.
We'll discuss digital photography next week. See you then.
~ AC
|