Fly Of The Week

Previous Flies
Fly Tying Terms

Crazy Legs: Hand-Crafted Hopper & Cricket Legs
By Richard A. Lewis

In the summer of 2004 I developed a new process for making realistic hopper and cricket legs. I call them Crazy Legs. Just what are Crazy Legs? Crazy Legs are realistic terrestrial legs that are cost effective and easy to make from commonly available materials. I found that "Crazy Legs" looked and felt just like the real deal-even sounding realistic when they went "splat" onto the surface of the water. Lastly, when used on my favorite Hopper and Cricket patterns, the hand-crafted "Crazy Legs aided me in catching some very respectable fish. I was really excited about this development and even though for a while these crazy little legs just might be the best hopper legs ever.

Just about the time that I had the process for making the "Crazy Legs" worked-out and running smoothly, I read a news release on the introduction of Wapsi Fly Inc.'s new synthetic "Hopper Legs." Uh oh, was my better mousetrap outdated already? Curious, I ordered some of the new rubber "Hopper Legs" through Orvis and compared them to my newly created "Crazy Legs". I found the new commercially marketed legs to be very interesting and useful! They are a great innovation to be sure, and are patterned after and molded from actual hopper legs. However, my own "Crazy Legs" will "stand-up" proudly against the commercial product in many respects.

Notes: The store-bought hopper legs are supplied molded on a "tree" and are linked together in pairs. In order to use them connected in a pair for ease of positioning and tying them in, you'll need to strap them onto your fly from the underside. If wrapped over the top of the fly body, they will be oriented backwards. Also-if used connected as a pair, the size of the fly will be limited to a small hopper-a size 10 or 12. Otherwise, when tying a larger, or bulkier hopper you'll need to separate the "Hopper Legs" legs and bind them in on the sides of the fly individually. The rubber Wapsi/Orvis "Hopper Legs" are slightly buoyant. They come in three solid colors and in one size. These commercially marketed "Hopper Legs" are relatively costly: priced at around $0.33 per leg.

Crazy Legs are made from standard, hollow shrink tubing. Therefore, once crimped and sealed, they are buoyant. Shrink tubing is sold in coils, or in 36-inch, straight lengths for around a dollar, as shown above. Crazy Legs can be made in any size or color and are constructed using common tools. To make these legs yourself, you'll need scissors, a lighter/or alcohol lamp, and a pair of needle nose pliers with smooth jaws. Your net cost, not including your labor, will be approximately $0.04 (4 cents) per leg or less. You can vary the size and color of the Crazy Legs to match the size and color of the terrestrial fly you are making. For this example, I am making legs for a pattern that I have named the "Electric Cricket." This cricket pattern is tied on a size-8, Daiichi style 1280 dry fly hook.

Instructions Crazy Legs:

    1. Start out by cutting a 2-½ inch length of 1/16" diameter black shrink tubing. Hold the shrink tubing by one end and center it over a flame until it begins to deform as shown. Work well above the visible portion of the flame. Move the tubing laterally to shrink about an inch of the piece of tubing. This is done in a matter of seconds. Don't rotate the shrink tubing. You want the resultant tapered shape formed by heating it from the underside-only. A little experimentation will be required to master this technique. Practice makes perfect.

    2. Next quickly grip both ends of the tubing and carefully stretch the softened tubing and elongate it about one more inch in length. The tubing will "neck-down" as shown. Don't pull too hard or stretch it too far. Perform the stretching and move quickly to the next step without allowing the tubing cool off substantially.

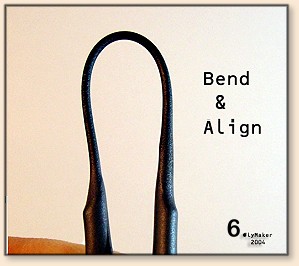
    3. Working quickly, orient and bend the pre-stretched tubing into an arch as depicted. Match-up the base of the legs evenly at the tapered sections. Proceed along to the next step with vigor.

    4. Using the pliers, clamp, apply tension and then crimp a flat spot in the middle of the arch. This creates the footpad for both legs. If you have worked quickly enough, the tubing is still warm enough to seal and be crimped flat. If, on the other hand, the tubing has cooled, simply touch the flame lightly to the area momentarily. Then immediately re-crimp the footpad portion of the arched tubing to achieve a flattened cross-section profile. Eventually you'll gain enough speed with this process to be able to heat, stretch, bend, and crimp the legs a semi-continuous operation. It takes a little planning and some practice.

    The above image shows the properly flattened footpad area that will become the Crazy Legs feet. Note that the bend was made with the heated, flame-shaped portion of the tubing positioned on the outside of the bend.

    5. Separate the two "Crazy Legs" by snipping the flattened portion of the tubing through the center using sharp scissors.

    6. Optional - Snip the foot pads longitudinally one or two times to create toes. It helps to have sharp, serrated scissors and to also use a magnifier to help accomplish this optional detail task.

    7. Using your fingers, orient and fold the tubing just behind the area where it necks-down to form the knee. Once you have it formed correctly, hold it steady and lightly touch a flame to the folded elbow. It only takes a touch of heat to make this bend stay put. If too much heat is applied, the leg will wilt. Brush the elbow with flame and adjust the shape and amount of bend in the lower leg until you get the desired result. Hold it in shape until cooled. I try to mimic the high angle of a hopper's legs at rest. The legs can also be made with less of an angle. The style of the leg that you make will depend on the insect you are imitating.

    8. Heat the open end of the upper leg. Shrink it back until the length is sized to lower leg's dimensions.

    9. While the leg is still hot, quickly crimp the end of the leg to seal and shape it. Put a flat on it that will allow it to be tied-in along the side of your fly. Cant, or angle the flat area upwards and also: either inwards, or outwards in order to make either left or right-hand legs. If you don't angle the legs inwards/outwards at the appropriate angles to create dedicated "left" and "right" legs, the legs will flare out from the sides of the fly when tied-in. This unwanted configuration would likely cause your fly to be hard to cast effectively. Recap: The motions to perform the last heat forming operations are: 1) Pinch the end of the tube flat, 2) tilt it upwards slightly at a moderate angle, and 3) toe the flap inwards towards you (Left Leg), or outwards away from you slightly (Right Leg). Hold the formed leg in the final position for a few seconds until the tubing has cooled and is heat-set. Trim any excess material from the flattened ends of the legs. You need only a short "flat" on the end of the Crazy Leg in order to effectively bind it to the fly body when you are tying your flies.

The above image shows the completed, left "Electric Cricket" leg.

It doesn't take long to make a bunch of these "Crazy Legs" once you get going. Be sure to work in a well-ventilated area. There are over 100 "Crazy Legs" (50 Pair) in this pile. Notice that I have opted for the toes on all of these Electric Cricket legs.

The Wapsi/Orvis "Hopper Legs" come in one size, three colors and are shown on the left side of the imaged group legs above. The "Crazy Legs" can be made in a variety of colors, and these colors are only limited by your imagination. Along with the standard available colors that shrink tubing comes in, you can also use clear shrink tubing and then fill the clear tubing with flash strands. Several of the Crazy Legs shown in the group above (upper right) are made with clear tubing over Mirror Flash strands of various colors and hues. These see-through legs light up wildly in sunlight.

Above: The commercial Orvis product (left) shown along side of three (3) bench-made "Crazy Legs"- shown on the right. The tan "Crazy Leg" was made using white shrink tubing that was colored tan with a ChartPak marker. The next two Crazy Legs to the far right were made using clear shrink tubing with brown, and then green strands of Gliss N Glo flash material placed inside of the tubing prior to thermally forming these legs.

Above: Handmade Tan Crazy Leg (Left) and Olive, Orvis-brand, Synthetic "Hopper Leg" (Right). The Crazy legs can have a more realistic coloration and have a shape close to that of a real hopper, or cricket's leg. All that it takes is a little effort on your part. With a little practice, you can make realistic legs for all of your terrestrial patterns.

The Electric Cricket pattern tied using" Crazy Legs." It looks realistic and draws serious strikes from big fish.

"Crazy Legs" are buoyant. "Crazy Legs" can be sized to match any color terrestrial pattern simply by using the appropriate diameter shrink tubing and thereafter coloring them to match. "Crazy Legs" are easy and fun to make and cost just pennies per pair. There is just something special about making a fly component all by yourself that adds to the enjoyment of fishing a hand tied fly. Give these crazy little "Crazy legs" a try.


~ Richard A. Lewis (FlyMaker)


For more great flies, check out: Beginning Fly Tying, Intermediate Fly Tying and Advanced Fly Tying.


[ HOME ]

[ Search ] [ Contact FAOL ] [ Media Kit ]

FlyAnglersOnline.com © Notice