
1. Start by wrapping the tying thread back to the bend
of the hook.
 NOTE: On the original fly pattern the hook
size was in the 8 to 10 range. Feeling that this size
of bug was to large for the fishing in the areas I like
to go to, I started tying this fly on the smaller hooks.
NOTE: On the original fly pattern the hook
size was in the 8 to 10 range. Feeling that this size
of bug was to large for the fishing in the areas I like
to go to, I started tying this fly on the smaller hooks.

2. The first thing is tie on the peacock herl for the
shellback. Take four the strands of peacock herl and
carefully bend around the tying thread as shown.
NOTE: The original fly pattern called for
two pieces of peacock herl doubled over the thread to
give a total of four strands. To me the shell back
looked more like a strip down the back so I doubled
the amount of peacock herl to give the fly a little
larger shellback or wing case.

3. Pull the peacock herl tight against the tying thread
and slide it against the hook.

4. Secure the peacock herl by a few wraps of tying
thread. Once in place you will have eight strands
of peacock herl tied out the back of the hook. This
will be trimmed, formed, and used as the shellback later.

5. Prepare the grizzly hackle as shown and tie onto hook.
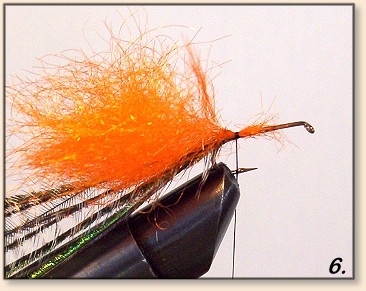
6. Now it is time to tie on the body. Take a small
clump of dubbing and form a small point in it and tie
to the hook.
NOTE: For those tiers out there who are shy
about using dubbing, bright orange chenille could be used
as a substitute. Matter of fact when I was first shown
this fly it was tied this way. I have chosen to use
dubbing instead of the chenille to give the fly a sheen
sparkle look.

7. Take the clump of dubbing in your fingers and twist
it in a counter-clockwise direction forming a dubbing
rope. Twisting the dubbing in this direction to form
the dubbing rope will keep the rope tight as it is
wrapped around the hook to form the body.

8. Wrap the dubbing rope around the hook to form
the body. Make sure to stop the body and remove
excess material just before the eye of the hook
to allow room to tie off remaining materials and
to form the head of the fly.

9. Wrap several turns of tying thread around the end
of the body to secure the dubbed body in place. Now
wrap the prepared grizzly hackle up the body. Just
before making that final turn, strip away a bunch of
hackle fibers leaving just the stem of the feather.
Make the last turn of the grizzly hackle and tie off
the hackle at the bare stem. Clip off the excess hackle.
Doing this will keep unwanted hackle fibers from poking
out the finished head and it will keep the head of the
fly smaller too.

10. Take a drop of head cement glue and place it on
to the peacock herl at the butt of the fly. Doing
this will strengthen the weak point of the shellback
and keep the peacock herl from breaking as it is fished.

11. Pull the peacock herl over the top of the fly,
trying to span out the herl, forming a wide shellback
on top of the fly. Secure the peacock herl in place.

12. Trim off excess peacock herl and form a small
head with the tying thread.

13. Whip finish the fly head.

14. Trim off the tying thread.

15. Put a drop of cement on the fly's head.

16. Finally this last step isn't completely necessary
but I like to add a small drop of head cement to the
shellback to harden and lock the peacock herl in place.


