 |
 Floating-Head Shad |
|
|
Materials for the Floating Head Shad
Thread: Danville 6/0, white Body: Enrico Puglisi Sea Fibers, Grey for the top and white for the bottom. Head: 2 ml craft foam, white, trimmed in a valentine shape and sized to the fly. Eyes: Prismatic Stick-On Eyes Details: Prismacolor Markers, Cool Grey, Red and Black Misc: Lock-Tite Brush-On Super Glue, 'Hard As Hull' Head Cement
 1. Start your thread and wind back to the last 1/3rd of the shank. Select a sparse bunch of white EP fibers and straighten them out.
 2. Fold the fibers doubled over and straighten them again.
 3. Invert the hook in the vise and tie the hank to the shank at mid-point.
 4. Pull the forward part of the hank back and tie it down. Wrap the thread forward 1/4" and turn the hook over.
 5. Now tie in a sparse Hank of Grey EP fibers on top the same way as the white.
 6. Double the front half of fibers over and tie them down. Move the thread forward 1/4" and invert the hook again.
 7. Tie in another sparse hank of white fibers just like the first. Double them over, tie them down and move the thread forward, invert the hook‚
 8. ‚and continue with the grey fibers on top the same way as the others.Keep alternating top and bottom until you get about 2 hook eyes from the front of the hook.
 9. Still going‚
 10. When you get to the front, finish with grey fibers. Then coat the thread with super glue for about 5" and quickly wrap it to form a 'head'.
 11. Allow the glue to set for about 1 minute, then clip the thread. You're done with it.
 12. Coat the wraps with 'Hard As Hull' head cement.
 13. Take your scissors and cut through any loops in the fibers on both top and bottom.
 14. With a small moustache comb (or what ever you like using), comb out all the loose fibers. I save them for dubbing.
 15. As you comb out the loose fibers, shape the fly into a 'shad' shape.  16. Take your scissors once again and trim the fly to shape, cutting any unruly fibers that insist on sticking out. It doesn't have to be perfect. In fact, it's good to leave a few short fibers sticking out here and there. It gives the fly a bit more action.
 17. Continue trimming, bearing in mind it is better to trim long and ease up on the shape than to take off too much.
 18. This is sort of what your body should look like at this point.
 19. Cut a 2" x 2" square from a sheet of white 2 ml. craft foam. You can use 3 ml or eve 4 ml if you want more floatation. 2 ml. keeps this size fly sort of in a 'neutral buoyancy state so that it glides through the water easily.
 20. Fold the foam square in half.
 21. Cut out a 'Valentine' just like you did in Elementary School, about ¾ or sized to your fly. If you cut it too big, it's easy to trim down. If you cut it too small, you will have to start this step over.
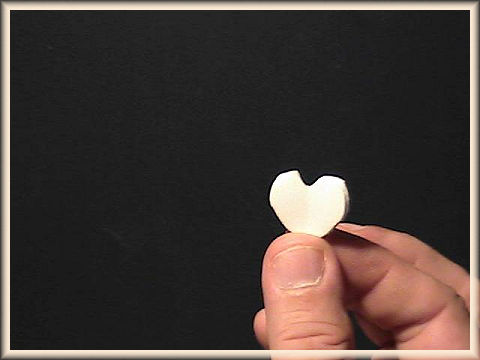 22. Your 'Head' should look something like this.
 23. The next two steps must be done quickly, so have your gear handy. Coat the top and sides of the front of the fly with super glue…  24. And quickly fold the head over the top of the hook, cut-side down. Do not compress the foam, and be careful not to get glue on your fingers.
 25. You just want the foam to stick to the fibers, not to itself. If you stick the foam to itself, the fly may ride sideways in the water. It should look something like this.
 26. Allow the glue to set for 1 minute. Take a grey Prismacolor Marker and color a dark strip on top of the head.
 27. Take a red Prismacolor Marker and draw in the gills on the back of the foam. Do both sides.
 28. Take a black Prismacolor Marker and make a 'Shad' spot one-third of the way down the body, about where a lateral line would be. Do both sides. I know the spot looks sort of big on this one, but I have noticed that I get more strikes with bigger spots. I don't know why. You can make yours however you want. You can even omit this step if you want to.
 29. Attach a pair of 'Stick-On' eyes, one to each side.
 30. Coat the eyes with 'Hard As Hull' head cement for added durability.
 31. The finished Floating Head Shad!
For more great flies, check out: Beginning Fly Tying, Intermediate Fly Tying and Advanced Fly Tying.
|
[ HOME ]
[ Search ] [ Contact FAOL ] [ Media Kit ]