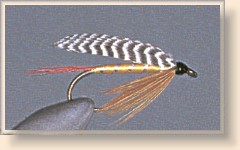
Fly Of The Week
The Professor
Previous Flies
Fly Tying Terms

The Professor
By Dick Talleur

Attractor - that's an interesting term, isn't it? It refers to those flies that don't specifically resemble a particular item of fish food. But to whom are they really attractive - the fish, or us? Let's face it: This is a totally homogenized expression. Can you imagine a big old trout scrutinizing some garish bit of fluff and saying to himself, "Wow, that's a great-looking attractor pattern; I'm going to eat it!" No; fish aren't connoisseurs, they're simply predators. If they go for a fly, it's because they're hungry, and they think it's something good to eat.

The interesting and, in fact, miraculous aspect of all this is that fish often do go for attractor patterns. Sometimes they work when the best hatch-matchers fail. Then there's the Atlantic salmon - for that matter, the Pacific strain as well. These fish aren't eating during their migratory excursions into fresh water, so why would they want to take a fly of any sort? Many theories have been offered, yet we still have nothing more than empirical knowledge. It's an eternal question, and frankly, I'm glad.

The Dressing - The Professor

Hook:   Daiichi #1560; IXL wet-fly.

Hook Size:  Size 10.

Thread:  8/0 Uni-Thread or comparable; any pale color and black.

Tail:  Bright-red-dyed rooster hackle.

Ribbing:  Fine gold Mylar or similar tinsel product.

Body:  Yellow floss.

Hackle:  Brown hen or soft rooster.

Wing:  Barred mallard flank feather.

Tying Steps:

1. Tie on about 30 percent of the shank length rearward of the eye with five or six wraps, then trim off the thread tag. You'll be tying in the tail at this point. . .

2. Select a large red hackle feather from the edge of the cape or from a strung bundle, if that's what you happen to have. The longer the barbs, the better. Barb-gather a bunch . . . Hold the barbs over the hook, and gauge proportions for the tail, allowing an appropriate amount - about equal to the shank length - to overhang the bend.

3. Tie in the bunch on top of the hook with a couple of pinch-wraps, then secure with a series of neat, firm wraps, working rearward. With your left hand, hold the bunch at a slight angle above the hook, while pulling from the rear. Wrap all the way to the bend. This method saves you two layers of thread; the only requirement is that the tailing barbs be of sufficient length to facilitate the process.

Steps 1 through 5
4. Come forward a couple of thread wraps and tie in the ribbing tinsel against the far side of the hook; later on, this will allow for one turn of tinsel behind the tie-in point of the tinsel. If you're using Mylar, make sure the gold side is facing out. You can probably sneak a soft wrap or two around the material to set it into place. However, if the material flops around and gives you trouble, try this technique:

(A) Hold the tinsel tightly between your two thumbs and forefingers.

(B) Place it under the hook, just ahead of the thread.

(C) With your left middle finger, catch it against the back of the hook.

(D) Pick up the bobbin and pass the thread over the material.

5. Wrap forward very neatly; when a floss body is called for, contiguous wraps form the best base. Bury the tag end of the tinsel, cutting it off when you've worked about 3/4 of the way up the shank. Stop here.

Floss tied in; step 6

6. Cut off a piece of floss 6 or 7 inches in length. Floss bodies should be slim, so select your floss according. Here, I'm using two skeins of the four-ply Danville rayon floss. Tie in the material at the position shown, using four or five very firm thread wraps. I suggest the two-handed technique described in the previous step; it works even better for floss than for tinsel. After the first two wraps, do this: Pull the floss gently rearward, so that about 1/8 inch of it sneaks under the thread; this ensures that when you begin wrapping the floss, the filaments will all be lined up neatly. Secure with several additional wraps. Don't be concerned that a little thread bulk builds up, you'll take care of that in a few moments.


Floss body being formed, step 1

7. Before wrapping the floss, trim off the tag end. Then, wrap the material smoothly and evenly rearward, overlapping the turns a little. The floss will flatten as you wrap, but you don't want any filaments to separate from the skein. If you see this happening, twist the floss a little and keep on wrapping.

Floss body being formed, 2


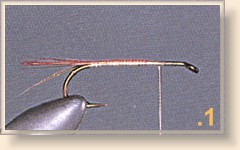
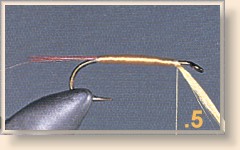
8. When you reach the bend, pass the floss once behind the tinsel; this sets it into position to start the ribbing. Then wrap forward, covering the first layer. You'll notice that the second layer goes on smoother than the first, which is why you use two layers.

Floss body being formed, 3

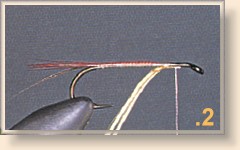
9. As promised, you'll compensate for any bulk caused by the thread wraps used to tie in the floss. When you reach the tie-in point, simply back off all but one of those wraps. Complete the body with a couple more turns of floss, allowing it to push the thread along in front of it. Tie it off beneath the shank and trim the tag end. This should leave about 1/5 of the hook shank ahead for hackle and wings. This technique for reducing bulk can be used any time a material is double-wrapped. It's of particular value with flat tinsel bodies.


Floss trimmed, ribbing in place.

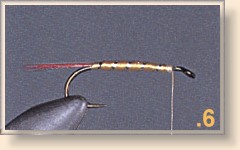
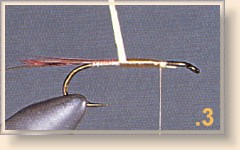
10. Now wrap the tinsel ribbing. Given the size of hook and width of tinsel involved here, you'll get five turns. Keep them evenly space, and try to come out in such a position that you can tie off the tinsel either on the bottom or against a side of the hook. Take a couple of housekeeping wraps.

Hackle in place, thread base established.

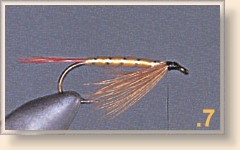
11. Now for the beard-style hackle, which consists of a bunch of barbs similar to those used for the tail, but softer. You may be able to find these in the lower portion of a rooster hackle, or you may need hen hackle, which is invariably soft and webby. Gather the barbs . . .procuring a fairly generous bunch. Cut or strip them from the quill, then pass them to you right hand, holding them by the butt ends with you thumb and forefinger.

12. Position the barbs beneath the throat of the fly. Gauge the length: In this instance, the tips should extend to about the point of the hook. Tie the bunch in place with several upside-down pinch-wraps and secure it with several more firm wraps. Trim off the excess butt material and take a few housekeeping wraps to establish a base for the wing. Note the thread position, which is just a turn or two from the rear of the thread base.

13. Switch to black thread and add a wing . . .[The wing should extend a little beyond the rear of the hook as shown.] Tie off, lacquer, and admire.

Completed Professor

More:

You can avoid changing thread color by two method: either blacken the yellow thread with a felt marker before creating the whip-finish, or use black head lacquer. The latter is dangerous: one tiny misstep, and you'll have a messed-up fly. Any colored head cement or lacquer must be applied with great care. ~ Dick Talleur


Credits: From Basic Fly Tying by Dick Talleur, Published by The Lyons Press. See the review of it HERE. We greatly appreciate use permission.


For more great flies, check out: Beginning Fly Tying, Intermediate Fly Tying and Advanced Fly Tying.


[ HOME ]

[ Search ] [ Contact FAOL ] [ Media Kit ]

FlyAnglersOnline.com © Notice