
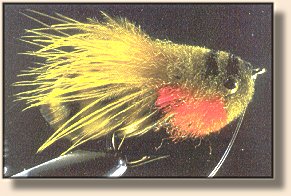
 Shineabou Sunfish |
|
|
MaterialsHook: Heavy wire, short shank, (standard bass-bug hook) a total hook-length of about 1 1/4 to 1 3/4 inches (3 to 4 cm). The hook shown is a Mustad 3366. Tying Steps:
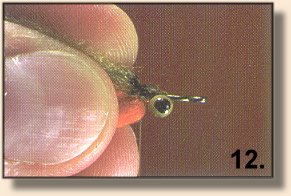
1. Start the thread three quarters up the shank and secure
a pair of painted lead (or lead-substitute) barbell eyes there
with tight crisscrossed thread-turns. Jimmy prefers the eyes
over the shank, like the top eyes in the photograph; I prefer
them below, like the lower eyes.

|
|
2. If you want a snag guard, secure the end of some
monofilament two thirds of the way up the shank; then
spiral the thread down hook and mono to partway down
the bend. Wind the thread back up to the end of the
shank. Snag guard or no, bind the end of some copper
wire at the bend, atop the shank - really secure the
wire. Dub a thick, tapered body up two thirds of
the shank.
 3. Set a matched pair of webby saddle hackles together, cupped, tips evened. Strip the fibers from their base. The remaining unstripped part of the feathers should equal the full length of the hook. Do the same with a second pair of saddles.
 4. Hold a set of the stripped-stem hackles over the body. The fibered part of the hackles should start directly over the front of the body; the hackles' tips should project off the hook's bend. Strip the fibers from the underside of the hackles. This stripped area should equal the body's length. Do the same with the other hackle-set, but strip the top of this set.
|

5. At the front of the body, atop the hook, bind the set
of hackles whose underside was stripped further than
its top. Bind the other set below the shank at the front of
the body so that, like the top set, bare stems face the body.
Add plenty of tight thread-turns; then trim the stems.
 6. Wind the wire one-half turn to the bottom of the shank. Draw the underside hackles up to the body, one feather on each side of the hook's bend. With a bodkin or hatpin, part the hackle fibers where the copper wire meets them. Wind the wire through the part in the fibers. Release the wire - its memory will keep it curled around the hackles' stems.
 7. Draw the top pair of hackles back and down to the body; the tips of these hackles should lie outside the tips of the lower pair. Part their fibers as you did with the lower hackles' fibers, and then wind the wire through that part. Continue this process, parting and winding through all the hackles, to the front of the body. Now the hackles should be locked in place with 4 to 6 wire ribs. Secure the wire under tight thread-turns; trim the wire.
|

8. Bind on a tuft of red marabou along each side of the
body, at the front, for gills. The tufts should reach about
three quarters down the body. (Wetting the marabou
makes it easier to handle.) Trim the butts of the marabou.
 9. Bind a good-size bunch of olive marabou atop the shank, at the front of the body, extending back over the body. The tips of the marabou should just reach the tips of the hackles. Trim the marabou's butts.
 10. Cut a smallish bunch of dyed-orange lamb's wool from the hide, and then trim straight across the wool's very tips, leaving a mix of natural and cut tips. Bind the wool under the shank; its tips should extend back about halfway down the body. The orange should stay beneath the shank and the red-marabou gills.
|

11. Trim the tips of a bunch of olive wool as you trimmed the tips
of the orange. This bunch should be about as thick as the orange
bunch. Bind it atop the shank, tips reaching about halfway down
the body.
 12. Draw the wool firmly back, keeping the olive on top and orange underneath, and pull the thread sharply forward. Add a few tight-turns at the front of the wool. Same procedure as basic deer-hair flaring.

|
|
13. Cut another bunch of olive wool. The bunch should be about
equal in density to the first bunches of olive and orange wool
combined. Hold the wool bunch lightly in front of the hook's
eye, the wool's fibers in line with the hook's shank. Push
the wool straight back over the hook's eye, down the shank,
around the barbell eyes, and well up the body. Hold the wool
secure as you take a turn of thread around its center and the
shank; then pull the thread tight. The wool should be secured
behind the barbell eyes and against the front of the
first bunches of wool. Add a few tight thread-turns, but don't
pull the thread forward through the wool yet.
 14. Flatten the wool on top, over the thread-turns. Spread a small amount of black wool over the top half of the olive wool. Take and tighten another turn of thread. Add a couple of tight thread turns; then draw the wool back and secure it as you did the first bunches.
 15. Advance the thread to the front of the barbell eyes. Continue adding bunches of olive wool topped by black wool to the hook's eye, at least 3 bunches of black wool. Whip finish the thread, and then trim it.
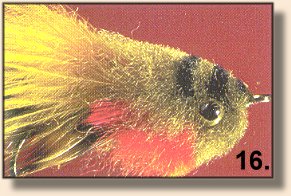 16. Trim the head to broad and blunt when viewed from the side, thin when viewed from the top. Trim the rear of the wool-head to expose the red-marabou gills, and trim the head thin enough to expose the barbell eyes. A razor blade won't work here, but scissors are very efficient. Complete the snag guard, if you included one, and complete the fly with a whip finish and head cement.
Fishing the Shineabout Sunfish |
| Credits: From The Art of Tying the Bass Fly by Skip Morris, published by Frank Amato Publications. We greatly appreciate use permission. |
|
For more great flies, check out:
Beginning Fly Tying,
Intermediate Fly Tying and Advanced
Fly Tying.
|
[ HOME ]
[ Search ] [ Contact FAOL ] [ Media Kit ]