Secondly, placing the dumb bells into the kinked shank of
the popper hook places the weight of the eyes "barely below
the centerline" (BBCL) of the hook shank. As long as weighted
dumb bell eyes have been placed below the centerline of the
hook, the fly will flip to the weighted side. This yields
the classic hook up, snag resistant swimming position of a
Clouser Deep Minnow.

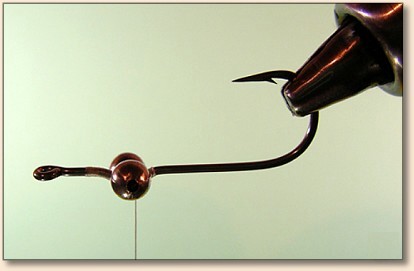
Note: Above image shows the weighted eye is located 2/3's below the
hook shaft's centerline. The kinked portion of the hook shaft also
hangs below the centerline. This weight distribution is ideal for
a properly swimming fly.
Balance and Dynamics: One notable difference when
using the popper hook is that the eyes are placed into
the kink on the shank from the "bend" side of the hook.
This is opposite and unlike the traditionally placement
of the eyes on top of the hook shank "away" from the bend.
However, placement of the eyes into the kink of the popper
hook locates the weighted eyes below the center axis of
the hook shank. Placing the eyes barely below centerline
balances the fly such that is maintains the snag resistant
"hook Up" swimming action. Furthermore, the "BBCL" placement
of the weighted eyes streamlines the fly! This important
refinement makes the fly more aerodynamic and hydrodynamic.
Streamlined Clousers tied on popper hooks can be cast further
and can also be cast with less effort! The reduction of
parasitic drag yields performance gains both in and out
of the water. Clouser Clones swim elegantly and are easier
to cast into the wind. Those of you trying to shoot a full
line with a big fly will benefit greatly from tying "Clones."
Bonded Eyes: Additionally, I utilize adhesive
wicking to bond the eye wraps to the hook using a high
quality cyanoacrylate adhesive. This robust bonding
technique eliminates another common problem with poorly
constructed Clouser Deep Minnows; the eyes loosening as
the fly is fished hard. Using this bonding technique,
along with the braced eyes in the kinked shaft completely
solves this issue once and for all. This fly is solid!
Materials for Deep Minnow Clones:

Hook: Mustad Signature Series CK52S and CK74SS popper
hooks-Size to match game fish species.
Thread: UNI-Stretch, UNI-Floss, or any un-waxed
thread in color of choice.
Eyes: Stainless, Brass or Plastic "Bead Chain" -
sized to match hook size.
Flash Tail: Flat prismatic strands such as
Mirror Flash, or Flashabou.
Optional Wing Flash: Krystal Flash.
Wing: Natural (Bucktail, Squirrel Tail, Arctic Fox
etc.) or synthetics as desired. Choose a light and a dark
wing material for a traditional pattern.
Adhesive & Head Cement: Zap-A-Gap CA Super Thin.
Optional Head Coating: Z-Poxy 5-Minute Epoxy, Loon
Hard Head-Clear, or UV Knot Sense.
Special Tools/Safety Equipment:
Vise: Rotary Tying vise, such as the Dyna-King
"Barracuda Indexer." Rotary vises make working with
polymer coatings a breeze.
Bobbin: Automatic bobbin. Using a bobbin such as
the Ekich Automatic Bobbin will provide superior control
of yarns and threads.
Adhesive Applicator: Modified Interdental Tool or
plastic toothpick.
Tying Instructions Deep Minnow Clones:

1. Mount the Popper hook securely in the vise.

2. UNI-Floss can be used effectively. Uni-Stretch Yarn
can also be utilized for its superb constriction locking
and wicking capacity. Any non-waxed thread is a good choice.
Start the thread of choice behind the eye, leaving enough
space in front of the yarn for two wraps. Advance the yarn
with taught wraps to a point just behind the kink in the
hook shank. Moisten that last wrap with a small spot of
Zap-A-Gap Super Thin adhesive and allow it to set under
tension.
3. Key Element #1 - Place the Bead Chain Eyes "dumb bell"
into the kink in the hook. Secure eyes using a figure eight
winding pattern and finish with a Boy Scout hitch. Make a
medium sized build-up of yarn between the eyes and continue
the thread base onto hook aft of eyes. Secure with a hitch.
Spot bond it with a drop of adhesive and trim yarn. At this
point I usually take a file to the rough burred edges of the
crimped holes on the bead chain. These burrs can nick a tippet
and cause you to drop a hooked fish. Smooth the edges of the
holes for best performance.
4. Important Adjustment: Take the fly out of the
vise temporarily. Inspect and adjust the eyes so that
they are lined-up perfectly straight on the hook. Apply
a Zap-A-Gap to the X-crossed yarn on the top of the fly.
Add another small droplet on the bottom side wraps to lock
down the bead chain eyes permanently. Make sure that the
yarn wraps along the hook shank are saturated with adhesive.
It takes very little glue and it wets-out fast. Re-mount
the fly in the vise and allow the adhesive to dry for a
few moments.

5. Key Element #2 - Working from the bend side
of the hook, tie-in at least a dozen strands of flat prismatic
flash material, such as Flashabou or Mirror Flash. Extend the
flash strands well beyond wing-length to create the key
"Flash Tail" element. A Flash Tail ˝ Inch longer
than the wing after final trim is appropriate. It helps
to hold the flash tail in a vise-mounted spring clip. You
can alternately use tape or a cloths pin to hold the flash
tail straight. Once the flash tail is tied-in securely and
stretched taught, wet the first half inch (1/2") of the flash
tail right behind the hook bend with a head cement and allow
the cement to dry. This cement treatment stiffens that portion
of the flash tail and prevents it from fouling the hook when
this fly is fished.

6. Tie-in Lower Wing material.
7. Optional Step (not shown): Tie-in a few Krystal
Flash strands in front of the eyes and place these even with wing.

8. Tie-In Upper wing material. Use one or two upper winging
material colors as desired. Keep the wing sparse. Finish thread
head.

9. Trim Flash Tail approximately ˝" longer than the wing.
10. Optional: Apply protective coating (Epoxy, Super
Glue, Goop, UV Cure adhesive or multiple coats of Head Cement)
to head and area between eyes to enhance durability. Allow fly
to dry, or cure.

11. Utilize your usual "Clouser Deep Minnow" tying tips and
tricks above and beyond the listed instructions to create
your perfect clones - each and every time.

Fishing Tips
Imitate free-swimming baitfish with long, fast strips of
about 2 feet or more followed by a pause. Imitate bottom
dwellers with longer continuous strips. ~ Richard A. Lewis


