This fly was born from many attempts at tinkering away at the vise. It
borrows heavily from other patterns and can be tied in
sizes to match many insects. Please feel free to
experiment at the bench and post any improvements.
Keep tinkering and tight lines.
Materials: Kratville Caddis
Hook: - Tiemco 2302 Size 14-16 for Caddis, Size 10 for
hoppers, Size 6-8 for stones.
Thread: - Danville 3/0 or 6/0 on smaller flies. Black
seems to make the segment lines stick out but red
against the yellow for a hopper looks good too.
Body: - Foam, either standard thickness (2mm) foam cut
to an equal sided strip or 1 mm Razor foam folded and
super glued on the smaller flies.
Under-wing: - .5 mm white Razor foam.
Over-wing: - 1mm tan Razor foam.
Bullet-head and collar: deer hair, fine hair from
flank of deer to keep bulk down.
Legs: - Medium centipede legs or brown hackle.
Tying Instructions:

1. Trim piece of foam so that it is as wide as it is
thick, or with Razor foam trim wide enough to wrap
around hook and form a tube.

2. Push point of hook through foam one hook gap from end
of foam, this forms the last segment of the body. Trim
front of foam so that it ends about 2/3 the length of
the shank. I like to taper the tie in point of the
foam to reduce bulkiness.

3. Attach thread at mid-point of shank and wrap back to
bend of hook making sure not to tie down foam.

4. Swing foam around under the hook and begin wrapping
under the foam. Make several wraps at shank on top of
each other to firmly secure the foam. Wrap forward
making sure to come down and under as straight as
possible and try to advance the thread forward on top
of the foam. This makes the segments look nice, the
fish probably don't care.


5. Trim the .5mm white razor foam to the length of the
body and round the rear edge and taper the tie in
point. Tie the foam down so that the foam extends to
the end of the body. Place super glue along the length
of the foam body and hold the white under-wing down for
a few seconds until it sticks.


6. Trim a piece of 1mm tan razor foam the same as the
under-wing. Tie in on top of the under-wing. Place a
drop of super glue near the tie in point and hold
down. Make sure the front half of the upper-wing
sticks to the glue but the rear end is separated a
bit. This makes the fly look like it is adjusting its
wings; this gap also can trap a small bubble of air if
the fly happens to submerge a little bit.

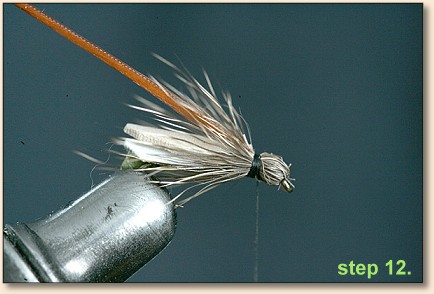
7. Cut a small clump of deer hair, stack and remove
underfur. Trim the hair so that is a little longer
than the shank length. Tie the hair in as you would
any other bullet-head, wrap right up to eye of hook.
Allow hair to spin around hook and then pull back over
body and tie in forming a nice collar and head. The
collar should end just shy of the foam body and wings.

8. Tie in either a brown hackle for the smaller flies or
rubber legs for hoppers and stones ala a Madam-X.

9. Whip finish and trim the collar on the bottom of the
fly to expose the segmented body.

10. Hopper variation.

11. Stone variation.

12. More variations below.

~ Dave Kratville

