Texas Foam Midge
By Hillfisher, Texas
I have been itching to go fishing but the last few days
have been rainy with a few snowflakes mixed in here and
there. During these brief but intense storms, the bream
and bass go deep and will not take anything. It's a good
time to catch up on tying and chores around the house.
The last storm lasted only three days but temperatures
reached the 20's during the nights and 40's during the day.
My hat is off to my northern brothers who can put up with
this for long periods of time.
Today the eastern sky dawned clear and bright and the
temperatures are to reach the upper 60's. I have a lot
of wood to chop from the big storms we had this last spring
and figured I would get a good start on it. This is actually
one of my more favorite chores. Mostly because I get to
play with large sharp objects (ax) and power tools (chainsaw).
After a little warming up I'm really getting into the wood
chopping. Every piece the perfect length and stacked by size.
After a couple of hours I have made some pretty good progress.
Then I made a mistake. I took a break and while I was sitting
there I heard water being slapped in the creek. Hmmm . . ."I better
check this out." I thought to myself and proceeded down to the
bank. There were rings everywhere! When I approached the edge
of the creek the bream were startled and several tail slaps were
observed as they turned and headed for deeper water. I squatted
down and waited for a time and soon they were once again rising.
They were feeding so actively that at times the water being
slapped as they would partially clear the surface feeding.
Ok that's enough wood chopping for today! I ran, literally,
back up to the house and grabbed my 5wt and hip waders, which
I keep ready in the garage just for days like this. Under a
slight bit more control, I walked back down to the creek and
very carefully waded into position. After a few minutes there
were rings forming all around me. Some of these fish were
rising within three feet of me. They were all bream. This
was going to be a great afternoon!
I started with a surface yellow spider but after a few casts,
it was apparent they did not give a darn for yellow spiders.
I tried a variety of other surface flys but to no avail.
This was really exasperating! I was watching these fish
actively rise to feed all around me. I tried a nymph about
size 12 and started getting taps and an occasional hook up
with some small bream, but nothing compared to the activity
I was seeing around me.
I stopped casting and watched the water around me. The afternoon
sun had produced enough warmth to cause a hatch. There were some
very small flies hatching on the surface and I mean some really
small flies. The bream were selectively feeding on these. I
carefully waded out of the creek and went straight to the tying
table. Not wanting to spend a lot of time spinning dubbing etc.
I went straight for the foam. I know for some fly tyers the use
of foam is just not considered to be the true art of tying and
in some ways I do tend to agree. However for speed, likeness
and performance, foam is quickly replacing a lot of natural
materials with the new generation of tyers. In a some cases
I will use foam to test the effectiveness of a pattern and
then switch to natural materials to get a more traditional
appearance.
All said and done the fly which came of the vise somewhat resembled
the hatch. It produced some nice bream that afternoon and the
next day. I think dubbing will produce a better fly and by
slightly varying the pattern to remove the wings and replacing
with a wing case will get the instant nymph pattern which was
also very effective. Below is the recipe and quick tying
instructions. Have fun!
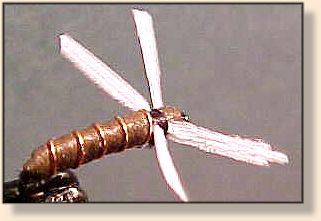
Materials: Texas Foam Midge
Hook: Mustad 3399D size 18.
Thread: Thread 6/0 black.
Body: Body brown foam strips in 1/16 x 1/8 x 3 inches.
Rib: Copper wire.
Wingcase: Optional - Peacock Hurl.
Wings: Wings white duck quill (Adult), Turkey (nymph).
Tying Steps:

1. Create thread bed and start foam strip just behind
the eye of the hook.

2. Wrap foam back to bend of hook. Wrap thread over foam
to the bend of hook. Tie in copper wire at bend of hook.

3. Wrap foam up to just behind the eye. Wrap thread up to
just behind the eye in between the foam layers. Wrap thread
back to about two eye widths and let hang. Wrap copper wire
up to thread and tie in.
 |