Fly Of The Week
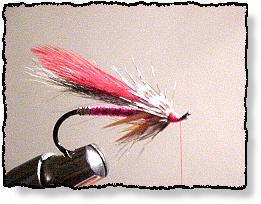
Hank's Red Apple
Hank's Red Apple
By Henry Chan


Previous Flies
Fly Tying Terms

Hank's Red Apple

First off I would like to thank this wonderful web site for asking me to do this week's Fly of the Week. I hope I live up to everyone's standards. For my first fly I will be tying up my very own Hank's Red Apple. This is a beautiful fly which can catch a person's eye while being displayed in a frame or it can catch a fish while in the stream! Thank you and happy tying! ~ Henry Chan

Materials List:

Hook:  Diiachi or Tiemco size 2.

Thread:  Red.

Tag:  Silver Oval Tinsel.

Body:  Red floss.

Rib:  UNI-stretch, pink.

Wing:  Red Rooster.

Collar:  Natural Guinea.

Collar Additions:   Orange Turkey Biot.

Tying Instructions:

1. Choose a strong hook. There are many hooks out there, but contrary to what some believe . . .not all hooks are the same. If you want to catch strong fish you need strong hooks. There are several companies that produce a wonderful product. Daiiachi and Tiemco both make a hook I trust my steelhead fishing with. For this fly, Hank's Red Apple, I use a size 2 hook. A larger hook can be substituted if desired. But if anything, please use a strong hook. Saving a few dollars on cheaper hooks may someday cost you a trophy fish!

2. Tie on a base of red thread. Near the bend tie down some silver tinsel. You can use substitutes such as white thread or silver/white floss. The best thing about tinsel is that it's strong, thread and floss will tear . . .and you don't want your flies tearing while you're standing on the stream staring at a pod of steelheads!

3. The next step is to roll on the tinsel (from back to front). Tie that off and then tie in some pink (or light red) UNI-stretch next to it. If you don't have UNI-stretch, you can substitute with floss. Move the red thread about three-fourths from the eye of the hook and tie it off with a half hitch.

4. Next tie on red floss, there are no substitutes. You can try red thread, but it just doesn't have that 'shine'! Be sure to start the floss near the eye and work back and then forward again. After the red floss body is laid down tie it off with a half hitch.

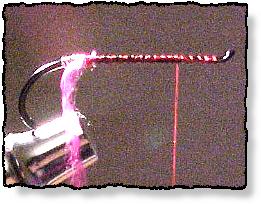
5. Now that the main body is finished, it's time to 'spice' it up! Tie back on the red thread, but near the eye. Roll forward the pink UNI-stretch so that there's an interval of red (base) and pink (UNI-stretch). Tie off the pink UNI-stretch with the red thread.

6. Sorry I had to change the camera angle. But after some thought I figured this background behind the fly would make seeing the details easier. The next step is something of my own trait…I LOVE BIOT! I use biot in about 65% of my flies! I have orange biot which I use to help 'flank' out the collar hackle (shown later on) while it swims. Tie on two pairs of turkey biot with the points going outward, not just back.

7. One of my favorite materials in fly tying is squirrel tail! It's cheap, easy to find, and some of the most useful stuff around! Tie on a small bunch of natural (undyed) hair. Tie it down and cut off the excess. If you want, dab it with some cement. To test if you need to cement now, just pull on the squirrel hair. If it comes out, then you need some!

8. The best thing about this step is that it's cheap. The wings are just a pair of rooster neck. I use red rooster neck here, but you can substitute with any red-like color. I prefer a red wing because it matches the body. Perhaps the toughest part of this step is to tie down the wings without it turning sideways. The best way to do this is to practice, and to do it slowly.

The easiest way is to tie down the wings with just a few turns of the thread first. Then after it is somewhat secure on the body you can adjust it. When the wings are on upright finish tying it down.

9. Now I know this fly is taking some time, but if you think this fly takes a long time, you should see some of my presentation flies! This next step is the collar hackle. I use some guinea hackle, natural color. There are MANY substitutes for the collar hackle. You can use grizzly rooster neck or any grizzly hackle. Just be sure there's a pattern within the hackle. I have used solid color hackle and it just doesn't look as good!

Tie down the hackle and make sure that it's not too far back. It's better to tie this collar hackle too close to the eye rather than too far back. This is because when you make the head of the fly you want the collar hackle to be pushed back.

10. This FINAL step is easy. Just make a few turns with the collar hackle (two-three turns will suffice). Tie it off and cut the excess. While making the head slowly push the collar hackle back. This will give it a wonderful look. After you've got the collar hackle where you want it just finish off the head with a whip finish and cement! And there you have it! Your very first Hank's Red Apple fly!

Fishing Suggestions

Henry with proof of this fly tying ability
Hank's Red Apple will entice many fish from salmon to Atlantic salmon to steelhead. I also tie this pattern in a gold and green. You can fish this fly deep or shallow in moderate current. Try to swing this fly right in front of the males during spawning time. ~ Henry Chan

About Henry:
Henry is an avid fly fisher and tier from Rochester, N.Y. He does sell his flies (very reasonably) and you can contact him directly at:
Henry Chan
1440 Monroe Ave #23
Rochester, NY 14618
or by email.


[ HOME ]

[ Search ] [ Contact FAOL ] [ Media Kit ]

FlyAnglersOnline.com © Notice