Tying Instructions:

1. Color a section of Ethafoam sheeting and secure the color *as described
below, (or color the foam and then wait to brush on the thinned Flexament
after the fly is complete; I prefer this because it secures
all the thread turns.) Cut the colored foam into a diamond shape approximately
three full hook-lengths long by one hook-length wide. Color the edges
of the diamond if you like.

2. Mount a beading needle by it's eye in your vise as shown. Start the
thread lightly near the needle's center. Tie in one tip of the foam diamond
on the far side of the needle. The uncolored side of the foam should face
you and the bulk of the diamond should project away from the vise. Use
light thread-tension throughout the needle-tying.

3. A tiny hump of foam should project beyond the thread turns. Hold
one tail hair above the foam and one below, take a light turn around
both, pull the turn snug enough to spread the tails. The tails should
project about 2 shank-lengths from their tie-in point, but this is
not critical. Do not trim the tail's butt.

4. Bend back the diamond as shown, towards the vise. Wind the
thread down the needle and hair butts a turn or two.

5. Bring the foam forward again, and then take two thread-turns
over it. The turns should be just tight enough to form a round
foam-segment.

6. Continue forming segments, each slightly larger than the last,
until there are four. (The hump of foam between the tails counts
as a segment.) Half hitch the thread and trim it. Slide the
segmented abdomen off the needle.

7. Remove the needle from your vise. Mount a hook in your
vise. Start the thread halfway up the shank; at this point tie in some
combed stacked coastal deer hair. The hair should project one-and-
a-half hook shanks from its tie-in point. Trim the butts of the hair at
an angle, and then bind the butts with tight thread-turns. End with
the thread at the bend. Half hitch the thread but don't cut it.

8. Remove the hook from your vise. Push the hook's point through
the center and out of the bottom of the last segment of the foam, opposite
the seam. Slide the foam up to the bend. Return the hook to your vise.
Take two turns of thread around the half-hitched thread that forms the
last foam segment.

9. Draw the foam down out of the way, then spiral the thread tightly to
just behind the eye, catching up the tail butts as you go. Trim the butts
closely. With your thumb nail, crease the hair back and up, and then
add tight thread-turns at the front of the hair to secure it upright.

10. Advance the thread to the eye again. With your left hand (right handers),
draw the front of the foam up again and around the sides of the shank. Add
firm thread-turns at the eye to secure the foam there.

11. Stretch the end of the foam as you trim it closely. Spiral the thread
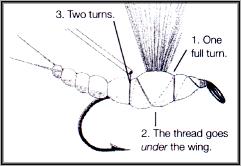
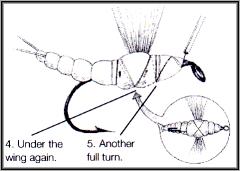
back between the eye and the wing and take a full turn there. Then
spiral the thread beneath the wing to about halfway
between the wing and the bend. Take two turns there, spiral the thread
forward under the wing, and then take a turn between
the wing and the eye. Return the thread to the eye, build a thread head,
add a whip finish, trim the thread. (See the following illustrations for
thread wrapping the thorax.) Remember that, as Richard describes it,
the tightness and placement of the thread-turns "sculpts" the thorax.

12. Cut a tiny slit in the foam on each side of the wing. Don't cut the
thread! (You have the option of cutting the slits before thread wrapping
the thorax - Richard prefers this - but for at least your first few Bunse
Duns, I'd suggest cutting them after.)

13. Pull the wing's hairs to the sides, into the slits. The wing should
now form a fan, a half-circle.

14. If needed, trim down the stub of foam between the tails, and
touch up the foam wherever needed with a marking pen. Add a
drop of highly thinned Flexament (three parts thinner to one part
Flexament) to the tail, to both of the wing slits, and to the thread
head (I don't bother with head cement). If you haven't yet secured
the foam's color, simply add Flexament at the points just described
and wherever needed to coat the color. Remember, thinned Flexament
flows well - a little is a lot. ~ Skip Morris*Coloring Foam
Ethafoam that is colored with a permanent marking pen should always
be given a coating of thinned Flexment (three parts thinner to one part
Flexament). This technique was developed by Richard Bunse. Richard
marks the foam with broad strokes of the marker, then lightly brushes out
the Flexament. "Lightly" is important here - Richard's brush merely
grazes the high points of the Ethafoam's textured surface. The thinned
Flexament spreads quickly. ~ SM
|