|
This section will have some of the techniques that
are found in the various lessons. We will be continually
updating this section as new patterns/techniques are
introduced.
A note about heads. The nice tiny heads we tend to strive
for may not be the best on flies that are to be fished.
When tying hair wings or, just about any other, a tiny
head doesn't trap and bind down much of the wing butts
o, such a wing can easily pull out. Placing a little
head cement on the butt ends of the wing so it can "wick"
into the base of the wing prior to covering with thread
can help some. Tiny heads do look good on display flies
though.
Matching Feathers For Full Featherwings
When you are matching feathers for flies that use the whole
feather for the wings, great care in matching will make the
task of setting the wing either easy or difficult. It can
also prevent wings that flair to one side or twist out of
shape.
When I first started to collect my "special" feathers and,
before I had actually begun to tie full featherwing flies,
my routine for matching was simple. First, look at the outline
and match shape. If the curve of the feathers shafts didn't
curve in the shame precise direction and follow the changes
exactly down the shaft, I didn't see as all that important.
So, I had all these feathers matched and in labeled bags ready
for me to tie with. I soon found out that trying to make two
dissimilar feathers, no matter how slight the difference, is
difficult at best and, near impossible at worst.
My matching criteria now is a three step test. A feather passing
all three qualifies as a matched pair. Two of three tests relegates
the feathers as non-pairs. First, I select two feathers who's
outline, curves and, length look the same. Second, I place them
together good sides out and, hold them up to a bright light. If
the outsides match exactly and, the shafts are also matched exactly,
it passes the second test. Third, while still holding them together
with my right thumb & index fingers, I flick the "wings" with my
left index finger rather hard. If the feathers do not move any
amount, they pass the third test. Now and, only now, they qualify
as a matched pair. I then put a dab of hot glue on the bottom tip
of the feathers to stick them together and bag them for later use.
One other visual thing to look for in matched feathers is that
the wing will be perfectly straight but, this is a natural result
of the three tests so, doesn't qualify as a fourth test. If the
barbs curve unnaturally even a little, you can be assured there
is a conflict somewhere.
If you really look at feather structure, you will see some
mazing structures that are incredibly strong for their weight.
Every curve has evolved to produce maximum strength. This is
especially true of the wing feathers which are some of the more
frequent feathers used for full featherwing flies. If you have
a pair of feathers that for every purpose match but, one is a
little shorter or, slightly more or less curved than the other,
you will have one feather that is, for lack of a better term,
stronger or weaker than the other. When you assemble these two
dissimilar feathers, a conflict arises and, the stronger feather
will win. You may be able to finish a fly that looks great with
such a pair of feathers but, the slightest disturbance will make
the feathers move to the path of least resistance. The wing will
"blow up." If this happens, the options are limited to none. A
little more careful matching could save that one of a kind
creation and, all the work that goes into putting it together.
Soft Loop
Tyers who do not have good thread control are at a distinct
disadvantage. Thread control means many things in our tying.
If you don't tie your flies at just below the breaking strength
of the thread, your flies can fall apart. Flies that look good
in the vise but fall apart when they are fished are not a good
thing. Experienced Tyers (That doesn't mean someone who has
tied for the last eighty years either) will get the feel of
their various materials including their tying thread. Your
hands will, after breaking the thread enough, learn the exact
stress they can apply to a given thread so that the Tyer
doesn't even have to think about thread tension.
Thread control also means compressing each component to it's
maximum to ensure the security of that component of the fly.
Thread control is also subtle turns and twists to bind various
materials. This includes flattening the tying thread for a
smooth base for a floss body or a broader flatter turn of
thread to bind a material. Dubbing loops are useful for
coarse dubbing materials.
One thread trick that many Tyers often overlook is what's
called a "soft loop." All this means it that you take a turn
around a material without any tension on that material and,
on the second time around the material, you apply tension.
This tends to pull a material straight down with less of
the tendency to "roll" a material off the far side. It will
take a little practice to master a soft loop but, is well
worth the effort to learn. You can apply the soft loop to
many tying tasks regardless of the type of flies you are
tying.
Dying
If you find yourself really enjoying tying the fully dressed
flies, you will likely at some time thinking of dying some of
your own feathers and, fur.
AK Best has a little book on dying called Dying and
Bleaching Natural Fly-Tying Materials. It gives a
pretty good overall system for dying fur and feathers which
are protein based substrates. Ted Roubal who is an Organic
Chemist who also happens to be a Flyfisher and Tyer also has
some very good info the presents in Michael Radencich's book,
Tying the Classic Salmon Fly.
Dying materials can be fun but, be prepared to waste some
materials to the Dying Gods. Not all feathers and fur take
up the dye at the same rates and some fragile substrates
can be ruined by excessive heat. If you do decide to get
into dying, try reading at least one of these guy's works
preferably, both. I also suggest you keep good notes on
what you do in each dye bath. Also, do test feathers before
tossing in a whole neck or saddle.
I do quite a lot of dying for some of my materials and,
honestly, most is plain work. There is an article on FAOL
by Jim Smith in England on
Using VENIARDS Fly Tying DYE.
"Burning" Hackle for Speys
A neat trick told to me by my friend Paco Soria in Spain is to
"burn" (to remove the barbules or web from feathers) feathers
for Spey hackle. His tip was meant to strip quills for quill
bodied flies but, I find it works well on potential Spey hackle
feathers. Simply put, it's hair removal cream! It is the same
stuff many use to remove hair from legs or other places on the
hairy human body.
Just place a dab of the cream between your fingers and draw
a feather through it and make sure it is worked into the feather.
The amount of time to "burn" a hackle will be determined by
the brand of hair removal cream but, I find about 45 to 60
seconds will give good results. Remember any "burning"
process you use, is causing damage to the whole feather.
Even this process tends to make a feather a little brittle
but, for a hackle like Mallard flank for instance that tends
to cling to itself, the trade off might be desirable. Remember
also, the feathers that cling to themselves when dry, will
usually not cling to themselves in the water.
Spey Wings

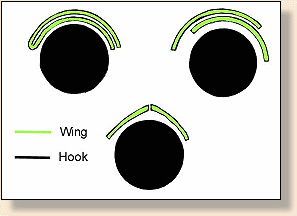
The three wing styles above are used for Spey Flies. The
top two are easier than the bottom one and, perhaps more
stable when fishing the fly.
The feathers need to match in all ways (curves
and barb length) PERFECTLY! Strip the bad side of the
feather and trash can it. Remove the base of the good side to where the tips
of the barbs are married. There is a "sweet spot" on bronze Mallard feathers
and, anything on either side will not work for Spey wings. Separate out the
width of one wing and stroke it down the opposite way that it grew. Hold
that feather next to the other and separate out the same size and stroke it
as well. Some guys just stroke the barbs a little bit, about 90 degrees to
the rachis. I forcefully stroke it as far to the bottom of the rachis as
possible. Now, cut both wing sections from the feather by cutting the rachis
not, the barbs. This bit is rachis will hold everything together better than
if you just cut the barbs from the shaft. Ok, now place the two halves
together with the now wrong way curves convex sides together and line up the
tips. Here, I will give you first my way of setting the wing, then another.
I want the two edges of the sections to meet and somewhat marry with a seam
down the middle of the finished wing. Tent this over the fly and, while
holding, take one soft loop of thread around the wing and hook with NO
tension. Take a second turn with LIGHT tension directly in front of the
first. From here, no turns behind the first or the wing will twist. You can
now let go of the wing and look at the alignment. If it looks the way you
like, take a third TIGHT turn. this turn will cinch up the first two and
really anchor the wing. It must be just about at the thread breaking point.
Take one or two more, lift the butts of the wing while holding tension on
the thread, and, cut them off a little at a time. Sometimes if you try
cutting the whole thing, the wing can move. Now, you can place a little
head cement on the butts and whip finish. The other option is to take
wider wing sections and, overlap them before tying in.
One other thing about the wing attitude. I use a pair of smooth faced pliers
to flatten the wing tie in area and the area directly behind it. If this
area is uneven, it can split the wings/barbs or, kick it up. I like the wing
to hug the hook shank as much as possible.
Happy Trails! ~ Ronn Lucas, Sr.
Back to Index
|


