
JC’s SALMONFLY
Just over a year ago, late May ’09, I was on the Henry’s Fork down in SE Idaho and took an opportunity to capture (and quickly release) an adult salmonfly. I held on only long enough to get a couple good pictures, including one of his undersides – what I like to call the fishies’ point of view.
For some time, I had been playing around with furled extended bodies for different flies, and had experimented with and succeeded in incorporating tails into a couple other extended body flies. I had learned the furled extended body (f.e.b.) technique from Tom Banyas of Pocatello ID and had been inspired to furl the bodies off the hook by FAOL BB member ducksterman. Duck’s inspiration enabled me to figure out how to incorporate tails in the extended body, which I did for the original version of this fly.
However, incorporating the tails in the extended body does not make for a particularly easy fly to tie. Getting the tails right can be challenging, to say the least. The rest of the fly is rather simple, requiring only basic skills for working with foam and deer hair. So this year I have revised and simplified the pattern. I believe it will continue to be effective.
The original fly proved itself on the Henry’s Fork, the East Fork of the Bitterroot, and Rock Creek last summer, and I’m confident the new one will be just as productive. This fly is easily adaptable to an adult Golden Stone with a change of size and color. And by leaving off the antennae and the tails and using the appropriate colors for your hopper hatch, you have another one of my original flies, the FEB Hopper. That fly proved itself for a lot of people around the country last summer for both cold and warm water fishes.

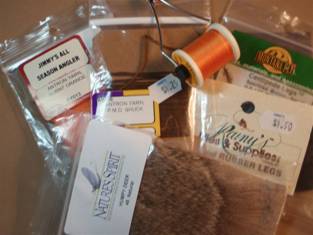
Materials:
- Size 8 standard dry fly hook
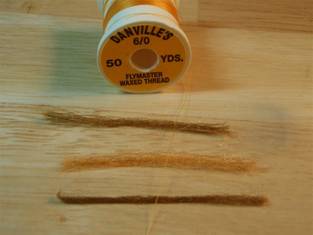
- 6/0 orange tying thread
- Antron yarn in burnt orange and PMD shuck
- MFC small centipede legs and Rainey’s small rubber legs
- Dark brown 2mm closed cell foam
- Dark deer hair
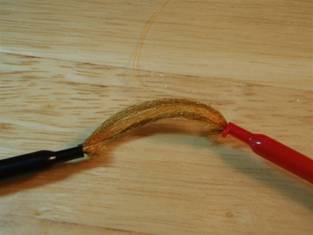
 Step 1 - I like to build the furled extended body first. Cut two strands of the dark antron yarn, one strand of the orange.
 Step 2 - Place the ends of the antron strands in electrician’s clips.
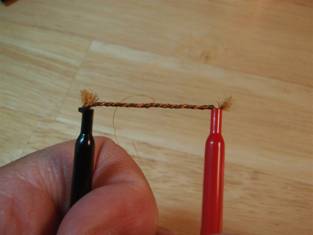 Step 3 - Twist the clips in opposite directions until the material is ready to furl.
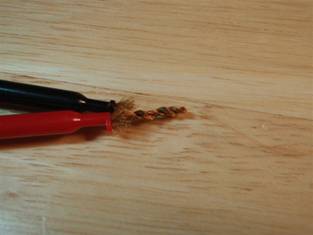 Step 4 - Pull on the center of the twisted material as you release tension on the clips. The antron will furl into the extended body. It helps to give it a further twist in the direction it has furled to tighten the furl.
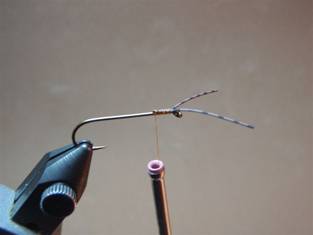 Step 5 - It is now time to debarb the hook, place it in the vice, start the thread, and tie in the antennae. I like to loop the MFC leg material around the thread, wrap the thread over the hook, and then take another wrap or two to secure the material. Then pull the antennae forward with one strand on each side of the hook and wrap the thread forward to secure the antennae in position. You may have to play with the material a bit to get the effect you want. Note – tying the antennae in first and leaving plenty of room behind the eye of the hook ensures that you will not crowd the eye as you finish the fly.
 Step 6 - Wrap the tying thread to the rear of the shank. Using the MFC leg material, tie in tails using the same technique used to tie in and place the antennae.
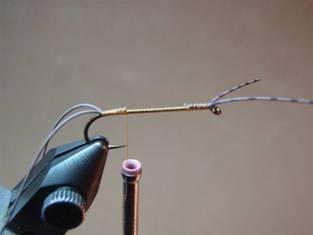
 Step 7 - Tie in the f.e.b. To secure it, take a few wraps over the f.e.b., then a couple in front of it, then a few more over it, a couple more in front of it, and finally a couple more over it.
 Step 8 - Just ahead of the f.e.b., tie in the dark brown foam strip.
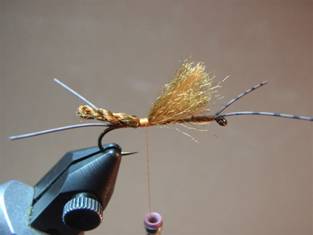
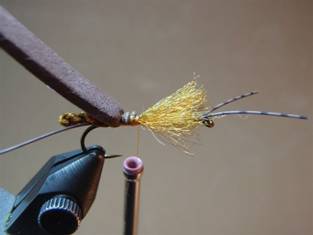
 Step 9 - Advance the thread forward several turns. Tie in Rainey’s rubber leg material for the rear legs using the same technique used for tying in the antennae.
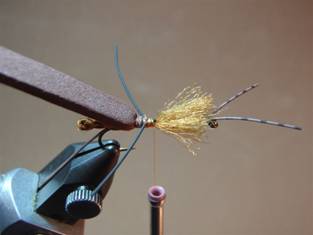
 Step 10 - At this point, advance the thread ahead of the loose ends of the antron bundle, stopping about the middle of the bundle. Spread the loose ends of antron around the hook then tie down the antron. Advance the thread ahead of the antron again, and then tie the loose ends to the hook. Tie in the front legs using the same material and technique used to tie in the rear legs.
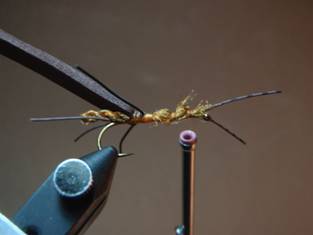
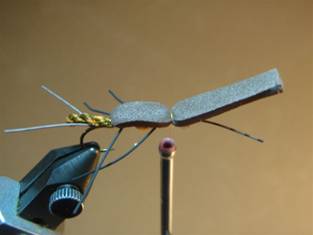 Step 11 - Pull the foam strip firmly over the back of the fly. Tie it in at a point about midway between the front legs and the antennae. This will minimize the prospect of altering the position of the antennae or legs while tying in the foam (and later the deer hair). To keep the foam securely in place on top of the hook and create a good tie in point for the deer hair, take several wraps over the foam, a couple wraps in front of it, well behind the antennae, a couple more over the foam and a couple more in front of it before returning the thread to the final tie in point.
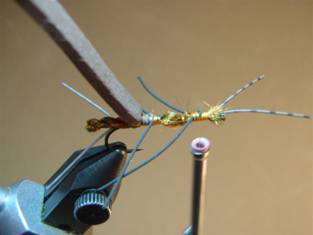
 Step 12 - Cut, comb, stack, and trim a bundle of deer hair to length. I like the end of the deer hair to extend beyond the foam, and for the deer hair to flair somewhat when tied in. The hair has some value in floating the fly, which is achieved primarily with the foam. The flared deer hair also gives the impression of fluttering and / or downed wings when the fly is on the water and helps one see the fly, which rides very low in the water.
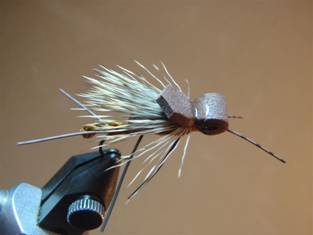 Step 14 - Form a bullet head out to the eye of the hook by extending and then folding back the foam strip. Tie the strip down well, take a couple four or five turn whip finishes over the tie in point, trim the tying thread and add some head cement.
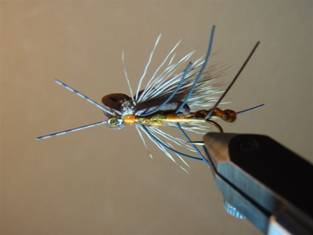 Step 15 - Trim the antennae, tails and legs to the desired length, if necessary. The tails should be shorter than the antennae (tails longer than the antennae for the Golden Stone version) and the rear legs should be longer than the front legs.
I tied and fished the first version of this fly just a few days after Jim Birkholm passed away last year. I had originally given it a different name. When the fly proved itself on the water, I renamed it, dedicating it to JC in appreciation for what he and Deanna have contributed to the fly fishing community over the years, specifically with the FAOL website, and more personally, what they and FAOL contributed to my development as a fly fisher and fly tier and how I conduct myself on the streams and rivers I fish.
A companion fly, the LF Golden Stone, is tied using a shorter hook and changing the colors of the tying thread (yellow), antron (one yellow strand and two olive), foam (light tan), and antennae, tails, and legs (amber or light olive). It is my tribute to Deanna for her role in and contributions to the Fraternity of Fly Fishers.
John
For more great info, check out:
Beginning Fly Tying | Intermediate Fly Tying | Advanced Fly Tying.