Fly Of The Week
Prairie Hopper
Prairie Hopper
By Craig Thorp, Minnesota, USA
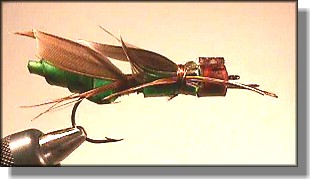
Photo by Jim Birkholm


Previous Flies
Fly Tying Terms

Prairie Hopper

Let me begin by saying that never in my wildest dreams did I think that this fly would be selected for Honorable Mention in the Millennium Fly Contest. The picture that you are looking at doesn't do this fly justice. This is one ugly fly. It's saving grace is that with ugly comes simplicity, it is a very easy fly to tie. I haven't as yet had an opportunity to put one of these in the water, but the thought behind it was that I wanted a fly that gave about the same silhouette as a real hopper and I think this does. This fly is fashioned after the American Bird Grasshopper. The range of these hoppers is from the Rocky Mtn., across Nebraska and Tennessee and up into New York. They range in size from 40 to 55 mm. or 1.5 to 2.2 inches.

Materials List:

Hook:  1/0.

Thread:  Brown 6/0,

Body extension:  316L welding rod.

Body:  Double stick foam tape, 3M brand.

Wing:  Mallard duck wing, brown.

Legs:  Pheasant barbles.

Tying Instructions:

The very first thing that you will have to do is the most difficult. Begin by taking 4-5 of the longest barbules from the base of a pheasant feather and tie a knot in the middle of it. This is accomplished by putting one end of the barbules in the vise, loop the barbule, then grab the end with a tweezers and pull it through the hole. Care needs to be taken to try to get the knot in the center. After this step is complete set them aside to be used later.

    1. For this step I like to use a piece of 316L welding rod. 316L is a stainless steel rod and is very brittle. That's how I get that rise in the tail of the hopper. If you don't have any of that laying around your desk use a toothpick. Wind the thread on the hook shank and incorporate the wire onto the hook so that it sticks out past the hook barb by about 1/2". Bring the thread back to the center and let it hang, or cut it off if you find it's in the way. At this point the distance from the hook eye to the back end should be about 2 inches.

    2. Use a permanent marker to color the tape edges and one side green or brown or both. Wind the foam onto the post pulling it slightly to get it to bond well and lap itself. Wind it to the center and attach the knotted barbules in as rear legs with the thread.

    3. Tie the rear set of wings onto the back half. Hold them close to the body so they develop a point or tent on the upper back.

    4. Bring the thread and the foam to the hook eye and tie it off.

    5. Go back about quarter of the shank length of the hopper and tie in the middle and front legs. I like to do this by using 3-4 pheasant barbules on each side. Half the barbule makes the middle leg and half make the front. Then tie in your second wing case at this same point.

    6. Using the permanent markers color the hopper to your personal preferences. If you get the Sanford brand 8 pack of markers you can really get into this part.

    7. With that done I use clear fingernail polish to coat the legs. I also bond the rear legs to the body about half-way between the knot and the tie in point to keep them from splaying out.

Tying Tip

Other than getting the fly wet that's pretty much it. One more tip I would like to pass along while I have this forum is this foam tape and permanent markers happen to make some great strike indicators. You can make it as big or as a little as you like and in any color. ~ CT


[ HOME ]

[ Search ] [ Contact FAOL ] [ Media Kit ]

FlyAnglersOnline.com © Notice