
Bamboo Chat- Host RON KUSSE - Thurs. 5-8 p.m. PST (8-11 EST)
|
My Rod ShopBy Ron Kusse, Master Rod Maker
|
|
 This is the grave stone of H.L. Leonard who was the founder and owner of the H.L. Leonard rod Company for many years. He is buried in the Highland Mills cemetery, Highland Mills, New York, about two miles from the H.L. Leonard rod Company.
 This was the former home of H.L. Leonard rod Company as it appeared in December 2002. This cement block building was built after the fire that leveled H.L. Leonard rod Company in 1964. The original shop was located about 100 feet to the left of this building and consisted of a three story frame building. After the fire this cement building was constructed. At that time is was painted a cane color and not the blue that you see here. The building consisted of four major areas; winding and varnish room, rod mounting room, cane room and office. Numbers of employees fluctuated from a low of about fifteen to a high of nearly thirty. Leonard was closed by the I.R.S. in 1984 for non-payment of federal excise taxes. This is now a fuel oil company.
 This home at one time was Ed Payne's and a few years later Jim Payne's rod Shop, located in Highland Mills, New York, about a mile or so from the H.L. Leonard rod Company. As a rod shop it looked somewhat different. On the left side of the picture it had a center main door with a little roof and a stoop. There were no doors in the sides of the building; however, there was a back door and the building was a cane color. It was of wood construction. It contained four rooms; varnish room, large center shop, cane room where beveling was done and a small office. During it's heyday it had as many as seven employees. Jim Payne died in 1968 and at that time the Gladding company in Syracuse owned it. They tried unsuccessfully to run it. The name and building was later sold to other owners. Eventually it was sold to a family who converted it to a home, as it appears in December of 2002.
 This is the cane shed located across the road from the H.L. Leonard Rod Company. Here is where the cane was stored. At times there were forty to seventy bundles of cane poles, each twelve feet long. For a hundred years or more cane was called simply poles by all rod makers. Demerest Company was the major importer of cane from china for many decades and they called cane simply poles. During the 1970's in some kind of strained quest for glamour the newer rod makers started calling them culms.
 Older photo of my shop when miller #2 was still on the center work-bench inconveniently getting in the way.
 My son Eric and me running a strip through the thickness planner. This machine will hold tolerances of 1,000 of an inch. I generally plain them to 10,000 over so that when I run it through the 60 degree miller I don't have as much cane to mill so it makes a much more accurate cut. This is a push-pull machine and requires two people to operate.
 This small but powerful four inch belt sander is very useful for a variety of tasks. The other machine is a thickness planer, easy to build and will save you time and will improve the cutting of strips. After the cane is split, straightened and the nods dealt with, you put it through the thickness planer and you can take it down to the depth you need plus .010 over so when you put cane through a 60 degree angle miller you have less cane to mill off because it is .010 thicker than the strip you are making.
 This is a node presser. Jim Payne gave me this back in the mid 60's as he had made a new one and I have used it ever since. It is mounted on a maple board over an inch thick. When the node presser is in use it is bolted to a heavy work bench.
 My varnish room is nine feet long by six and a half feet wide. It has it's own environment. It has it's own temperature, humidity controls and has an ionizer for dust control. The walls have number of chain driven turners for the drying of the varnish on winds. It also has a rather sophisticated dipping apparatus. This walk-in room is capable of hanging thirty joints at a time.
 After the strips have been tempered and put in their proper sequence, masking tape has been wound around the thicker end and with a razor blade you slice between two strips and the joint can be fanned open with the masking tape holding them in their proper sequence.
 The strips have been fanned open and Urac-185 is liberally applied to the cut side of all six strips with a three inch brush.
 The strip has been closed up into a hex shape and is now run through the binding glueing machine. After one pass it is then passed through again with the string going in the opposite direction. This is done with various amounts of weight depending on the size of the strip to be glued. They are then hung in the varnish room to cure.
 This machine has two purposes. After the strips have been milled and put in the proper order to make a joint they are wound dry with string before tempering. After the strips are tempered the string is pulled off. Then a razor blade is inserted between one of the six strips so it can be fanned open but remain in the proper sequence. Glue (Urac 185) is painted on the inside of the strips generously. The strip is then put back through the machine and now the machine will be used for gluing. The cane is put in the machine, string attached, and it is wound through. The tension on the string forces the excess glue out. A few half-hitches and then it is passed through the machine in the opposite direction, checked for straightness, excess glue wiped off with a damp sponge and hung in the drying room to dry. I generally glue enough joints at one time to make at least twelve rods. I use a different amount of weights between butts and tips as the tension on the string is not the same for both.
 Overall view of the glueing table and binding, glueing machine attached.
 This is the 60 degree miller. It puts the 60 degree angle on the strip, no taper.
 Cane milling machine #2. This view shows the carriage and pattern going under the cutting head.
 Just a different view of the cane milling machine #2.
 Here I am at the metal milling machine cutting a taper into the maple pattern for the cane milling machine.
 This workbench is the main workbench in the shop. I try to keep it clean so I have a large area to work. Miller #2 sat on a similar table for fifteen years. Because of the way I cut my cane, the miller is only used for about a month out of the year, a year's worth of cane can be milled at one time. The other eleven months it got in my way. It needed thirteen feet of operating room and encumbered my work space. Now miller #3, a new version, is only used when I cut cane and is put away for the rest of the year.
 Drill press and motorized wet stone. Small drill press for light drilling and motorized wet stone. The only way to make tools sharp.
 Pictured here are two tools. One is used often and one is not. The 3/4 horse buffer is used often. The scroll saw is used infrequently but there are times when it is needed.
 This is a shelf I store most of my extra motors on. There is an extra motor for every tool in the shop. In the event a motor should fail I can install a spare and be back in business within twenty minutes. The failed motor then could be repaired at my leisure.
 Medium drill press, not a very impressive tool, but when you need it, you need it.
 This small metal lathe was sold through Sears & Roebuck. It is quite old but will last forever as it is all cast iron and steel construction. This six inch lathe was made by Atlas Clausing Company. This is the same company that made the Everitt Garrison famous lathe. I use the mostly to make ferrules and other small parts.
 This is one of two identical Rockwell wood lathes in the shop.
 A workbench at the front of my shop with a vise and a rod rack where work in progress and some repairs are stored. There are also some small hand tools hung on a rack on the wall.
 A Logan metal lathe is my workhorse lathe. I do more things with this dealing with metal than all of the other metal working tools combined. I have almost every conceivable option for this table. My collet set numbers 105 in all, both inner and outer.
 This eight inch table saw is fine for most cutting I do in my shop and I like this one very much. When heavy-duty cutting is needed I use the ten inch table saw. An indispensable tool is the 48 X 6" heavy-duty belt sander.
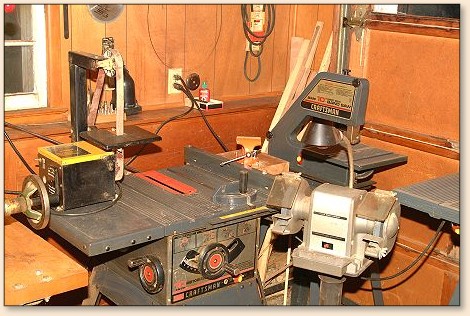 Shown in this picture is a 1 X 42 inch belt sander, a ten inch band saw, a 3/4 horse power grinder and a ten inch table saw. These tools are not used everyday, but these tools are necessary to have a complete rod shop.
 This machine is a great machine for making parts for other machines and cutting patterns for milling the milling machine. I could not do without it in my shop. Also, it makes a fantastic heavy-duty drill press. It weights over eleven hundred pounds.
 On the left is a heavy-duty router and table. On the right is a jointer planer. Just behind that is a heat gun. Behind the oil tank are almost seventy, six foot, pre-embargo cane poles. These were purchased from Minei Hull, a very good rod maker who lived in Buffalo, NY. I bought them in about 1963. There are some 2 - 21/2," 21/2 - 3," and some 3 - 31/2" poles. The power fiber in these cane poles is very deep . They are very clean with very tiny nodes. I have only used 3 or 4 of them in forty years. One of these days...
 This rack has boxes of cork, maybe 4,000 - 6,000 corks. Some of this cork is older cork that I got from Jim Payne and from Leonard. This is plain, untreated cork from Portugal and is stamped on each and every cork. Also many kinds of wood are represented here for reel seats.
 This is my cane shed. It holds many bundles of cut and uncut cane. The most important thing about any cane shed is that is must remain dry at all times. Three outboard motors, two lawn mowers and lawn tools share the space with the the cane.
 This is me, on the small back porch of my new home. This was taken shortly after my eye surgery, hence the dark glasses. My new shop is 28 by 34 feet with ten foot ceilings, oil heat, 100m amp electric, water and all 2 X 6 construction. What more could a rod maker want? ~ RK
|
[ HOME ]
[ Search ] [ Contact FAOL ] [ Media Kit ]