+ Reply to Thread
Page 1 of 2 12 LastLast
Results 1 to 10 of 18

Thread: Sleazy Steve

  1. #1
    Join Date
    Jan 2007
    Location
    Portage, PA
    Posts
    2,900

    Default Sleazy Steve

    Does anyone know if Sleazy Steve Foam Cutters is still in business? I was thinking of buying some cutters to make some panfish and bass flies. I sent him an email and got know response.
    Also, do the trout-size cutters work for panfish flies, too?
    Last edited by lastchance; 07-17-2012 at 11:49 AM.

  2. #2
    Join Date
    May 2009
    Location
    Katy, Texas (Houston is our biggest suburb!)
    Posts
    528
    Blog Entries
    1

    Default

    Yes, he is still in business, as of a month or so ago. My understanding is that he is a long-haul truck driver, and he may be on a "haul".

    With respect to your last question, it is not the kind of fish (trout vs panfish/bass) that is important; it is the size of the mouth, and the typical feeding behavior of the species.

    IMHO, it is criminal that such a profound "artificial" line has been unintentionally created between panfish/bass flies and trout flies. Those of us who live in the South have the same groups, and in some cases actual species (e.g., we have the large mayfly Hexagenia limbata in the freshwaters around Houston Texas), of aquatic insects that inhabit "trout" waters, and our fish feed on them too. Thus, any "Trout" fly you have in your boxes will catch our panfish! One can have a blast catching sunfish using a #12 Adams, or a #14 Mosquito pattern.
    Last edited by aged_sage; 07-18-2012 at 11:14 AM.

  3. #3
    Join Date
    Feb 2008
    Location
    Sheffield Lake, Ohio
    Posts
    320

    Default

    Give him a chance he will get back with you. Here is moe info.

  4. #4
    NewTyer 1 Guest

    Default

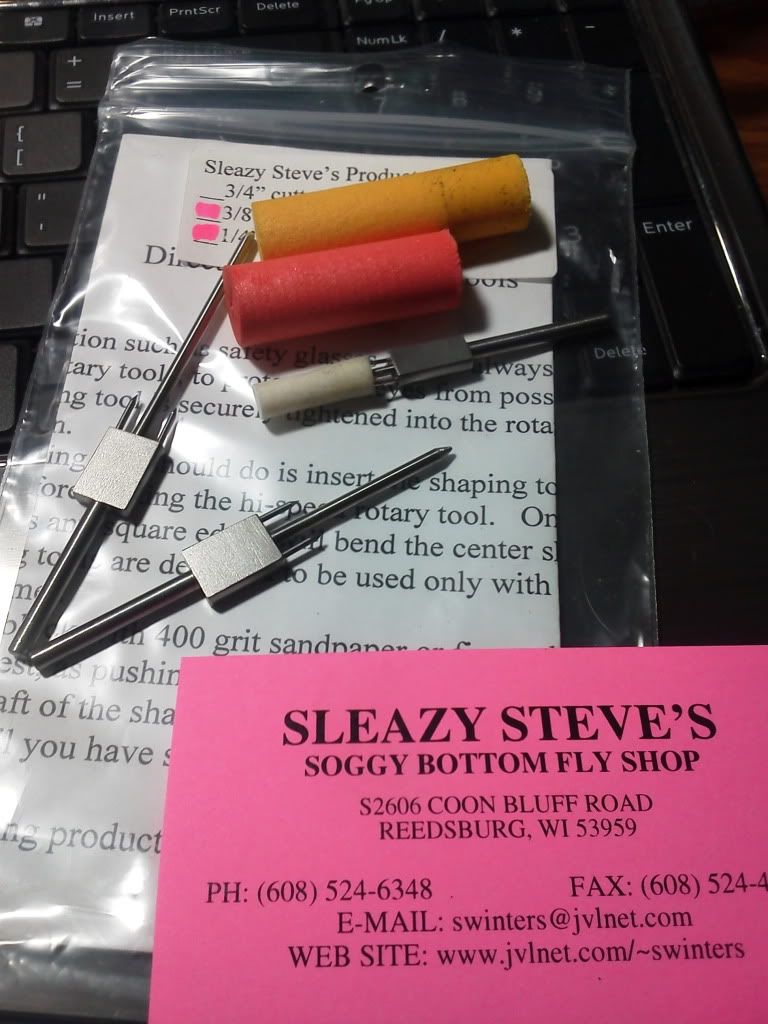
    What is that product? Is it an adaptor for a drill to make a lathe of some sort? (I'm assuming from the picture, to turn rubber or foam).

  5. #5
    Join Date
    Jan 2006
    Location
    Richardson Texas
    Posts
    144

    Default

    The spindle below the sponge cylinders holding the cork cylinder should answer your question

  6. #6
    Join Date
    May 2009
    Location
    Katy, Texas (Houston is our biggest suburb!)
    Posts
    528
    Blog Entries
    1

    Default

    The device works the very same way the the prongs on each end of a rotisseri' rod work. They keep the cork from moving around the central 'shaft'. Otherwise, they would spin when you put sandpaper, etc., up to them to shape them.

    Incidentally, I had intended to include a very inexpensive way to make your own brass 'plug cutters' in my earlier post; but just plain forgot. You can buy brass tubing in about any diameter your heart desires at almost all hobby stores, hardware stores,and the big box stores. Simply cut it to length for the the thickness of the material you are going to cut them from, plus some extra to allow for chucking in an electric drill, or drill press. File or grind a bevel aroundonend to form a cutting edge. Now, just above the cutting edge, but well below the upper chucking end, using a cylindrical grinding stone, such as for a Dremel, grind out one side at least half way through the tube, creating an elongate 'gate' on that side. Next, take a piece of dowel with a diameter equal to the I.D. of the tubing, and cut one end off at a 60 degree angle. Push the angled end into the tubing until the 'top' of the angled cut is just at the edge of the 'gate', and square with it. This will have the long point of the angle well below the upper level of the 'gate' and along the backside of the cutter. Epoxy into place, and cut the excess off that projects out of the upper end of the tube. You can cut one plug after another without having to remove them one-by-one as they are cut.

    What you have done is create a plug ejection window (gate), an 'automatic' ejector (the dowel), and reinforced the upper section of the cutter to minimize chuck jaw damage (deformation) to this end of the cutter. As you cut into the foam and a plug is forming inside the tube, when it reaches the lower end of the dowel, it begins to force the top end of the plug out through the side 'gate'.

    I am not really knocking Sleazy Steve's, but you have to manually extract each plug before cutting the next one, and getting them out can be a PITA due to the presence of the pilot bit built into them. I had one, and had another the same size given to me. As they were such an aggravation, I quit using them and ultimately gave one away. He would make them much more 'user friendly', IMHO, if he left that pesky pilot bit out. Unfortunately, it will not be easy to either cut, or break, it out. I have carefully pursued this option! (I presume it is hydraulically pressed into the solid brass base.) Plug extraction is not a problem with my home-made ones.

    The absence of the pilot bit hole through the center does not inconveinence me as I do not like a hook through the very center of a bug. I can take an old hacksaw blade, or a 'cut-off disc' in my Dremel, and cut a groove in what is to be the bottom to accomodate a hook.

    Regards,
    Frank
    Last edited by aged_sage; 07-18-2012 at 06:17 PM.

  7. #7
    Join Date
    Aug 2004
    Location
    Elida, Ohio
    Posts
    1,696

    Default

    Quote Originally Posted by aged_sage View Post
    Incidentally, I had intended to include a very inexpensive way to make your own brass 'plug cutters' in my earlier post; but just plain forgot. You can buy brass tubing in about any diameter your heart desires at almost all hobby stores, hardware stores,and the big box stores. Simply cut it to length for the the thickness of the material you are going to cut them from, plus some extra to allow for chucking in an electric drill, or drill press. File or grind a bevel aroundonend to form a cutting edge. Now, just above the cutting edge, but well below the upper chucking end, using a cylindrical grinding stone, such as for a Dremel, grind out one side at least half way through the tube, creating an elongate 'gate' on that side. Next, take a piece of dowel with a diameter equal to the I.D. of the tubing, and cut one end off at a 60 degree angle. Push the angled end into the tubing until the 'top' of the angled cut is just at the edge of the 'gate', and square with it. This will have the long point of the angle well below the upper level of the 'gate' and along the backside of the cutter. Epoxy into place, and cut the excess off that projects out of the upper end of the tube. You can cut one plug after another without having to remove them one-by-one as they are cut.

    What you have done is create a plug ejection window (gate), an 'automatic' ejector (the dowel), and reinforced the upper section of the cutter to minimize chuck jaw damage (deformation) to this end of the cutter. As you cut into the foam and a plug is forming inside the tube, when it reaches the lower end of the dowel, it begins to force the top end of the plug out through the side 'gate'.


    Regards,
    Frank

    Or...just buy a set of these and cut till your heart's content....

    http://www.harborfreight.com/6-piece...set-67030.html

    Brad
    "A woman drove me to drink and I didn't even have the decency to thank her."
    -W.C. Fields

  8. #8
    Join Date
    Feb 2008
    Location
    Sheffield Lake, Ohio
    Posts
    320

    Default

    Quote Originally Posted by aged_sage View Post
    The device works the very same way the the prongs on each end of a rotisseri' rod work. They keep the cork from moving around the central 'shaft'. Otherwise, they would spin when you put sandpaper, etc., up to them to shape them.

    Incidentally, I had intended to include a very inexpensive way to make your own brass 'plug cutters' in my earlier post; but just plain forgot. You can buy brass tubing in about any diameter your heart desires at almost all hobby stores, hardware stores,and the big box stores. Simply cut it to length for the the thickness of the material you are going to cut them from, plus some extra to allow for chucking in an electric drill, or drill press. File or grind a bevel aroundonend to form a cutting edge. Now, just above the cutting edge, but well below the upper chucking end, using a cylindrical grinding stone, such as for a Dremel, grind out one side at least half way through the tube, creating an elongate 'gate' on that side. Next, take a piece of dowel with a diameter equal to the I.D. of the tubing, and cut one end off at a 60 degree angle. Push the angled end into the tubing until the 'top' of the angled cut is just at the edge of the 'gate', and square with it. This will have the long point of the angle well below the upper level of the 'gate' and along the backside of the cutter. Epoxy into place, and cut the excess off that projects out of the upper end of the tube. You can cut one plug after another without having to remove them one-by-one as they are cut.

    What you have done is create a plug ejection window (gate), an 'automatic' ejector (the dowel), and reinforced the upper section of the cutter to minimize chuck jaw damage (deformation) to this end of the cutter. As you cut into the foam and a plug is forming inside the tube, when it reaches the lower end of the dowel, it begins to force the top end of the plug out through the side 'gate'.

    I am not really knocking Sleazy Steve's, but you have to manually extract each plug before cutting the next one, and getting them out can be a PITA due to the presence of the pilot bit built into them. I had one, and had another the same size given to me. As they were such an aggravation, I quit using them and ultimately gave one away. He would make them much more 'user friendly', IMHO, if he left that pesky pilot bit out. Unfortunately, it will not be easy to either cut, or break, it out. I have carefully pursued this option! (I presume it is hydraulically pressed into the solid brass base.) Plug extraction is not a problem with my home-made ones.

    The absence of the pilot bit hole through the center does not inconveinence me as I do not like a hook through the very center of a bug. I can take an old hacksaw blade, or a 'cut-off disc' in my Dremel, and cut a groove in what is to be the bottom to accomodate a hook.

    Regards,
    Frank
    I use them for balsa wood. I dont use the pilot center hole for my hook but will use a fine mitre saw blade and mini files to notch the bottom of my bodies and epoxy the hook shank.
    It only take me about 20 minute to make a dozen bodies. The best thing that ever came out for making better popper than those pre casts foam junk.

  9. #9
    Join Date
    Jan 2007
    Location
    Portage, PA
    Posts
    2,900

    Default Cutters/Harbor Freight

    Brad, is it hard to remove the cut foam from the cutter? Do you use something to sort of grease it up?
    Bruce

  10. #10
    Join Date
    May 2009
    Location
    Katy, Texas (Houston is our biggest suburb!)
    Posts
    528
    Blog Entries
    1

    Default

    Kaboom...

    Great suggestion. Unfortunately, they will not be useful in the cutting out of my balsa pencil popper bodies, the way I do it. Whereas, the brass cutters I describe will do both for me. These are not long enough. I use 4" long brass cutters for my large pencil popper bodies.

    Brad: to answer your question to Brad; No you do not use a lubricant. Cutting the second one forces the first one out, etc., just like I described in my SBS for making your own. If you use something like this, and feel a need for a lubricant, glycerine, available at most all drug stores, works great and is environment friendly, relative to the petroleum oils.

    Frank

+ Reply to Thread

Similar Threads

  1. Steve's Hare's Ear SBS
    By ScottP in forum Fly Tying
    Replies: 4
    Last Post: 10-30-2016, 01:48 PM
  2. Thank You Steve Molcsan!
    By nighthawk in forum Sound Off
    Replies: 3
    Last Post: 03-23-2011, 11:20 PM
  3. Steve Molcsan
    By nighthawk in forum Fly Anglers Online
    Replies: 0
    Last Post: 03-21-2011, 12:47 AM
  4. Calling for Steve P
    By Flyfish4troutguy in forum Fly Anglers Online
    Replies: 3
    Last Post: 04-30-2010, 01:50 PM
  5. Custom fly rod Steve
    By SteveP in forum Rod Building: Cane and Graphite
    Replies: 1
    Last Post: 03-24-2010, 05:19 PM

Posting Permissions

  • You may not post new threads
  • You may not post replies
  • You may not post attachments
  • You may not edit your posts