+ Reply to Thread
Results 1 to 10 of 46

Thread: Switch Rod - Step by Step Build

Hybrid View

  1. #1
    Join Date
    Dec 2004
    Location
    Mt Pleasant, MI USA
    Posts
    193

    Default Switch Rod - Step by Step Build

    Hello. I've been wanting to photo document one of my builds for a while now for my own purposes and am finally getting around to doing it. I thought if there was interest that I would post the step-by-step process on the board as I go along. I thought it might be neat for others to see.

    Anyway, I am building a 10'8" 7wt switch rod for myself. This will be a new addition to my steelheading arsenal to replace a rod I broke last year. I'm not a super fast builder so dont expect this to go at lightening speed. I basically only work on it after my son has gone to sleep and a bit on the weekends. I already have a bit of a jump on the build so I hope you enjoy the photos. Stay tuned for more as I make progress on this rod.

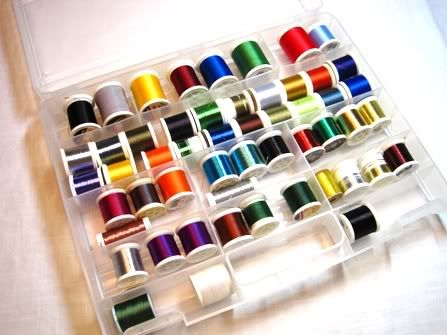
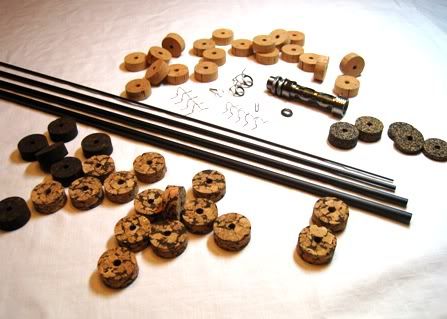
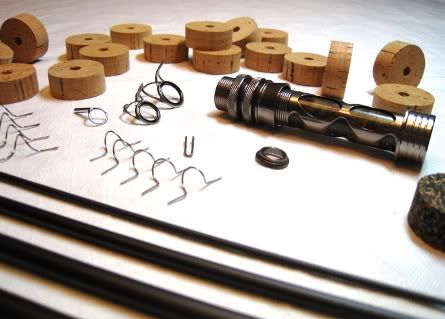
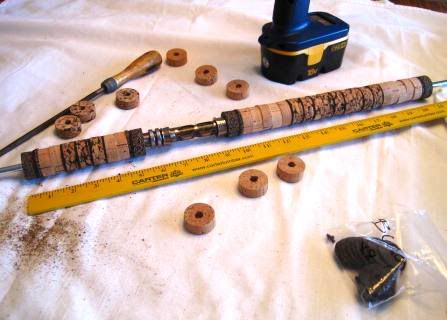
    Heres the complete set of starting materials. Batson 10'8" 7wt Switch rod blank, American Tackle Braided Window reel seat, TITAN titanium stripping guides (size 16 and 12) REC recoil heavy wire snake guides, Cork (regular, burnt, copano and dalmation rubberized)


    Here is a closer look at some of the components


    The first step for me was to work on the handle. I normally turn handles out of exotic hardwoods on my lathe so it has been a while since I have made a custom cork handle. I like the wood handles but it just wont work for this rod as the handle will be pretty large.

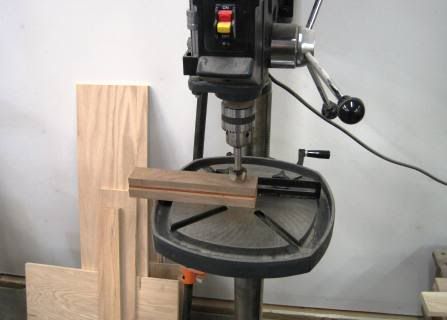
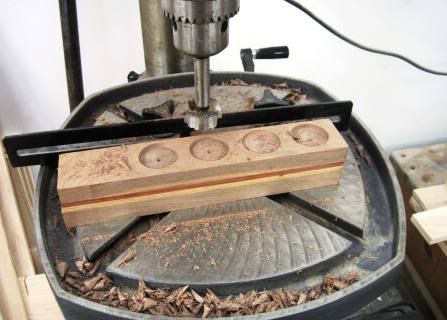
    I had an idea in my head of what I wanted for a handle and it involved some thin trim bands of burnt cork. Time to make a jig.....Here is the scrap piece of wood I used to make the jig.....


    Using a Forstner bit of the appropriate size I drilled out 4 shallow holes of varying depth....each hole would be for a different thickness cork trim band (assuming I will want different thickness trim pieces for different handles in the future).


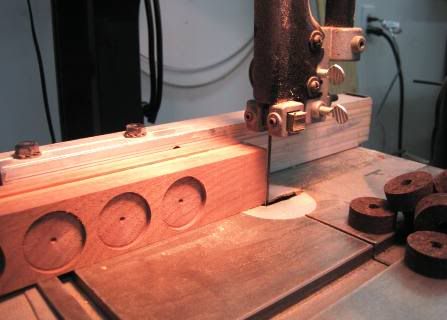
    Next thing was to get the jig lined up on the bandsaw. I wanted the blade of the saw to run flush with the surface of the jig.....


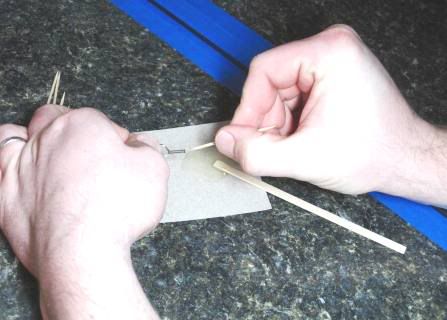
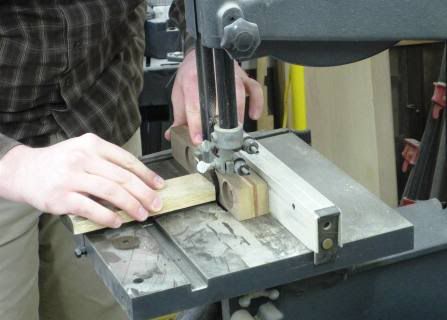
    Here's a photo of the jig in use. I use a push stick to hold the cork square into the previously drilled holes. The bandsaw slices off the body of the cork and you are left with a nice thin ring the depth of the hole....


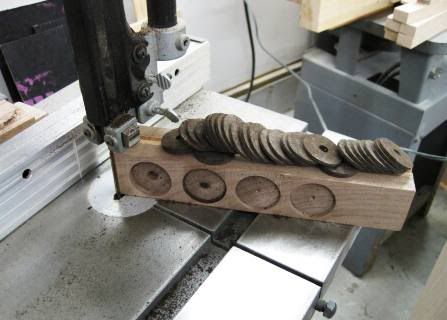
    As you can see the jig works pretty well yielding trim rings 3/32 inch thick and all uniform. Not bad for a jig that didnt cost me anything but a few minutes of time....


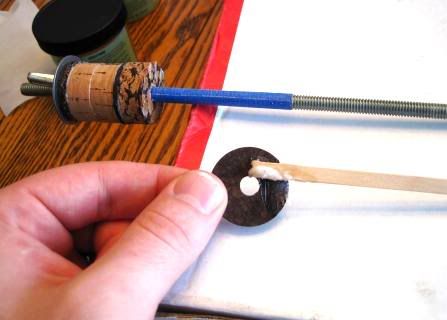
    Next step was to ream out all of the cork and make sure it fit well on my gluing mandrel....


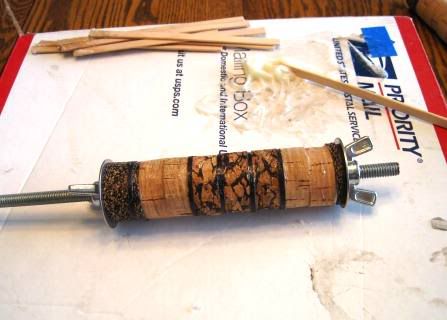
    Next was to play with different orientations of the cork and arrive at a design that I liked. This is what I ended up liking......


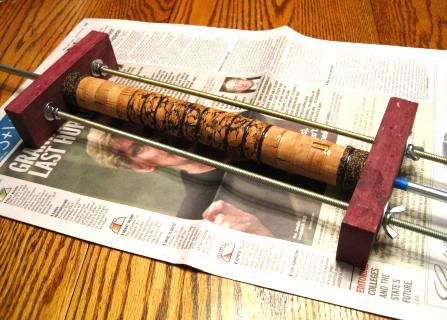
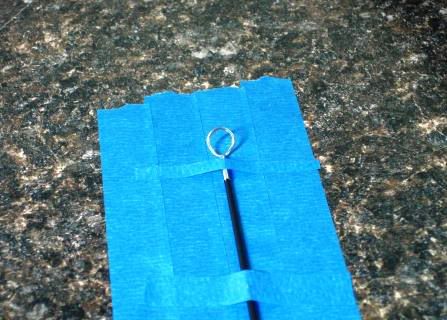
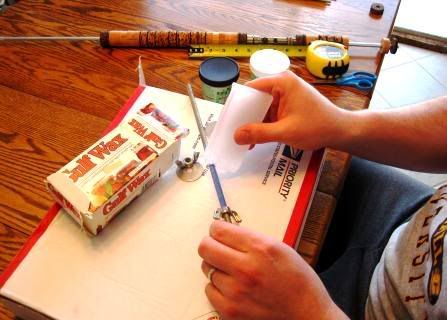
    I glued the butt piece together first. This piece is about 5 inches long so I just used a threaded rod. Apply painters tape first to the areas where the cork will be and then rub with parrafin wax to make sure the epoxy doesnt stick to the mandrel.


    I'm hitting my limit now for # of pics in a post so thats it for now, I'll post more very soon.
    Hope you enjoy.

    Yonks
    Last edited by yonks311; 02-02-2010 at 01:43 AM.

  2. #2
    Join Date
    Dec 2004
    Location
    Mt Pleasant, MI USA
    Posts
    193

    Default

    Ok...here's some more of the build I have done so far.....

    I'm using U-40 Rod bond for the glue up. I applied a thin layer of epoxy to each mating surface to ensure a good joint...


    Here's the bottom part of the grip all glued up and in the mandrel. I will add one more piece to this after it has dried. This will be another piece of the rubberized cork however with no hole in it to form the very bottom piece of the grip.


    I used to always just use threaded rod as mandrels when gluing up cork, but since this foregrip is pretty long (12 inches) I was worried about the straightness of the threaded rod. Easy solution, make up a cork clamp with steel mandrel. I had some scrap pieces of purpleheart laying around that I cut to size. Only had to buy the threaded rod and steel mandrel as I also had the washers and nuts left over from other projects....


    Here is the final product. Cost me less than $5...beats the $20 they want for the same thing from Cabelas.


    Next step was to glue up the foregrip. I underestimated how long this would take. All the little trim bands and extra length of the handle sure make for a lot of surfaces to put glue on. I felt like I was gluing forever! Anyway here is the handle all glued up and in the new cork clamp....


    Thats all I got for now. I did those glue ups yesterday and so I want to give them plenty of time to cure. Probably turn the handles on the weekend. In the meantime there are other things to do.....like pick out colors.....oh man too many options....


    Hope you are enjoying following along. I'll try to post updates as soon as I make progress.

    Take care.

    Yonks

  3. #3
    Join Date
    Jun 2009
    Location
    Littleton, Colorado
    Posts
    2,256
    Blog Entries
    3

    Default

    I think I am as tickled with tools that I build as I am with what they help me make sometimes.
    Kevin


    Be careful how you live. You may be the only Bible some person ever reads.

  4. #4

    Thumbs up

    Yonks -

    Great job with the pics and the narrative. And a very creative approach, both with the tools and the grip.

    Really looking forward to watching this step by step all the way through.

    John
    The fish are always right.

  5. #5

    Default

    I want to build a rod soon and have not found a menter yet or a confidence builder.Perfect timing.Looking forward to your build.Ray

  6. #6
    Join Date
    Sep 2006
    Location
    South Wales, UK
    Posts
    272

    Default

    Great pictures and descriptions - I'm really looking forward to your next installment!

    Cliff

  7. #7
    Join Date
    Nov 2004
    Location
    California
    Posts
    412
    Blog Entries
    2

    Default

    Thanks for taking the time to post your pictures and document the build. This will be fun to see it all come together. I like your idea of the trim rings of burnt cork. I went steelheading last week and ended up doing a lot of single handed spey type casting with the 9' 6" 7 weight (the new Scientific Anglers steelhead line works good for that). It made me want to build one of the Batson swich rods, too.

  8. #8
    Join Date
    Dec 2004
    Location
    Mt Pleasant, MI USA
    Posts
    193

    Default

    Thanks guys. Glad you like the photos. I'll do my best to keep moving along and keep posting photos in a timely fashion. Maybe posting on the board is good motivation to keep me working on it diligently.

    Still waiting until the weekend to turn the grip but I did manage a little bit of work last night. Here are just a couple more photos...

    I put all the pieces together and this rod is VERY straight. Normally I would just forget about finding the spline and just assemble in the straightest fashion, but since this was already so straight I decided to go ahead and find the spline. I was able to locate the spline on the two top pieces but the bottom two were too heavy and short for me to locate it......Heres a photo of finding the spline on the top piece.....


    Once I located the spline it was time to glue on the tip top. I never have been a fan of the "tip top adhesive" so I use epoxy. Use a toothpick to get some inside the sleeve of the tip top and apply a little onto the blank. Clean up with isopropanol.....


    I like to tape the blank down to the counter in the proper orientation and then tape the tip top in position so it doesnt move while drying. I've always wondered if others are doing a similar thing or if you have other methods....


    Thats it for now. Take care.

    Yonks

+ Reply to Thread

Similar Threads

  1. Pine Squirrel Cheater - Step by Step
    By JohnScott in forum Fly Tying
    Replies: 8
    Last Post: 04-13-2013, 01:50 PM
  2. Step by Step mayfly nymph pattern
    By fishtooth in forum Fly Tying
    Replies: 4
    Last Post: 01-20-2013, 07:44 PM
  3. Step by Step Prince Nymph
    By fishtooth in forum Fly Tying
    Replies: 13
    Last Post: 01-06-2013, 08:59 PM
  4. Step-by-Step of the usual
    By davidm in forum Fly Tying
    Replies: 1
    Last Post: 04-27-2008, 08:22 PM
  5. Wooly Bugger Step By Step
    By Flyguy5910 in forum Fly Tying
    Replies: 14
    Last Post: 09-17-2007, 12:05 PM

Posting Permissions

  • You may not post new threads
  • You may not post replies
  • You may not post attachments
  • You may not edit your posts