+ Reply to Thread
Results 1 to 10 of 52

Thread: Furling Board Features

Hybrid View

  1. #1

    Default Furling Board Features

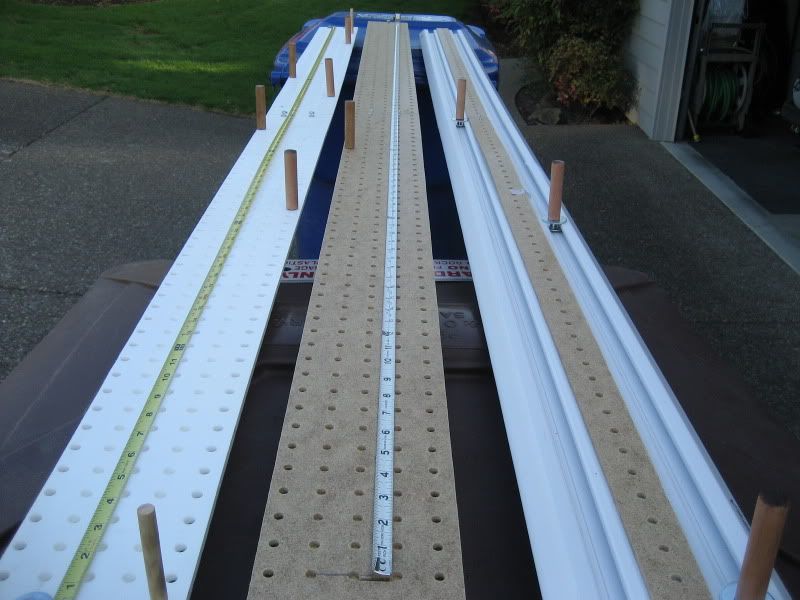
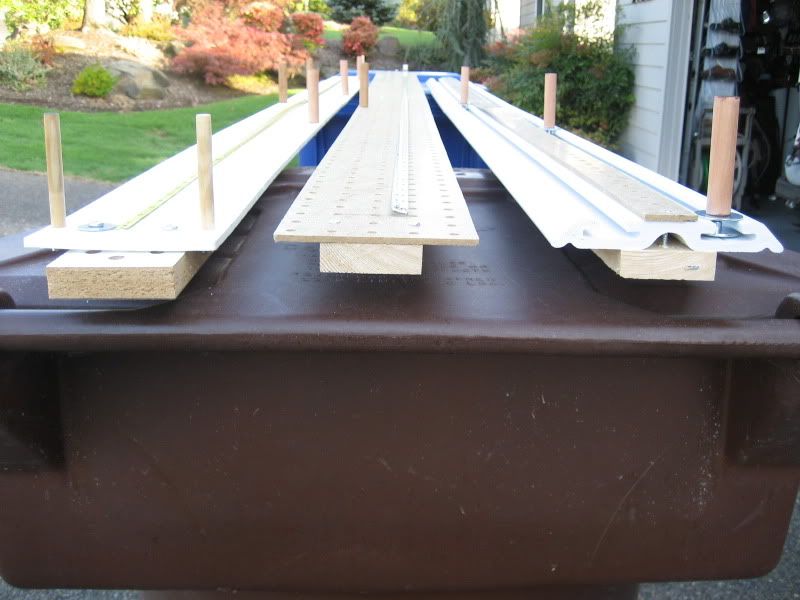
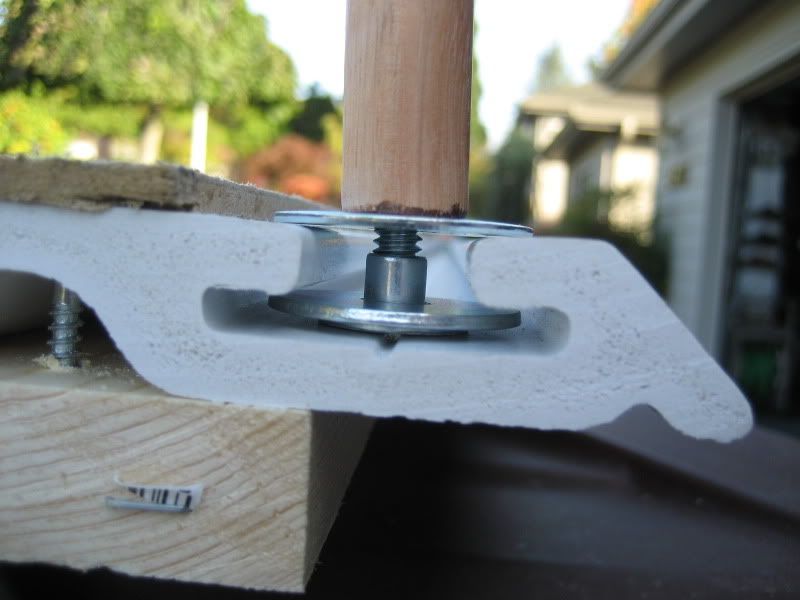
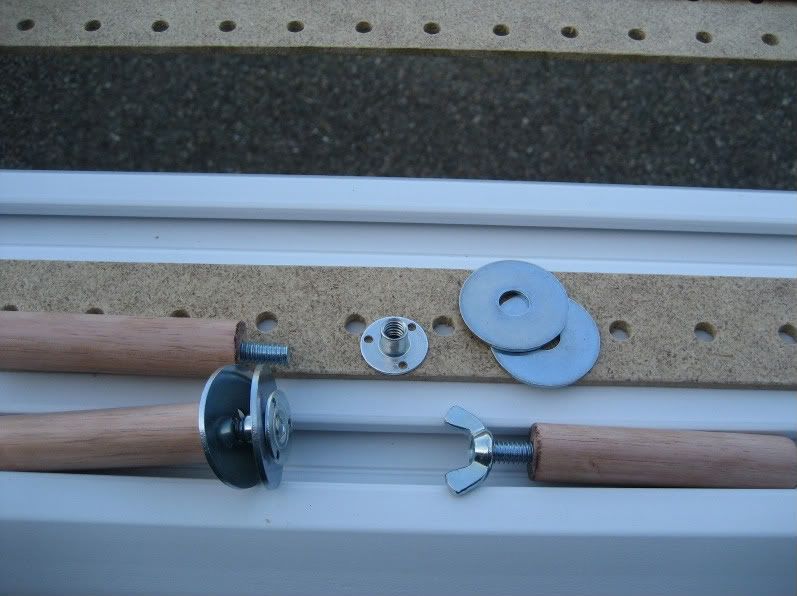
    I'd like to build a board that allows multiple positions of the pegs.

    For my current board I just have kept drilling more peg holes and that works...they are sort of a hodge podge so I 'd like to streamline. ...not very interested in drilling a whole bunch of holes say an inch apart.

    I have seen the really fancy ones some of you have with metal tracts and all.... besides not being anything close to a cabinet maker....I'd like to keep the costs down.

    Anyone have any suggestions?

    Kaboom1 are you still using the one you presented in that previous long furling thread? I'd be interested in more details of how you made the pegs....or any thing you would have done differently...or other advice.

  2. #2
    Join Date
    Jun 2009
    Location
    Metuchen NJ
    Posts
    168

    Default

    Hi Ducksterman.
    I'm at the same stage you are. I just built a 3 hooked geared turning head with a 3 speed fan motor on it. My board looks like Swiss cheeze with all the holes in it. I'm building another board & I'll be using those t tracks.
    I've seen them for any where from $9.94 to $29.00 for a 4 ft length
    The cheapest is from McMaster Carr. If you get a better price let me know.
    I was just going to screw them down to a board & use bolts into wooden dowels.
    http://www.mcmaster.com/#1850a19/=3vkgtp

  3. #3

    Default

    Hey folks a short highjack of my own thread....ask Fishn50 for pictures of his motor system ....neat

  4. #4
    Join Date
    Jun 2009
    Location
    Metuchen NJ
    Posts
    168

    Default gearbox

    Thanks ducksterman
    Here's the picture of the motor & gearbox I just made. I used Shoulder bearings & sandwiched the gears between them on 1/4 " Alum plate. I couldn't wait to try it out & mounted it any old way so this is not the final mounting system I have in mind. What a difference it makes. It is soooo much easier & quicker to use the 3rd hook to furl.
    Attached Images Attached Images

  5. #5
    Join Date
    Aug 2004
    Location
    Elida, Ohio
    Posts
    1,696

    Default

    My solution for allowing multiple positions of the pegs was to rout a 1/4" groove in the furling board. The T track was just too expensive for my taste. The groove cost me the price of a new router bit and I have it for other projects. Here is a pic of the board


    And a couple of shots of the pegs


    The pegs are made with PVC plumbing parts and a 1?4' carriage bolts and nuts. The nut is trapped in a PVC fitting inside of the peg and allows you to tighten tyhe peg at the desired position on the board.

    Duck

    I am really happy with the board and pegs. They were cheap and work very well. So far I wouldn't change a thing. If you give me a couple of days, I will try and give yoy some detailed pictures of the peg construction.

    Brad

  6. #6

    Wink

    Duck -

    Very timely thread, so to speak.

    I just gave away my old furling jig to a friend in Idaho Falls as a part of my move, and have been planning to build a new one, probably mechanized with a set speed motor and a timer to control the consistency of the process, when I get settled in Missoula.

    This thread, with the great posts by FISHN50 and Kaboom1, really put a nice twist on the process. Caused me to furl my brow on a couple of the details, but .....

    John
    The fish are always right.

  7. #7

    Default

    Quote Originally Posted by FISHN50 View Post
    Hi Ducksterman.
    I'm at the same stage you are. I just built a 3 hooked geared turning head with a 3 speed fan motor on it. My board looks like Swiss cheeze with all the holes in it. I'm building another board & I'll be using those t tracks.
    I've seen them for any where from $9.94 to $29.00 for a 4 ft length
    The cheapest is from McMaster Carr. If you get a better price let me know.
    I was just going to screw them down to a board & use bolts into wooden dowels.
    http://www.mcmaster.com/#1850a19/=3vkgtp
    Just was at Lowes today and happened to see what is called GearTrack Channel...it is $9.97 for a 4 ft length but each length has 2 "T' tracks built in....it's basically a board...not wood...

    Here's a picture...[Lowes does not list it in the website]... the sites that list it online have higher prices...

    http://www.thegaragedesigncenter.com...C042PPY-f3.jpg

    The height of the T is narrow so one would have to use a flat head bolt and washer....the a peg with a tee nut....should be easy.

    As I see it...

    20 bucks for an 8 ft board with the tracks already done...

    Easy to drill a few center peg holes....you could route the center but you won't find me recommending that.

    I think this would be a rather quick and easy...relatively inexpensive route to go....

  8. #8

    Default A Tip

    Going to toss this tip in from my old days when I was glass bedding rifles...probably most of you know this but when working with epoxy if you want to mould it to something but want to break that bond when you are through...you use a "releasing agent"....actually a can of vegetable oil works just fine.

    I see a use for that if you are going to epoxy in some tee nuts and are worried about getting epoxy in the threads....coat a bolt.... thread it up... and it will release after the epoxy has set.

  9. #9

    Default Overkill

    Did I mention that I needed two boards? Well I do... for another location.
    Sooooo in going after pegboard I saw the GearTrack mentioned above...couldn't resist ...so I made a board with it.

    Here are the three boards I ended up with....maybe the ideas will help some one...easy and inexpensive boards....pegs interchangable...


    IMHO the pegboard setup is the easiest to use and very inexpensive...pegboard $3.78 and I had the Lowes do the cutting.
    I'll probably remove the pegboard strip on the GearTrack when the holes are drilled.

    Storage is not a problem for me so I left the boards at 8 ft...they easily could be cut in sections.

    Well the journey is over.....

  10. #10
    Join Date
    May 2009
    Location
    Katy, Texas (Houston is our biggest suburb!)
    Posts
    528
    Blog Entries
    1

    Default

    A couple of comments about making a furling board. One of the frequent topics is timing of the twisting! One can forget counting twists, twisting times pigtailing,etc., if you include a micro switch in the system, and use the proper tension weight for the material you are using.

    It has been mathematically demonstrated that there is a point at which maximum twist will be reached.Trying to furl beyond this point will break the material, which only stands to reason. Also, if proper twisting tension (weight) is applied, it will NOT pigtail before reaching this point. Thus, the point that gives maximum twist is that point at which the materials break without pig tailing.

    Knowing the tensil strength of the material you are using will enable you to calculate the breaking strength (tensil strength) of your doubled leader, and use this weigh accordingly to the specific material, as Karel has done. If you use a traveling tensioner hook, as apparently ducksterman does, and I do, by setting the extended actuator arm across the tensioner guide track and locking it in place at the end point for the length of your leader, when the tensioner carrier reaches the actuator, it will automatically turn things off; provided that the actuator arm is low enough for the carrier to interact with it.

    In my experience, twisting and furling speed does not have a noticeable effect on the end product. I use an old sewing machine motor that is wired to a dimmer switch for a rheostat, and have successfully furled at over 300rpm (actual tachometer measurements). There is a speed at which it can be difficult to maintain control of things (I have an ON/OFF toggle switch to fall back on should the micro switch fail me, and I always keep a finger on this switch and watch the twisting process for untoward happenings. I use this switch to turn everything off after the two legs have been twisted and while moving both legs to the furling hook.)

    I need to spend a little time and learn how to post photos her, and as soon as I figure it out, will post photos of my "rig".

    aged sage
    Last edited by aged_sage; 01-13-2011 at 10:14 PM. Reason: Typo

+ Reply to Thread

Similar Threads

  1. Furling
    By okflyfisher in forum Fly Anglers Online
    Replies: 10
    Last Post: 10-24-2015, 07:46 PM
  2. Furling Flurocarbon
    By moonlitflies in forum Furling
    Replies: 23
    Last Post: 02-05-2012, 06:52 PM
  3. Furling re: 10% and pigtailing
    By ducksterman in forum Furling
    Replies: 2
    Last Post: 01-14-2011, 06:06 PM
  4. Furling Q??? Yet another!
    By brhoff in forum Furling
    Replies: 3
    Last Post: 02-24-2008, 02:23 PM
  5. Features: What's Cookin' ?
    By MrsKneppPA in forum Sound Off
    Replies: 53
    Last Post: 10-18-2007, 10:09 AM

Posting Permissions

  • You may not post new threads
  • You may not post replies
  • You may not post attachments
  • You may not edit your posts