Is the fly effective? You bet it is and easy to cast as well!
Jerry calls it 'ultra-dry" because it is almost impossible to
sink. The fly hits the water with a telltale splash that
alerts the fish to its exact location. From there it's a
matter of setting the hook because the fish is going to strike.
Jerry designed it to be a trout fly, but has caught bass and
steelhead on it as well.
Materials for the Hole-In-One Stonefly:
Hook: TMC 200R, size 4.
Thread: Orange & fluorescent orange.
Tail: Black biots.
Body: Hot orange golf tee.
Over back: Black latex.
Rib: Black Larva Lace.
Wing: Automotive upholstery fabric.
Head: Deer hair, bullet style.
Eyes Melted monofilament.
Legs: Rubber leg material.
Antenna: Black wild boar hair.
Tying Instruction for the Hole-In-One Stonefly:
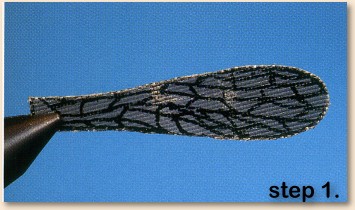
Step 1: Prepare the wing by coating the rip-stop upholstery
fabric with a thin coat of gray water-based paint. Allow it
to dry, then cut the wing to shape as illustrated. Apply the
vein markings with a felt-tip marker or stamp. Spray the wing
with clear acrylic to waterproof it. Set it aside to dry. Also
cut a half-inch section of monofilament and melt the ends to
form a set of eyes. Color them with a black marker and set them
aside as well.
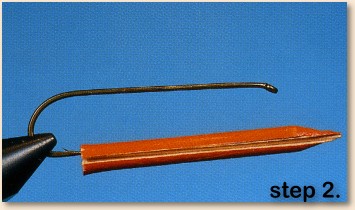
Step 2: Cut the large end from an orange golf tee and discard
it unless you plan to use it as a pan-fish popper head. Saw
a slot length-wise in the remaining slender portion that is
deep enough to cut about half way through the piece. We've
stuck the prepared golf tee on the point of the hook for
illustration purposes only. It is mounted on the hook in
the next step.
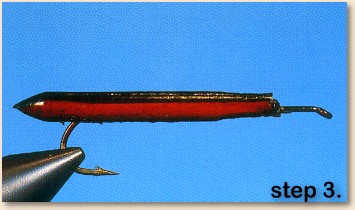
Step 3: Mount the body on the hook using Shoe Goo or epoxy
and allow it to dry. Be sure the front 1/4 of the hook shank
remains bare. The body should extend beyond the end of the
shank no more than 3/8 inch. After the glue is dry, color
the top of the body with a black felt-tip marker.
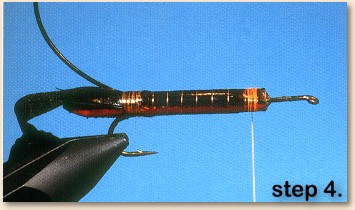
Step 4: Attach the orange thread at the very end of the
hook shank and trim the waste end. Tie a black biot on
both sides of the body as a tail and cut off the excess
material. While at the end of the shank, tie on a
1/4-inch-wide strip of black latex directly on top of
the body. Next attach a section of black Larva Lace on
the off side of the body. Wrap the thread forward to the
front of the body forming evenly spaced turns later to
be covered by the rib.
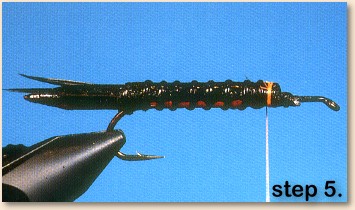
Step 5: Fold the latex over, tie it down at the front
of the body, and trim the excess. Wrap the black Larva
Lace forward to form a rib, spacing the turns so it
covers the thread placed in the last step.

Step 6: Position the wing on top of the body, bind it
in place, and trim away the waste end. Apply a coating
of head cement to the wing/body juncture. Whip finish
the orange thread and trim it from the hook. Tie on the
fluorescent orange thread and advance it to the hook eye.
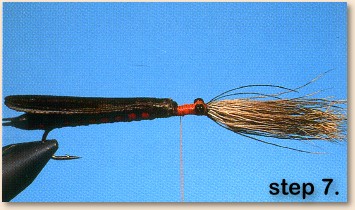
Step 7: Select, clean, and stack a clump of deer hair.
Adjust it so the fibers are equal in length to the hook
shank then spin it around the front of the hook with the
tips pointing forward. Trim off the waste end then cover
them with a thread base. Tie on the eyes shaped in Step
1 then tie on two wild-boar fibers to form the antennae;
they should extend forward one-half inch.
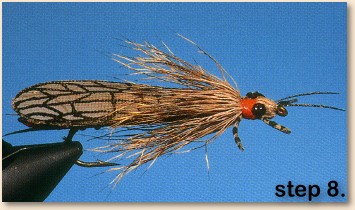
Step 8: Pull deer hair over to form the bullet head. As
you bring the hair back take care to allow the antennae
to remain pointing forward. Form the head and bind it in
place. Cut two sections of rubber leg material and tie
one of them to the off side of the hook so one end sticks
out next to the eye and the other next to the body. Repeat
the process on the near side of the hook. Whip finish the
thread and trim it from the fly. Trim the legs to length
and spot them with several drops of black head cement to
provide texture. Apply a coating of cement or Aqua Tuff
to the bullet head and orange thread wraps. ~ Al & Gretchen
Credit: The Hole-In-One Stonefly is one of the
many great conceptual and innovative flies in their book,
Innovative Flies and Techniques published
by Frank Amato Publications.

