|
It is on the bulletin-board, guys ask about it
in the Chat-room, I get e-mails about it, students
want to know how, at 'Fish-In's' they inquire,
strangers on the street stop me and ask, "How do
I do the 'Double-Haul'?"
Never have so many written so much about something
which is so simple and made such a complicated mess
out of it as the double-haul. People with
room-temperature 'IQ's' can perform it with ease
and well-papered scholars are mystified by it. It
is high time that this situation be corrected and
I, James Castwell, am here once again to rectify
the enigma.
From this point on completely disregard
all you have ever read about it, as most of it was
hog-wash written by over-paid writers who had only
seen it done in on TV and that was obviously wrong
because those are actors not real fly-fishers like
you and I.
Here is a picture we shall be using for the rest of
this exercise. You might do well to print a few copies
and tape them in conspicuous (or perhaps inconspicious)
places in your home, work place and vehicle. Refer to
them as often as needed as this will help ingrain the
instructions for future use when needed. Remember too,
that once you have learned this, (and this is the only
correct method), do not at any time attempt to teach
this to anyone else. You are barely able to comprehend
it yourself now, after a long period of frustration,
you are not remotely qualified to pass this along to
another, and most likely never will be.
 If by this time you still have not figured out how to
perform the double-haul, I will type slowly and also
point out some of the features of the picture that,
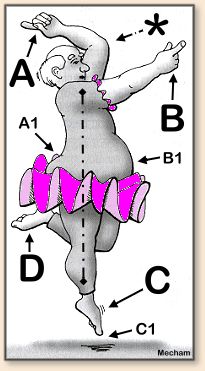
to you, may not be immediately noticeable. There are
strategically placed about the caster a series of
letters from the standard English alphabet, namely
the letters, A, B, C and D. Included in a smaller
size are also, A1, B1, and C1. Do not look for a D1,
there isn't one. Had there been a need for a D1, I
most certainly, would have put it on there.
If by this time you still have not figured out how to
perform the double-haul, I will type slowly and also
point out some of the features of the picture that,
to you, may not be immediately noticeable. There are
strategically placed about the caster a series of
letters from the standard English alphabet, namely
the letters, A, B, C and D. Included in a smaller
size are also, A1, B1, and C1. Do not look for a D1,
there isn't one. Had there been a need for a D1, I
most certainly, would have put it on there.
Notice first off the distance indicated at C1. This
is a personal choice and is determined by one's own
style. That is, novice (tyro) and professional (expert).
There seems to be no middle ground here, either one can
do this or one can not, period. The experts seem to
increase this distance over that performed by the
novice. This can be produced at any time during the
cast, but looks rather silly if done in public, especially
without a fly rod in evidence. I suggest one practices
this move in private. In fact, most of this should not
be for public consumption.
The term 'weight-forward' is explained by the arrow
at B1. Any more description of this is unnecessary,
redundant, not needed and I won't comment further
upon it. The letter 'C' illustrates the correct attitude
of the foot and toes during the cast, the quivering
is an affectation of the model for this picture and
is not at all desirable, omit it at all costs. Note
here; notice the line from the foot to the nose, it
is perfectly straight. This is not important but I
thought it looked nifty so I put it on there, you can
remove it is it interferes with your concentration.
'D' is a must. If one does not hold his 'off-foot'
thusly, one shall most certainly fall over. The foot
held aloft in that fashion is indeed a counter-balance
to the before mentioned, 'weight-forward' shown at B1.
As 'falling-over' is frowned upon now that you have
matriculated to fly-fishing, you should really try
to avoid doing so. (A1 is also a counter-weight and
can be developed as needed. If this increases, one
may attempt to keep both feet on the ground, but
certainly not in the early stages of learning.
Our 'Caster' is of course left handed and would be
holding his fly rod in his left hand signified by
the arrow at A. Several students of mine have proclaimed
to have the disease of aixelsyd so I put in a 'Lefty.'
Feel free to transpose if desired. So, with the rod in
his left hand (A) and pointed to the rear, (not his,
way out behind him somewhere) the reel would be on top
and the line would be running from the fly (way out in
front of him, like out where he is pointing with his
right hand) back to him and over his head and reversing
it's path back to the rod tip (beyond the A, to the left
someplace) down through the rod to the reel. That is
except for the section of line he has jerked loose and
is holding in his 'off-hand' (B). Note here; that one
fingered gesture is also useful for hailing a cab or
buying something important at an auction. The distance
between the juxtaposed finger and thumb should not be
taken as a measurement for anything at all, ever.
This is the hand which controls all of the important
functions of the DH, or as some avow, the DDH. It jerks
the line in a semi-syncopated rhythm interposed with
the manipulations of the fly rod in semi-sequence of
cadence. Simple, as you can now see for yourself.
Another note here; the 'star' by the higher elbow
is to indicate that the elbow should be leading the
ast. I have no information on this but have read it
for years and still do not understand it. But, it
must be the right way, so many fine writers have
said so.
Clothing is optional I suppose, that is, the tutu is
not required but, does seem to ad a bit of a flair to
the exercise, once again, that choice is, I suppose,
yours. Well, there, now you have it. The first really
important, concise, anatomically correct, perfectly
done, highly informing and darn near a classic in the
annuls of fly-fishing writings. In fact, most of what
I write is almost that good.
I hope you take this in the spirit of which it was writ,
just not too much of it at one sitting.
~ James Castwell
|

