
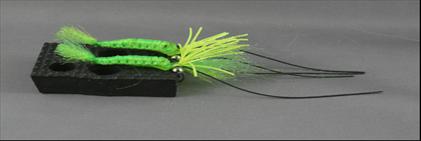
INDESTRUCTIBLE SHRIMP
Find a Louisiana oyster reef and you will find redfish, flounder and speckled trout prowling the shell beds for crabs and shrimp. Flies must be fished on the beds slowly. Oyster beds are remarkably destructive and dragging a conventional fly over the razor sharp edges will result in a hang up or the fly will be quickly shredded. Flies must be durable and must ride hook-up on retrieve. Man-made materials can provide a dependable level of durability and the Indestructible Shrimp was designed to be retrieved very slowly across any bottom materials, including oyster beds. The pattern may be tied on circle hooks or "J" hooks depending on the fisherman's preference. The body of the fly is made of Pony Bead Lacing, available from Hobby Lobby or www.craftsetc.com in a limited selection of colors, but may be purchased in "glow in the dark" colors, which are particularly effective for fishing at night under the lights of a dock or pier. Whether or not it actually does any good, Louisiana fishermen swear by rattles. Tying with a rattle is possible on hook sizes down to a 6, but smaller flies can be tied on the same hook without the rattle if the target species is feeding on smaller shrimp.
Materials:
- HOOK: Mustad 34011 Size 1- 6 ("J" hook) or Mustad C71S (circle hook) Size 2-1/0
- THREAD: Danville's Flat Waxed Nylon
- EYES: Large Bead Chain
- ROSTRUM & TAIL: Super Hair
- ANTENNAE: Round Rubber Leg (medium)
- LEGS: Silicone Skirting Material
- RATTLE: Worm rattle (3mm-4mm)
- BODY: Elastic Round Plastic Pony Bead Lacing
- Making a thread base and mounting eyes: Wrap a tight layer of thread from the middle of the hook shank to 1/3 down the bend of the hook. If clear lacing is used, the thread color will show through the final shrimp (consequently color variations in the fly are virtually unlimited). Tie in the eyes using a figure eight wrap at the point where the thread stops in the hook bend and put on a drop of Super Glue. Loctite Easy Brush super glue is the easiest to apply.
- Making the rostrum: Lay a small diameter bundle of super hair with uneven ends across the middle of the eyes and figure eight wrap through eyes, then tie down the excess hair 1/4 inch along hook shank and cut off the remainder. Placing all the materials in steps 3-5 between the eyes is necessary for correct appearance.
- Making the Antennae: Fold a 4"-6" black rubber leg in half, loop around the hook shank and bring down to the eyes then pull through the center of the eyes and tie down with figure 8 wrap.
- Making the Legs: Take three standard silicone strands from a spinner bait skirt (each strand will be about 5" long). Fold twice (making 12 legs) and loop the folded bundle around the hook shank and bring down to the eyes then pull through the center of the eyes and tie down with a figure eight. Cut the loops open made by folding.
- Putting on the rattle: Put a layer of superglue along the thread covered top of the hook shank behind the eyes and lay a rattle on the glue with the pointy end toward the hook eye. Wrap many winds of thread over the rattle. This will show through the clear lacing, to be added later, as the body color of the shrimp.
- Tying in the body material: Tie in two long pieces of round stretch plastic Pony Bead Lacing along the hook shank where the rattle meets the shank. Have the ends of the lacing nearest the hook eye come just beyond the rattle where they will lay below the pointy end to fill the space between the rattle point and the hook shank to make a base to slope a thread wrap toward the eye. Have the long tails of the material hang over the hook bend and leave 3/8 - 1/2 inch of shank from the hook eye open. Wrap over the lacing on the hook shank with thread.
- Attaching the tail: Take a 1½ " long bundle of super hair (using slightly more strands than was used for the rostrum) and tie the hair in, overlapping the point where the plastic lacing was tied in. Wrap with thread until the diameter of the tie in point makes a smooth transition from the rattle and trim excess super hair on rattle side. Using the hair with the ends of the lacing, the final shape should taper slightly and smoothly from the rattle to the hook eye. Note that the super hair extending over the hook eye may be tied in so that it points up or down as the fly rests in the vise. This will actually be opposite of how the tail sits on retrieve. A "down" tail in the vise will encourage the file to move slightly upward on retrieve, and an "up" tail will do the reverse.
- Making the body: Starting as close as possible behind the eyes, using an overhand knot weave, tightly weave a plastic lacing several times in front of the rattle to fill in the gap between the rattle and the eyes. Continue to weave the lacing over the rattle (compressing occasionally with thumbnails) to within 1/8 inch of the hook eye. Pull the lacing toward the hook eye and make several thread wraps over the lacing to tie down the ends of the lacing thread, then cut off ends close to the hook eye. Bring the thread under the super hair and wrap thread on the shank to make a lump that causes the tail to angle away from the shank, then whip finish behind the hook eye under the super hair. Spread the super hair in a fan and hold between thumb and forefinger at the hook eye and trim into a tail shape.
Final bite proofing: Put a drop of Super Glue at the beginning of the weave (by the eyes) and all around the thread wrap at the tail. Put a drop of super glue at the bottom of the fanned-out super hair tail (nearest the hook eye) to keep the fan shape on retrieve. If any gaps appear in the weave, put a dot of super glue.
For more great info, check out:
Beginning Fly Tying | Intermediate Fly Tying | Advanced Fly Tying.