
FLY TYING WITH CYANOACRYLATE - CA – SUPER GLUE
Part II – Making a Foam Fly
For many fly tyers, just thinking about using super glue is uncomfortable. It’s way out of their box. But occasionally, doing something different, is the right decision.
Boudreaux’s wife Clotile decided to take a vacation in Chicago to see the Oprah show. She stopped at the beauty shop to get a special vacation hairdo and she mentioned the trip to Vivian, the hairdresser.In a snide tone Vivian said, “Chicago? Poo-yie! Why would anyone want to go there? It's crowded and dirty and full of Yankees. Woman, you're crazy to go to Chicago.” A few second later she asked, “So, how are you getting there?”
“I’m taking Greyhound,” Clotile answered. “They’ve got a vacation rate!”
“Greyhound?” exclaimed the hairdresser – same tone of voice. “That's a terrible bus line. Their busses are old, their drivers are unpleasant, and they're always late.” Another few seconds passed. “So, where are you staying in Chicago?”
“I’ve got a room at this nice hotel by the famous Picasso statue. It’s called the....”
“Don't go any further. I know that place. Everybody thinks it’s going to be something special and exclusive, but it's really a dump, the worst hotel in the city! The rooms are small, the service is bad and they're overpriced. So, whatcha gonna do when you get there?”
“I’m going to go to see the Oprah show.”
“Oh, yea. Right,” laughed the hairdresser. “You and a million other people trying to see her. You won’t get a seat and if you did it’d be so far away she'd look the size of an ant. Boy, good luck on this lousy trip of yours. You're going to need it.”
Two weeks later, Clotile returned to the beauty salon. As soon as she was in the door, Vivian asked her about the trip to Chicago. “It was wonderful,” exclaimed Clotile, “not only were we right on time but I was on one of Greyhound's brand new buses, a special tour bus with a TV monitor for every seat. I had a handsome driver who waited on me hand and foot. And then the hotel was great! They just finished a $15 million remodeling job and now it's a palace, the finest hotel in the city. Turns out they were overbooked, so they apologized and gave me a suite at no extra charge!”
“Well,” muttered the hairdresser, “that's all well and good, but I know you didn't get to see the Oprah.”
Clotile smiled. “Actually, I was lucky, because while I was on the studio tour, a guard tapped me on the shoulder and explained that the Oprah likes to meet some of the visitors. He led me to her private dressing room and asked me to wait. Sure enough, five minutes later, Oprah walked through the door and shook my hand and we stood there looking at each other! I almost fainted.”
“Oh, really! What'd she say?”
“She said, ‘Who gave you that terrible hairdo?’”
Part I of this series discussed the chemistry and merits of super glue for making flies with closed cell foam. Many people are still reluctant to try. Purists consider glueing to be nothing less than blasphemy and non-tyers think they can’t do it at all. The truth is, making foam flies is especially good for beginners because much of it is fail-proof tying and the flies catch a lot of fish. This article will try and guide you step by step through making several foam flies with super glue. And yes, it really is easy. Oh, you should know that the longest part in make a super glue fly is preparing materials. If you prep and lay out the materials for several flies in advance, most of these patterns take only a minute or two. True story. You will also notice that these patterns call for flat waxed nylon thread. This is a very tough thread that allows for a lot of pressure to be used, which will compress the foam at selected locations. Kevlar will cut the thread and 6/0 or smaller will break.
The simplest fly to make with foam and super glue is an ant. We’re not talking size 24 hook ant, but a replica that fish will attack because it is ant-ish. So now you ask: Why would this oversized creature work on fish? Because....
Imagine that you are a bug which the Creator designed to be dry. You fall in the water. Suddenly all your parts now have to deal with a completely different environment. What do you look like? Certainly not what you looked like dry. You intuitively understand that you’re not supposed to be there because bad things might happen. You have several choices and instinct will chose for you. You first try mightily to get out of the water. When that doesn’t work you can try to be invisible and just let your parts dangle there. Or you can try to get a defensive posture with all the sticky parts sticking out. Regardless, chances are it’s going to be bad.
Now consider that you are a fish. You spend most of your life chasing down food and you understand that things floating on the water are often not food, but some are. Your vision isn’t perfect so you learn to recognize things that are food-ish. Leaves and sticks don’t wiggle. Things that wiggle are usually food. This includes unlucky bugs.
Just to remind you about buying foam... the cheapest way to start is foam sheets from Michael’s or Hobby Lobby or the Dollar Store. The first two have 2mm and 3mm foam and DS has 1.5mm in limited colors. Expect to pay about $1.25 for an 8x12 sheet (unless it’s on sale) except for the DS where a pack of twenty five small sheets are...duh...a dollar. Many folks cut up old flip-flops, but you have to make sure the sole is foam all the way through and not thin foam slices around a sponge middle. Sponge doesn’t float. 5/8" foam is available from a number of sources and foam tiles from www.softtiles.com will be a lifetime supply for most folks. 2'x2' is $5.80 and 1'x1' is $1.45. If you’re into grey, Walmart and Sams have workout foam tiles at 6 for $20 Alternatively, several layers of sheet foam can be glued together, but, you don’t want to glue whole sheets together. Cut pieces just a bit larger than size you need to cut out a shape or punch out a couple of cylinders and glue these pieces together. You will also want to acquire something to cut out plugs of foam. A Pitteburg hollow punches set from www.harborfreight.com is the cheapest at $6 for nine sizes. Buy a decent pair of plastic handled hair scissors from Sally’s or Walmart for about $10 and that will work to cut the foam.
The inscription on some metal bands used by the U.S. Department of the Interior to tag migratory birds lists the address of the agency keeping track of birds. For example, in the west there are birds with the Washington Biological Survey, abbreviation: “Wash. Biol. Surv.”
As it happened, Boudreaux was invited west for a duck hunt and shot a tagged bird. The next day he sent a letter to the Department. It read: “Dear Sirs: I shot one of your birds. I followed the cooking instructions on the leg tag and I have to tell you, it was horrible.”
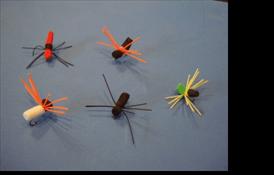
So, now, here is the first recipe.
FOAM ANT
- Hook: Any 10 or 12 dry fly hook.
- Thread: Flat waxed nylon
- Body: Closed Cell Foam
- Legs: Round rubber legs (fine)
- Wing: Grizzly hackle
1. Punch out a foam cylinder with a small diameter hollow punch.
2. Cover the hook shank with thread and stop with the bobbin hanging down in the middle.
3. Paint the top of the threaded shank with super glue.
4. Push the foam cylinder onto the thread (after this it’s not going to move).
5. Make a couple of snug wraps around the middle of the foam. The foam will segment and start to look roughly ant-ish.
6. Hold three short pieces of round rubber leg on top of and parallel to the foam.
7. Make two wraps around the middle of the legs then turn them perpendicular to the foam and make figure eight wraps behind and in front of the legs. The rubber will splay out to make legs.
8. Bring the thread under the foam toward the hook eye.
9. Whip finish behind the eye under the foam.
10. Put a drop of Hard As Nail on the middle wraps on the bottom of the shank.
Super glue allows easy creativity here. Punch cylinders from different colored foam and glue the cylinders end to end. Trim down to make ant bodies of black and orange, or black and red, etc. Adding a color will allow it to be seen more easily in the surface film.
NOTE: if you segment the foam cylinder 3/4 of the way to the hook eye you get a spider.
CHERNOBYL ANT
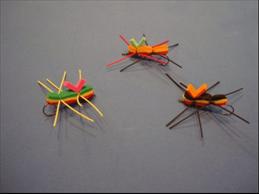
Next is the Chernobyl ant, which is used successfully for many varieties of fresh water fish. For those of you who have forgotten because you’re getting old or maybe you weren’t born yet... [Not born yet? Sorry to make you aged guys feel even older, but college freshmen this year were born in 1989.] Anyway, the Ukrainian city of Chernobyl became infamous in 1986 due to an explosion at a nuclear power plant that bathed nearby areas with radiation. The Chernobyl ant is a bit of black humor. It is supposed to depict what a radiation doused ant might have grown into. Most patterns (there are many variations) create the ant with two or more different colored layers of sheet foam, rubber legs and a wedge of foam (indicator) on top. Combinations can be pretty funky because, let’s face it, imagining a post radiation insect involves free thinking.
- Hook: Any 2x to 4x long shank hook (size 8 or smaller, matched to foam size)
- Thread: Danville flat waxed nylon (or 140 or size 6/0 thread)
- Body: Closed cell sheet foam
- Legs: Medium round rubber legs
- Indicator: More sheet foam
This fly is so susceptible to the tyer’s imagination that only vague directions are possible.
1. Cut strips of sheet foam about 3/8" wide and 1" long. You can make this fly much larger or smaller and, obviously, width and length of the foam should vary accordingly. Basically you want the body a bit longer than the hook. The key is to use contrasting colors – so the choices are wide open for both foam and leg colors. Try combining black, yellow and orange for starters.
2. Take these three foam strips and glue them together lengthwise like a sandwich.
3. If you want, but it’s not required, trim the ends with scissors to a rounded or tapered shape. You can also use foam cutters designed for making wings and hoppers and punch out identical shapes to glue together. (The punches are by Riverroad Creations and are sold in most fly catalogs.)
4. Lay a layer of thread on the hook shank and leave the bobbin hanging at the end of the thread nearest the bend.
5. Put a layer of super glue on top of the threaded shank and push the foam body down on the thread. Now it’s not going anywhere. The foam should extend over the bend and over the hook eye.
6. Take the thread and wrap tightly twice around the foam (about 1/3 of the length of the foam will be sticking out the rear).
7. Attach a leg to each side of the foam at this point and wrap Madam X style. This means you hold a leg against the side of the fly and wrap around it twice with thread. Round rubber legs (not flat silicone) will make a “V” sticking out from the fly. Do the same on the other side and the two “Vs” make an “X” when you look down on the fly.
8. Bring the thread on the bottom of the fly up another 1/3 of the foam length and wrap around the hook shank and foam here (segmenting the foam) then tie in two more legs X style. Yes, you’re right, ants don’t have eight legs – but this is Chernobyl, and fish can’t count.
9. Put a drop of super glue on top of the front thread wraps and put on a small strip of brightly colored sheet foam (about 1/6th the length of the ant). Push it in place and then snug it down with a couple of additional wraps around the foam and through the legs. The foam isn’t going anywhere after you glue it, but wrapping thread over it will cause it to make a “V” upward, giving the fisherman a better view of the fly.
10. Bring the thread under the front of the foam and whip finish.
Once again, the key here is the quick adhesive quality of the super glue which keeps the components of the fly in place and allows you to move fast from step to step.
Bubba’s nephew, Ferd, was required to do an experiment for the Science Fair if he didn’t want to get held back.again. After much consideration, two Moon Pies and a six pack of Mountain Dew, he decided to experiment on insect reactions. He decided to train an ant to jump when it heard a verbal command.
Several days later he had actually taught an ant to jump. Then Ferd removed ant's front pair of legs, told it to jump, and the ant jumped. So he wrote in his notebook: “After taking off the front legs all remaining ant parts worked.”
Next, Ferd removed the second pair of legs and ordered the ant to jump. It managed a little jump, so he wrote again: “After taking off the middle legs all ant parts left worked.”
Finally, Ferd removed the back legs. He told ant to jump, and nothing happened. He ordered it a second time. Nothing. He ordered it a third time, but the legless ant never jumped. He made a last entry in his notebook. “After taking off the back legs, the ant went deaf.”
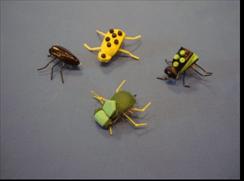
FOAM BEETLES
Now we get to the foam beetle, probably the most posted foam fly pattern on the entire Internet. You might want to check out http://flyanglersonline.com/features/bobboese/101308.php for why beetles are a good fly choice for a wide variety of fish. This pattern is a variant of the recipe from that article. Not better, just different.
- Hook: Dai-Riki 070 (or equivalent) Size 12-18 or Mustad 34007 (or equivalent) Size 8.
- Thread: Flat waxed nylon in a color to match foam Body: Closed cell sheet foam
- Hackle: Optional. Grizzly palmered
- Legs: Round rubber
1. Wrap the entire shaft of the hook with thread to provide a base for other materials. Leave the bobbin hanging about 1/4 of the way down from the hook eye.
2. Cut two rectangular strips of foam sheeting 1.5 times the length of the hook shaft. You can glue these together their full length now if you want, but it’s better if you only glue them together the length of the hook shank. Most beetles are black, brown or green, but with 350,000 varieties to choose from almost any color is possible. Once you have decided on colors and the foam pieces are glued together, trim the glued end to a point.
3. Paint the top of the threaded shank with super glue. Push the foam, point toward the hook eye, on the hook leaving about 1/4 of the length of the shaft by the eye open.
4. Make three wraps over the foam point.
5. Fold the foam around the hook shank and wrap the thread back toward the hook bend. You want to wrap a couple of times, then skip a space and do it again, going over the foam and making segments as you wrap. You should get at least four to six segments.
6. The thread should now be hanging below the hook shaft above the bend. The excess foam should be pointing out beyond the hook bend.
7. Tie in hackle at the last wrap point above the hook bend, but do not palmer yet.
8. Bring the thread back toward the eye 1/3 of the hook shank, trying to keep the thread on the previous wrap points between the segmented foam.
9. Tie in a leg on each side of the segment, Madam X style.
Okay, here’s a tip on making segmented legs. First, it always works better with round rubber legs than with flat silicone. Second, it’s always easier to do with forceps. Third, take the end of a leg and bring it back in a loop in front of the rest of the leg. Stick the forceps through the loop and grab the end of the leg. Pull the end through the loop (you have made a simple overhand knot). Wet the leg and tighten.
10. Bring the thread up (skip a couple of foam segments) and tie in two more legs Madam X style. Move the thread to the last wrap before the segment by the hook eye.
11. Palmer the hackle in the wrap spaces between the foam segments and tie off where the thread is hanging. Trim excess hackle. Earlier you may have chosen to glue the entire length of foam together so the first part of step #13 won’t matter to you. However, doing the foam pieces separately usually works easier.
12. At this point the thread should be hanging about 1/4 inch behind the hook eye.
13. Pull the first piece of foam tightly over the hackle and tack down with thread wraps behind the hook eye. Paint the top of this foam strip with super glue. Pull the second piece of foam tightly over the first piece and tack down. Gently push the two pieces of foam together.
14. Whip finish at the wrap point. You should have covered the segmented body and have foam sticking out over the hook point.
Now you have another choice. Most beetles do not have a flat piece sticking out in from of them (of course, some do) however; leaving a bit of foam sticking out past the hook eye will make the beetle popper-ish on retrieve. Otherwise...
15A. Trim the excess foam.
This fly is going to lie low in the surface film and completely disappear from view. (See yellow and black in the photo.) There is a solution to this problem.
16A. Punch out dots of highly contrasting foam with a standard hole punch. Super glue these to the top of the beetle shell. How you do this (patterned or not) is up to your own taste. The dots don't encourage or discourage the fish.
OR
15B. Fold the excess foam back over the top of the beetle (see green and dotted black beetles in the photo) and glue it to the back.
16B. Trim folded foam as desired or add dots.
17. Coat the thread wraps nearest the hook eye with Hard As Nails.
The whole beetle making process is really a lot easier than 17 steps might make it seem. You can, for instance, not put in the hackle. You can also use only one layer of foam. I do many youth tying classes/demonstrations. Children who learn the beetle first are usually more successful in making a half decent looking fly that will catch fish.