|
A few people have recently asked me how to build a
rod stand for making your own fly rod. I show a few
factory models and a homemade model built from a
cardboard box in my
rod building series, but I didn't
show how to build your own stand from wood.
I'm a firm believer in the idea of making things that
work for me, and keeping the plans flexible enough to
fit my needs exactly. However, my needs may not be your
needs, so what I would build for myself might not be
what you would need or want. I also use a power lathe
from Anglers Workshop in my regular rod building, so I
don't really need to build a wood rod stand.
That said, I decided to rebuild the old rod stand I loan
out on occasion, just so you can see how I would build one
on a budget. I have plenty of wood scraps in my garage
(remnants of the endless honey-do list), so I just whipped
this thing out from scraps I had and a few gadgets from
my old stand. If you had to buy everything I show here
new, it might cost you about 25 bucks, but most of that
price would be the thread tensioners you would have to
buy at a sewing center unless you can find a junker at
a second hand place. I didn't do any finish work on
this project, but instead whipped out a functional
stand that is long on function and short on looks.
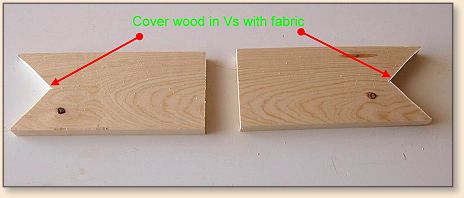
First I cut two 8" pieces of 1X4 pine to use as uprights.
I cut a notch in the top of each one to cradle my rod.
I'll cover the wood with felt later when I get near a
fabric store.
Next, I cut a couple of 10" long pieces of 1X4, cut some
slots in them with a Rotozip tool, and attached them to
my uprights with glue and screws. The grooves will allow
me to slide the uprights in or out to accommodate different
guide spacing. I'm using a scrap piece of white shelving
for the base.

Then I zipped a slot in a scrap chunk of 1X8 that will
serve as a thread carriage. A few more scraps of wood,
some carriage bolts, some washers and nuts finished out
my basic stand.

Thread routing and tensioning took a little more work.
I used another carriage bolt as a thread spindle to
hold my spools of thread. Then I added a basic thread
tensioner I salvaged from an old sewing machine many
years ago, and an adjustable tensioner I think I may
have bought at a yard sale about two decades ago. I
glued a spinning rod tip-top to a spring steel wire
and bent the wire to the right shape to guide my thread
to a place just above middle between the rod stands.

This is a view of the stand with a rod blank in the
cradles to show how it would look from the side you
would be working from.

And, this is a view from the side.

The whole project took a little more than an hour to
build. I used some scrap wood and a minimum of hardware.
I made everything adjustable so I could fit the stand
to any rod blank I would be using. It isn't pretty,
nor was it intended to be, but it is functional.
I hope this helps a few people to see how easy it is
to make your own rod stand for rod building. Yours
can be smaller or bigger as needed. You may not see
a need to make the uprights or thread carriage
adjustable. You might decide to just use one
thread tensioner, maybe the $2 non-adjustable type.
This is just one idea. You can create one that fits
your needs and size requirements easy. It only takes
a few pieces of scrap wood and a few bits of hardware.
Don't forget the felt to protect the rod blank from
the wood.
~ AC
|